

Quand il s’agit d’être attrayant et beau de haut en bas, nous faisons tout ce qui est en notre pouvoir pour nous rendre élégants. Mais la partie la plus déroutante est de décider de la coiffure que nous pouvons porter avec cette robe ou pour cette occasion particulière. Ce n’est pas que nous ayons un choix limité de coiffures. Mais c’est que nous avons tellement de choix de coiffure que nous ne savons plus lequel choisir. Surtout quand il s’agit de faire des tresses de cheveux. Comme cela semble facile, mais en réalité, ce n’est pas si facile avec tous les rebondissements que nous devons faire. Nous devons également vérifier quelle tresse de cheveux nous ira bien. Et comment pouvons-nous oublier les occasions, évidemment nos tresses de cheveux doivent également aller avec l’occasion.
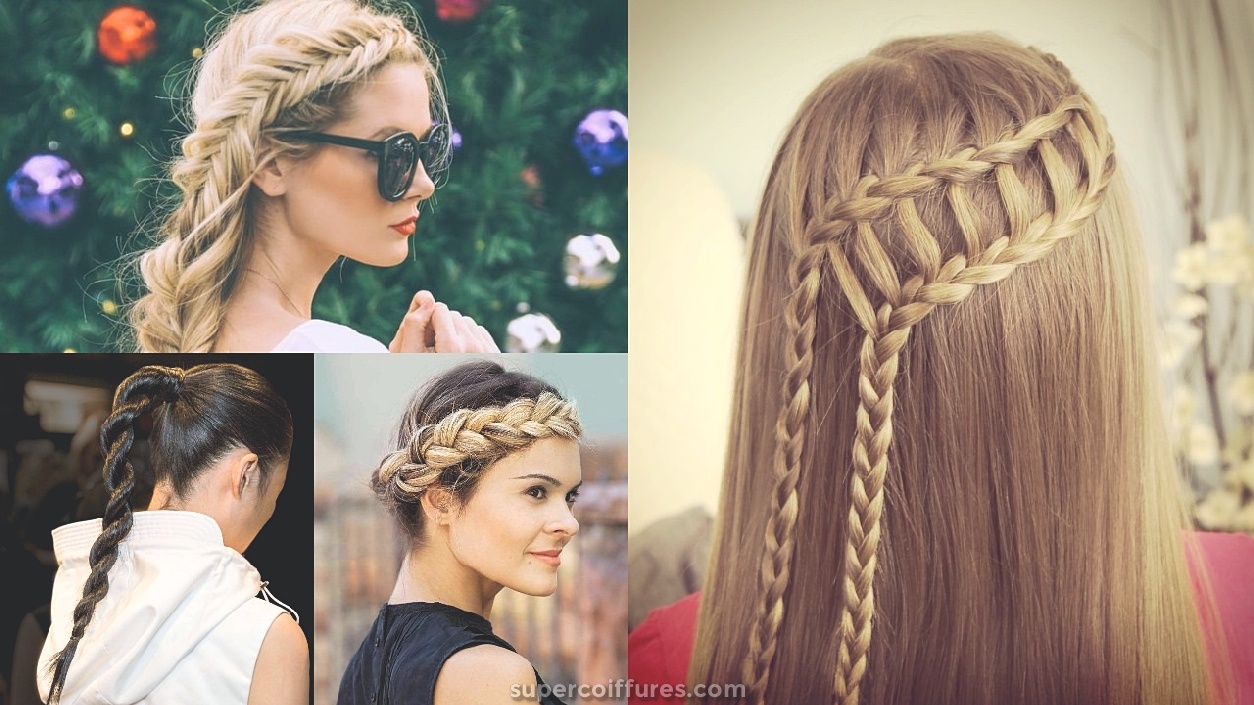
Pour simplifier votre confusion quant au style de tresse que vous pouvez choisir en fonction de l’occasion et du style, nous partageons avec vous environ 45 coiffures Easy Braid . Certaines sont faciles à faire, mais certaines sont compliquées, ce qui ne peut se faire sans un coup de main. La mode des tresses de cheveux ne va jamais finir. Et à certaines occasions, vous ne pouvez pas coiffer vos cheveux sans une tresse. Beaucoup de gens se rapportent à des tresses de cheveux pour les occasions traditionnelles seulement. Mais la réalité est que les tresses de cheveux sont pour chaque événement. Que ce soit un concert de rock, une soirée de bal d’étudiants, une fête formelle, une cérémonie de mariage ou une réception, ou une fête, les tresses sont à la mode en toutes occasions. C’est juste que vous devez trouver la bonne tresse pour les cheveux pour la bonne occasion.
Les coiffures de tresses faciles que nous partageons sur cette page ont toutes les collections. Pour un chic pour une mariée ou une fêtarde, vous verrez toutes sortes de tresses ici. Parallèlement à cela, nous partageons également avec vous comment faire ces tresses de cheveux. Certaines tresses de cheveux peuvent nécessiter seulement 10 minutes pour les faire, tandis que les autres tresses de cheveux peuvent nécessiter plus d’une heure. Voyons maintenant quels types de tresses sont faits pour les cheveux.
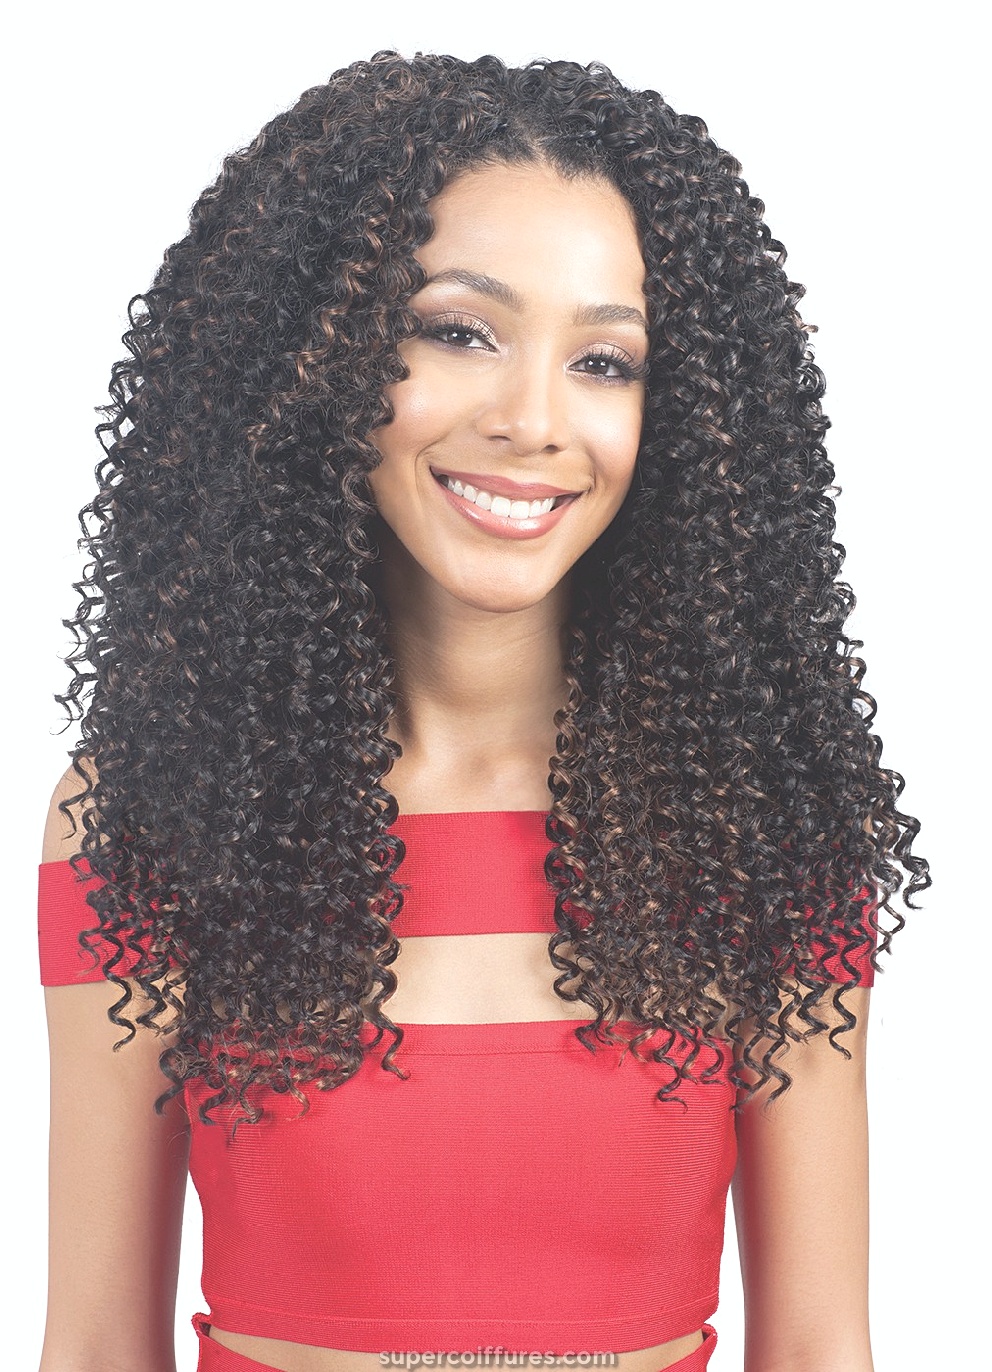
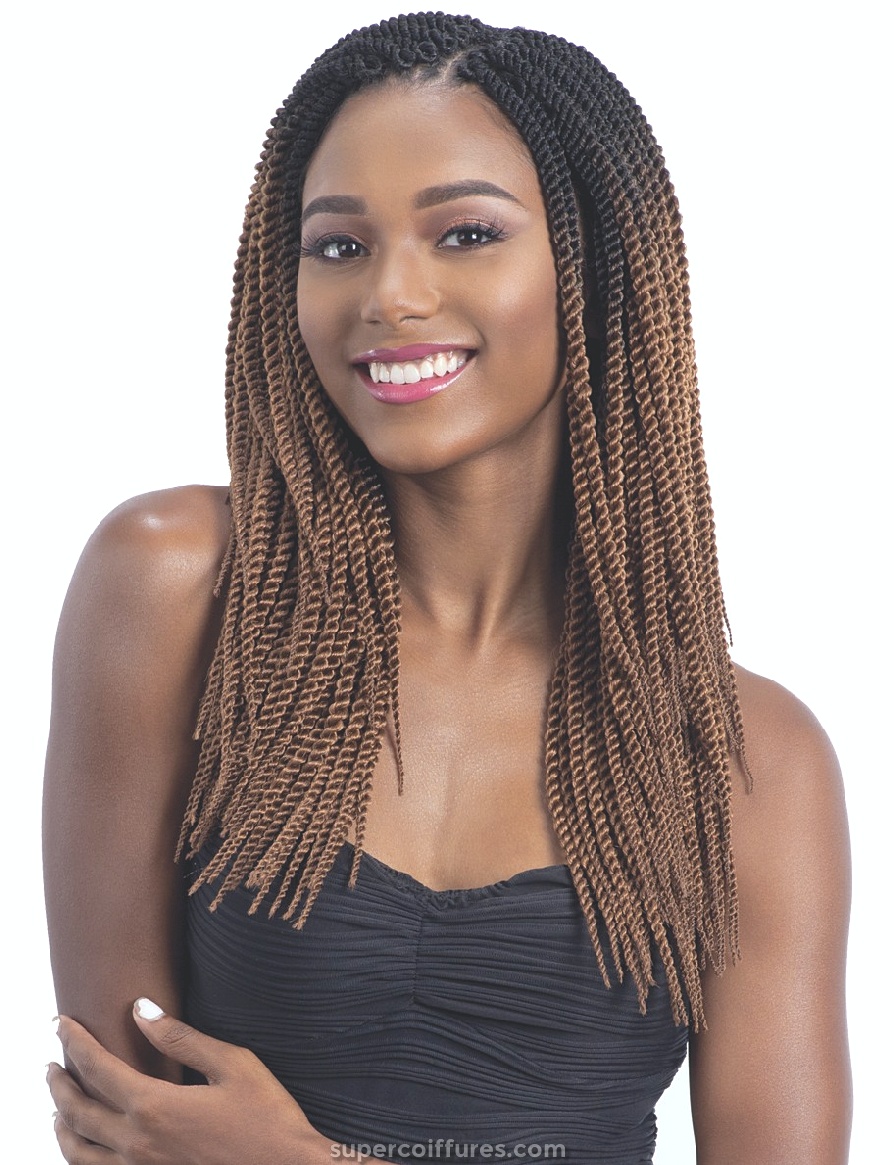
(1) tresses afro-américaine
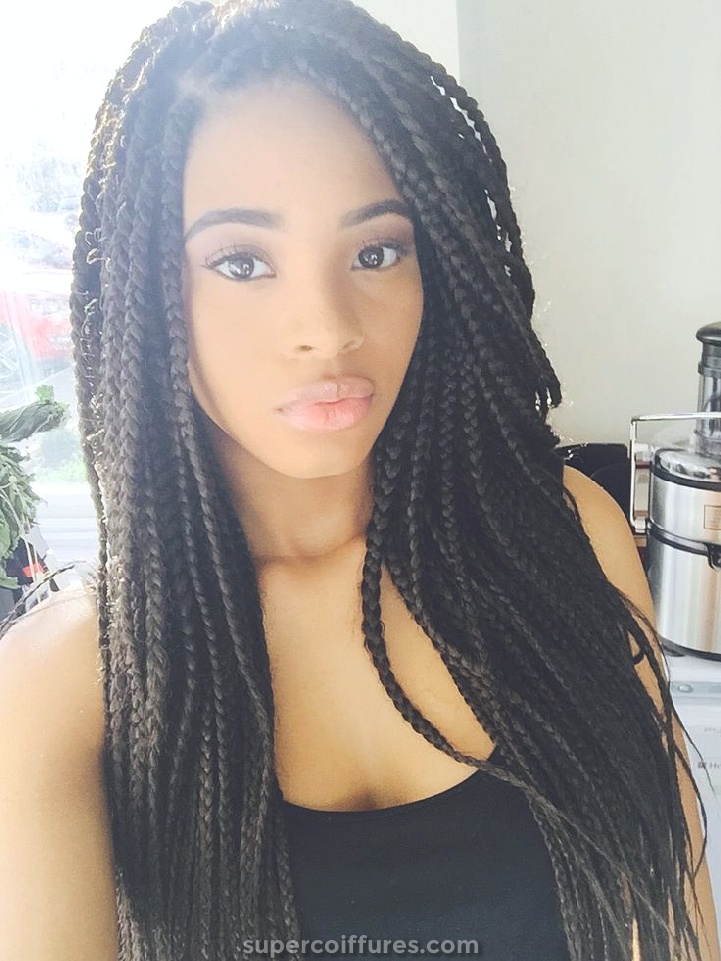
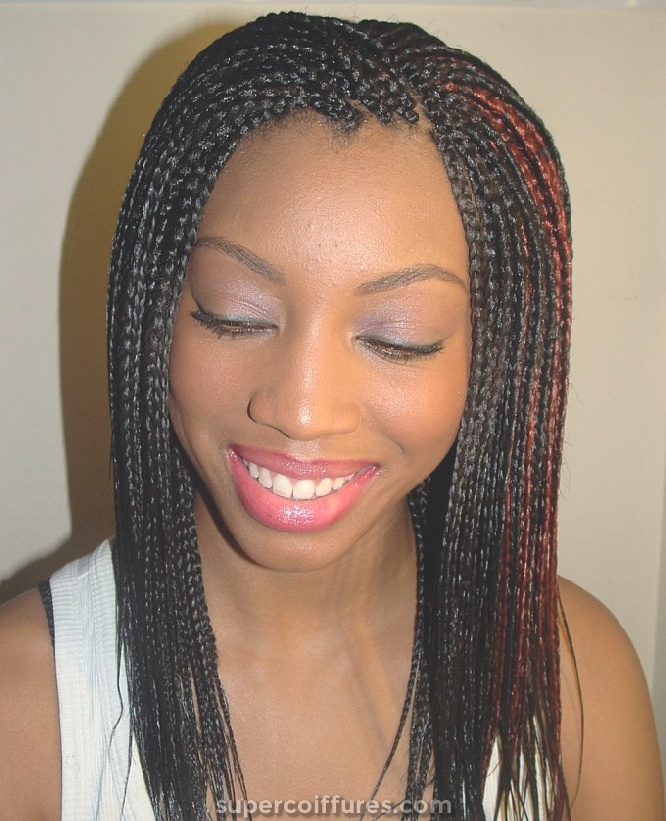
Si vous avez les cheveux longs et volumineux, vous devriez absolument essayer cette tresse. Les longues, élégantes et simples tresses sur votre tête vont sûrement faire tourner beaucoup de têtes autour de vous. Comme cette tresse afro-américaine vous donnera un look et animé. Vous pouvez aussi les appeler comme une sorte de boîte à tresses. Mais vous ne pourrez porter cette tresse que si vous avez les cheveux longs.
Comment faire des tresses afro-américaines:
- Pour commencer avec cette tresse de coiffure, vous devrez d’abord bien vous laver les cheveux. Aussi, conditionnez-le bien.
- Maintenant, laissez-les se sécher. Après cela, peignez vos cheveux pour démêler chaque nœud.
- Comme vous pouvez le voir sur la photo, les cheveux sont séparés de côté. Donc, vous devez également séparer vos cheveux d’un côté.
- Attachez un côté des cheveux avec un élastique afin qu’ils ne se confondent pas en faisant les tresses de l’autre côté.
- À l’aide du peigne à queue, prenez une mèche de cheveux d’environ 1 pouce en utilisant la queue du peigne.
- Divisez cette section de cheveux en 3 parties et commencez à tresser jusqu’à ce que vous atteigniez la fin des mèches de cheveux de cette section. Pour sécuriser la fin, attachez les cheveux avec un élastique.
- De la même manière, commencez à ramasser la section de 1 pouce encore et encore, et commencez à faire la tresse en la divisant en 3 parties et en le faisant jusqu’à la fin.
- Une fois que vous avez terminé avec l’un des côtés, vous pouvez détacher les poils de l’autre côté et recommencer à suivre la même procédure.
- Vos tresses afro-américaines seront prêtes maintenant.
Conseils pour les tresses afro-américaines
N’oubliez pas que faire ce style de tresse prendra beaucoup de temps et qu’il faudra également beaucoup de patience. Nettoyez toujours vos cheveux avant de faire cette coiffure. Vous pouvez également utiliser une bonne huile pour empêcher les tresses de cheveux de sortir.
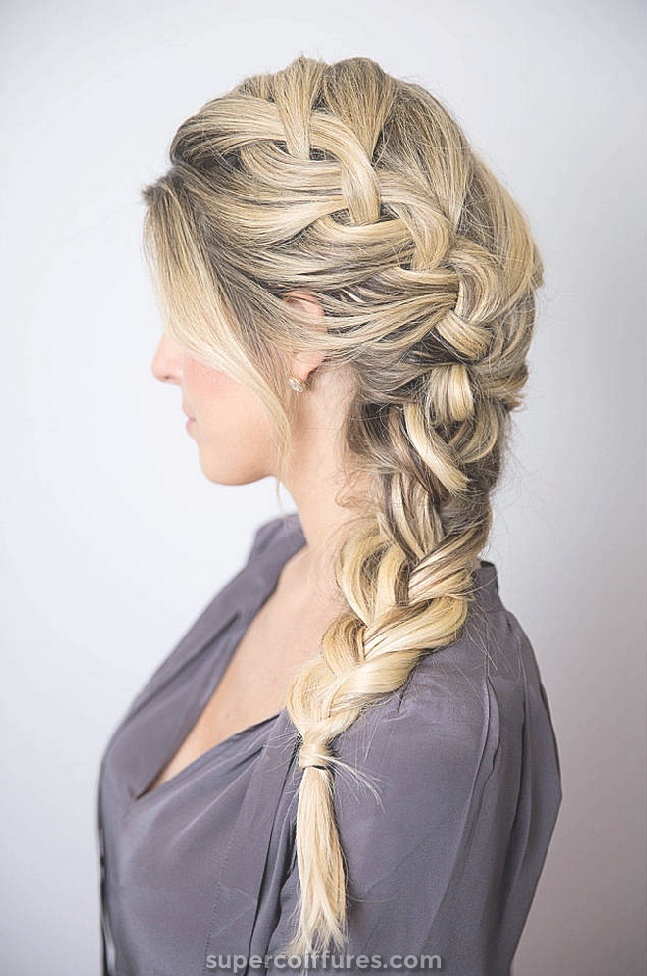
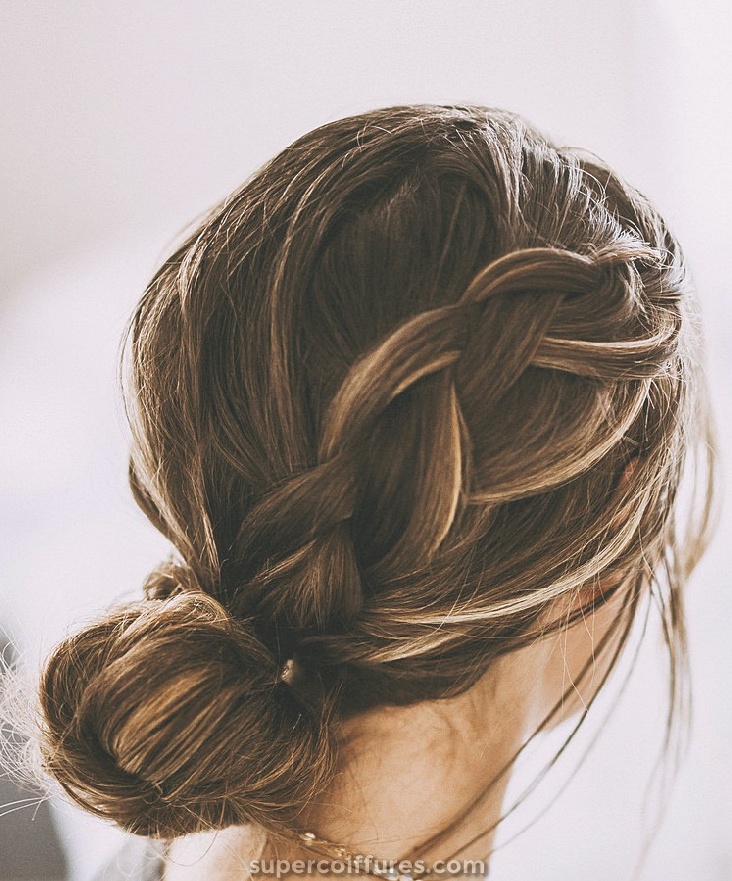
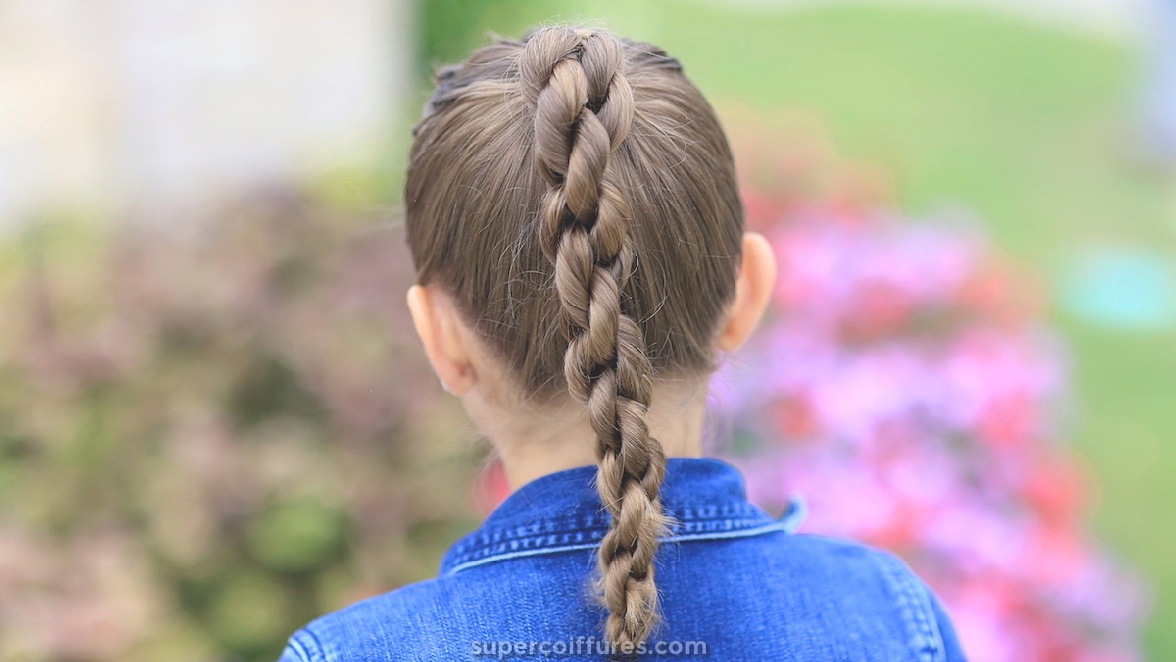
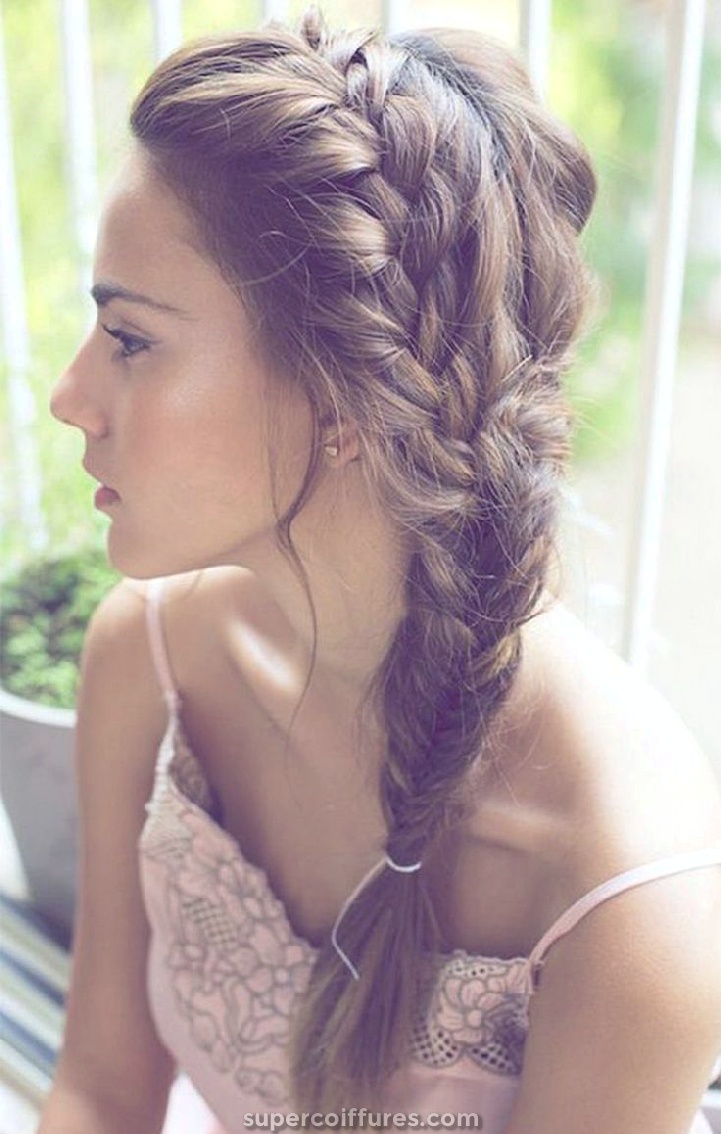
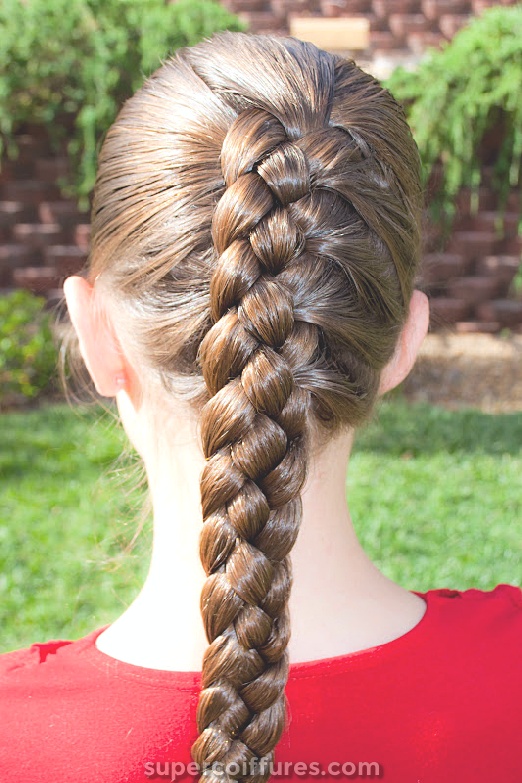
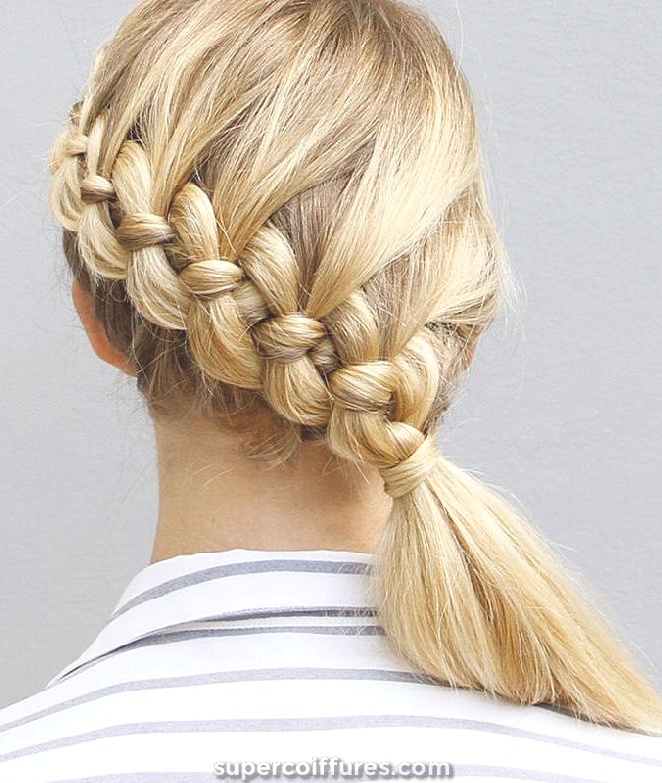
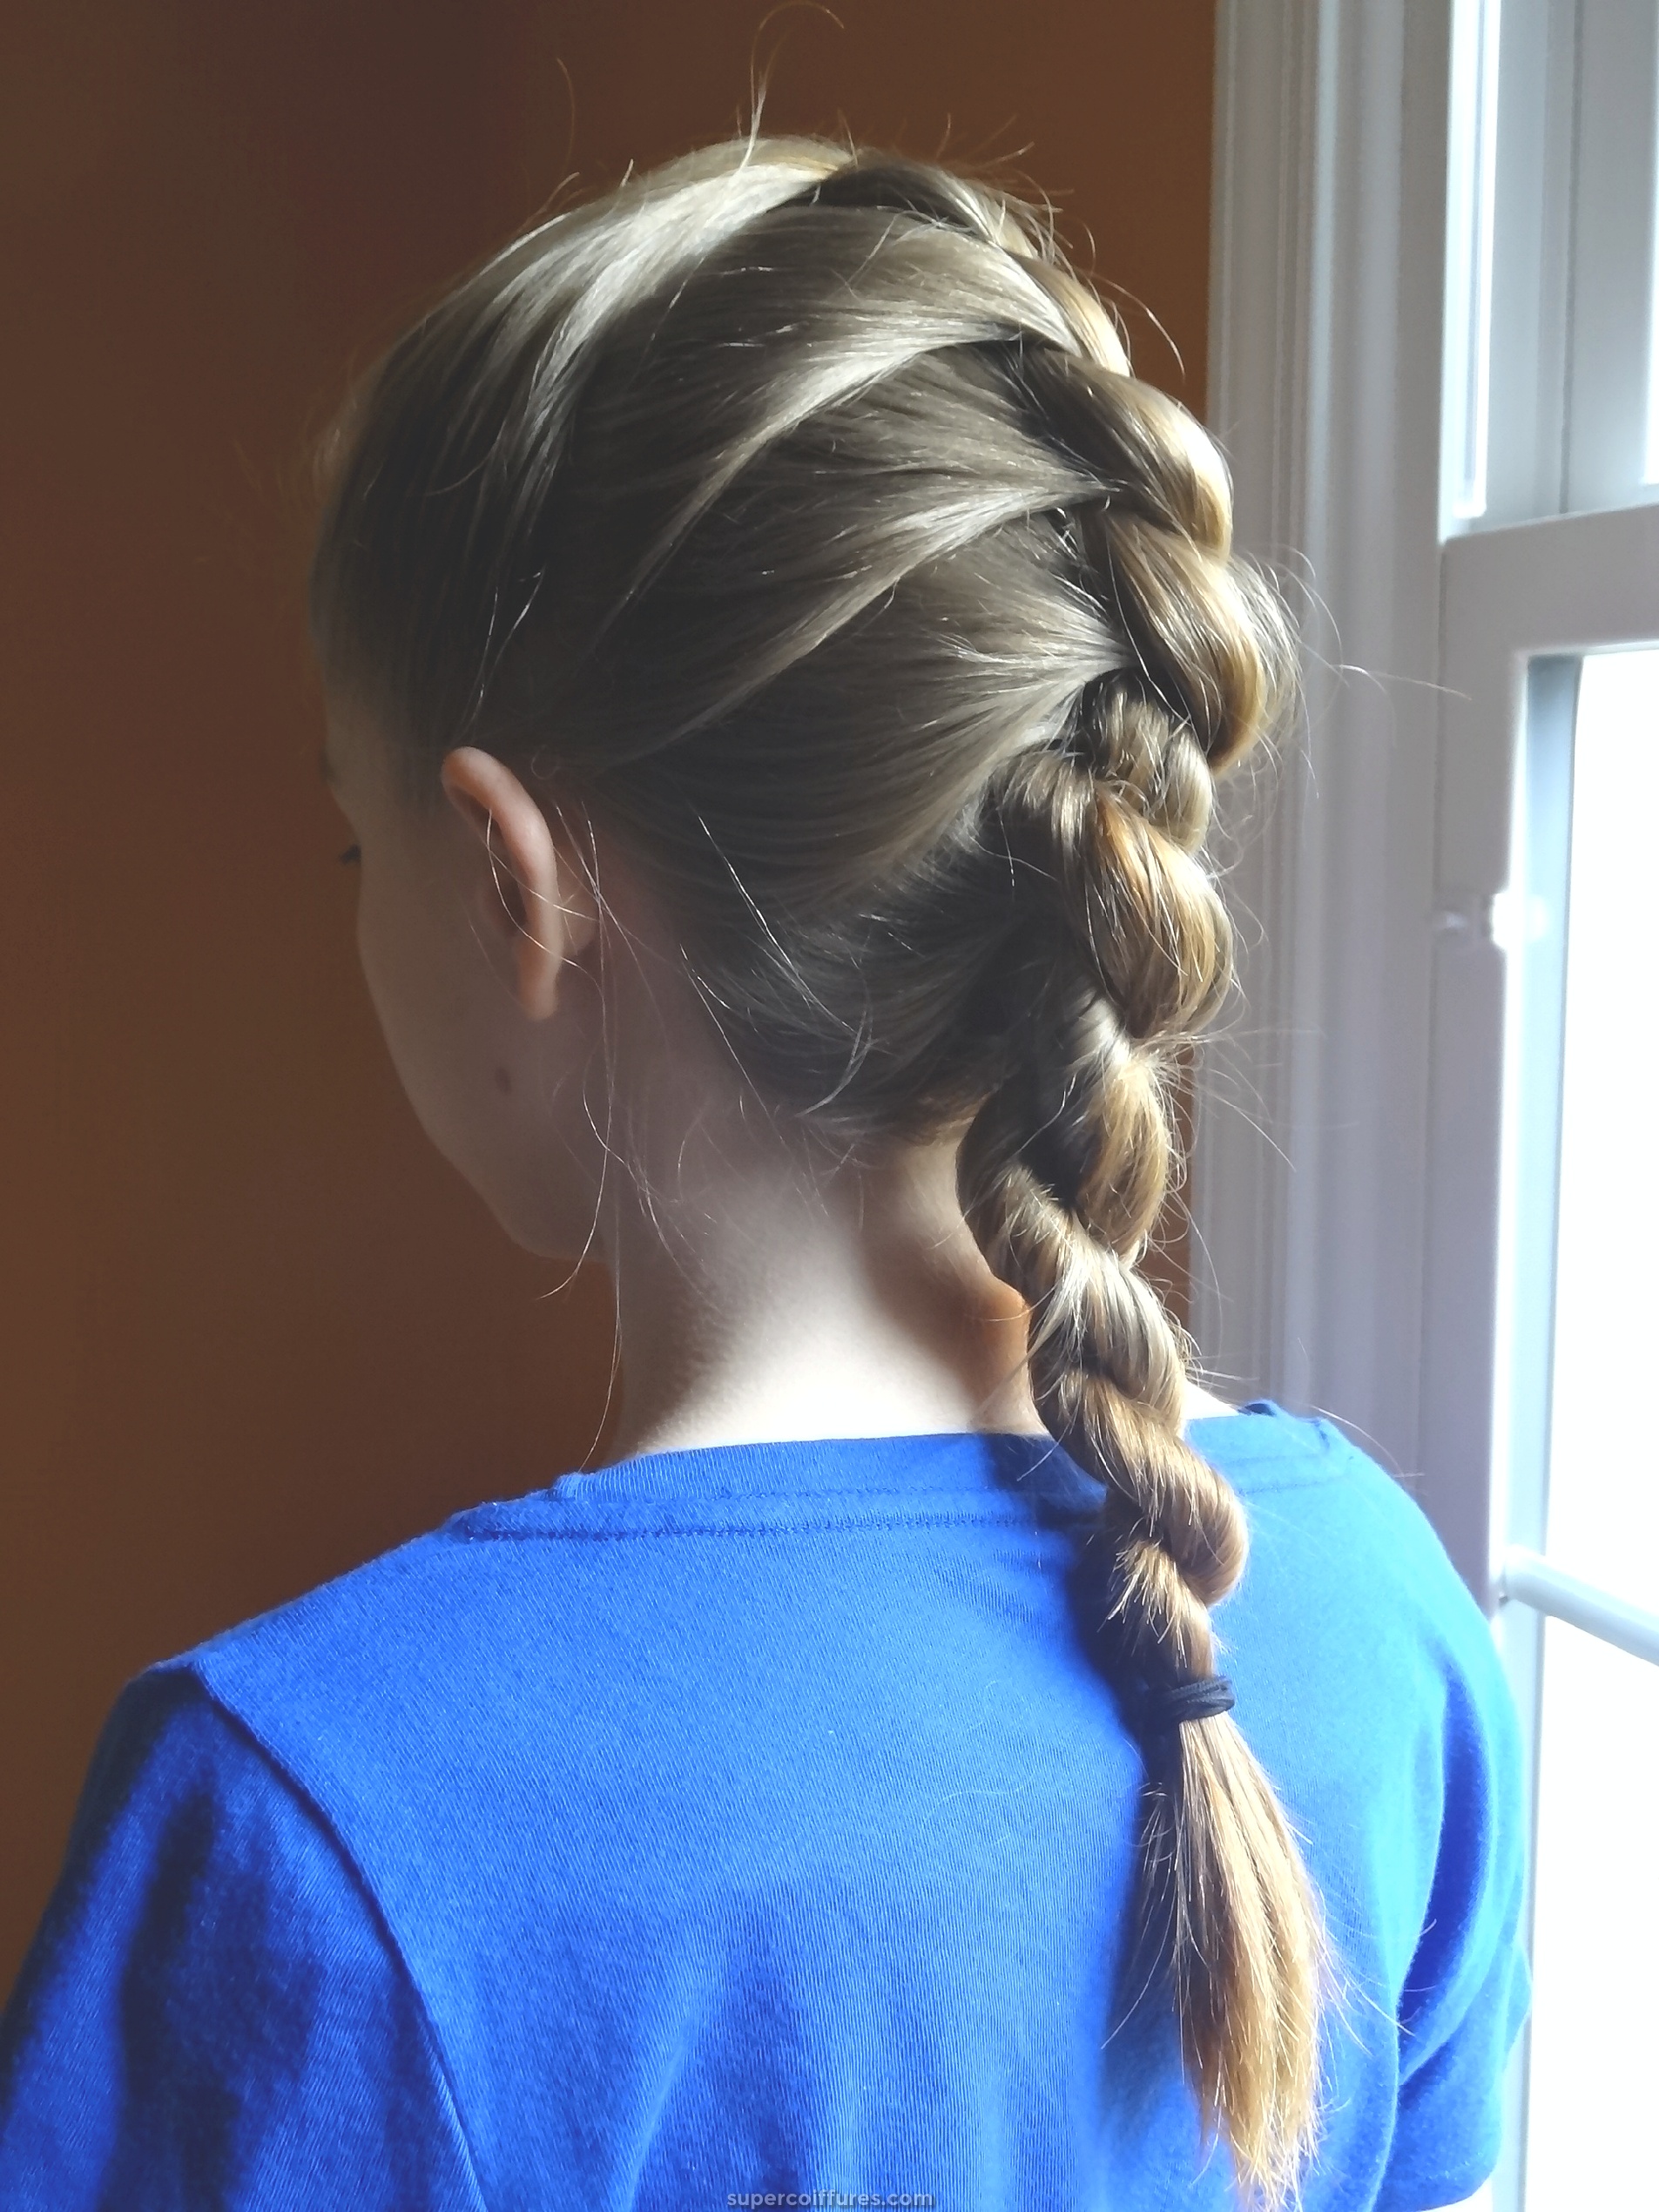
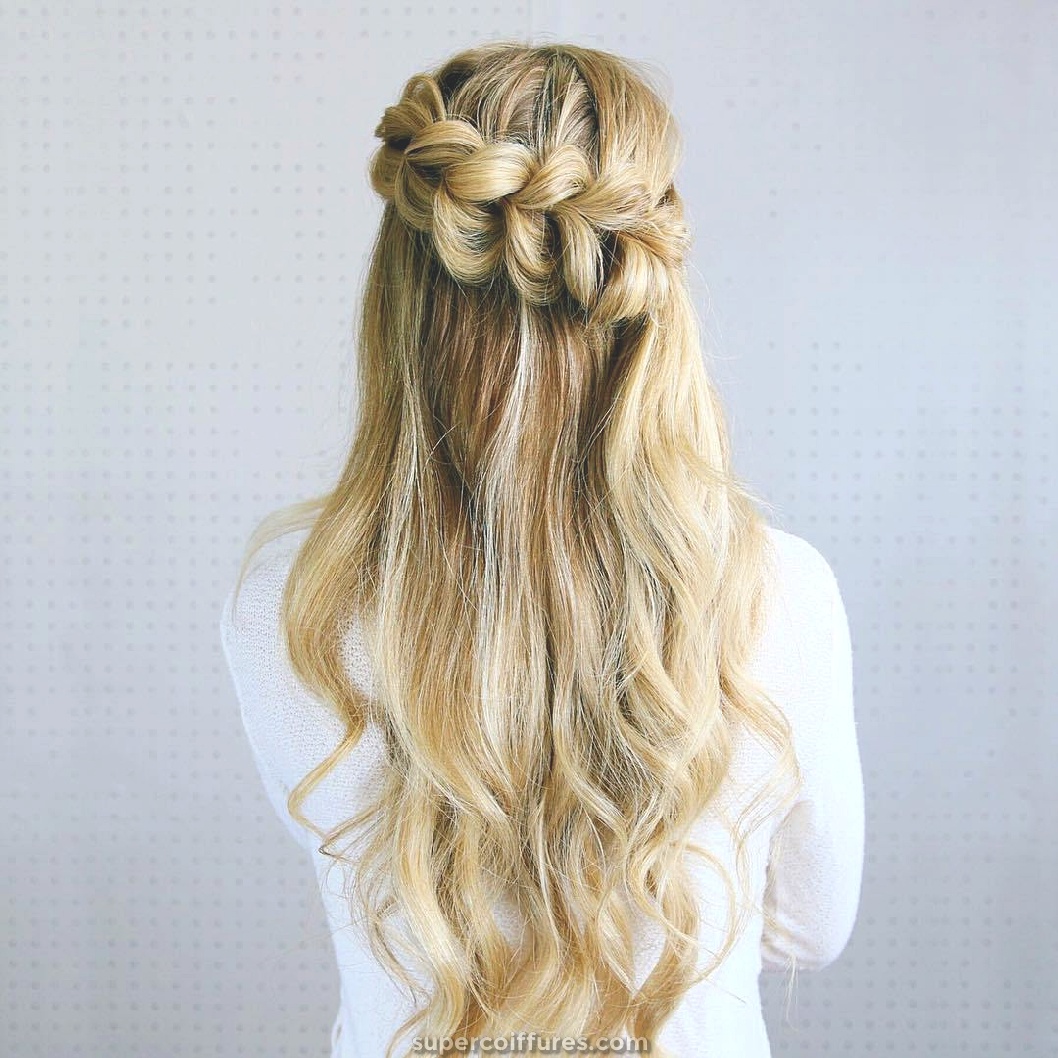
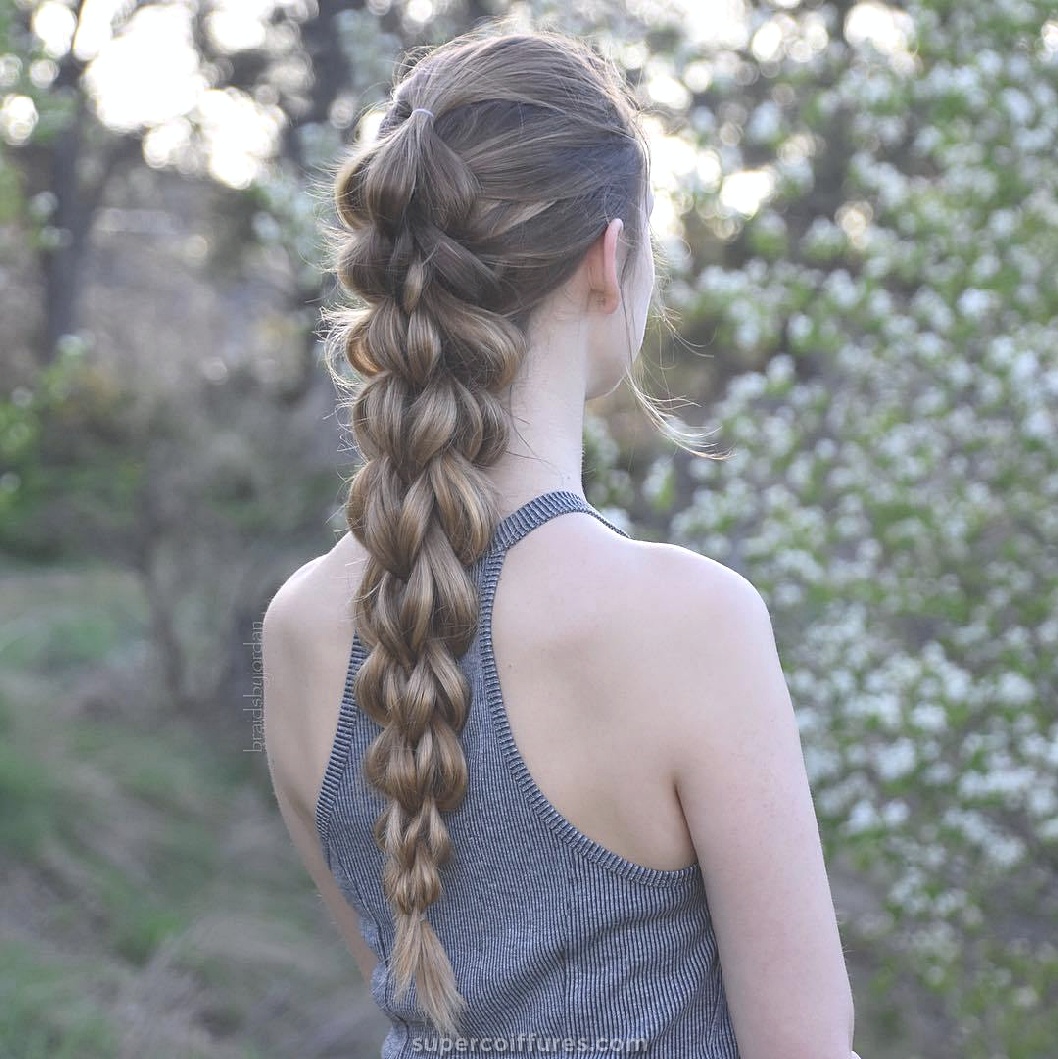
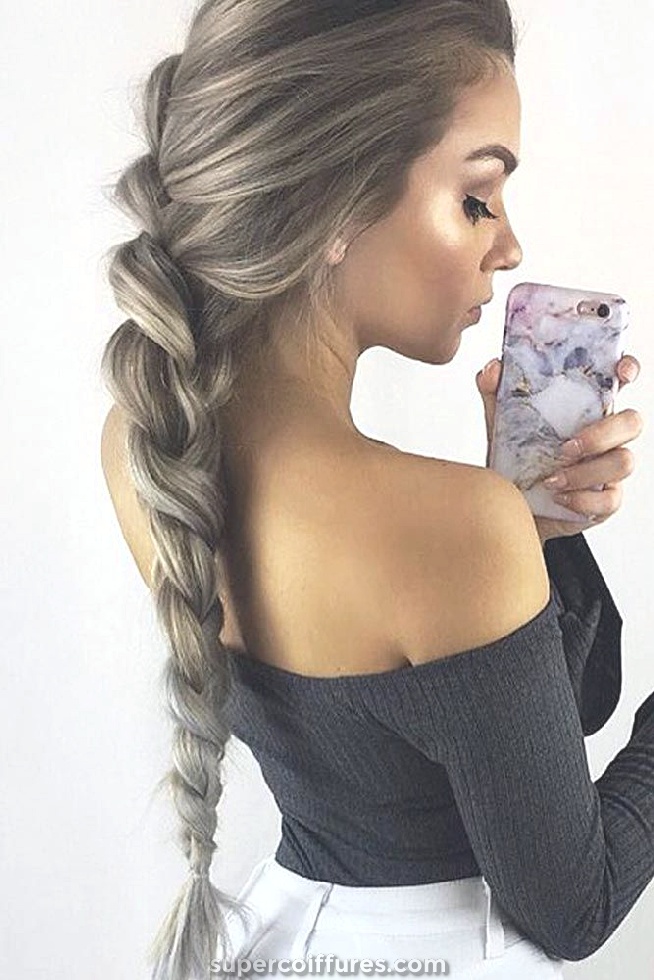
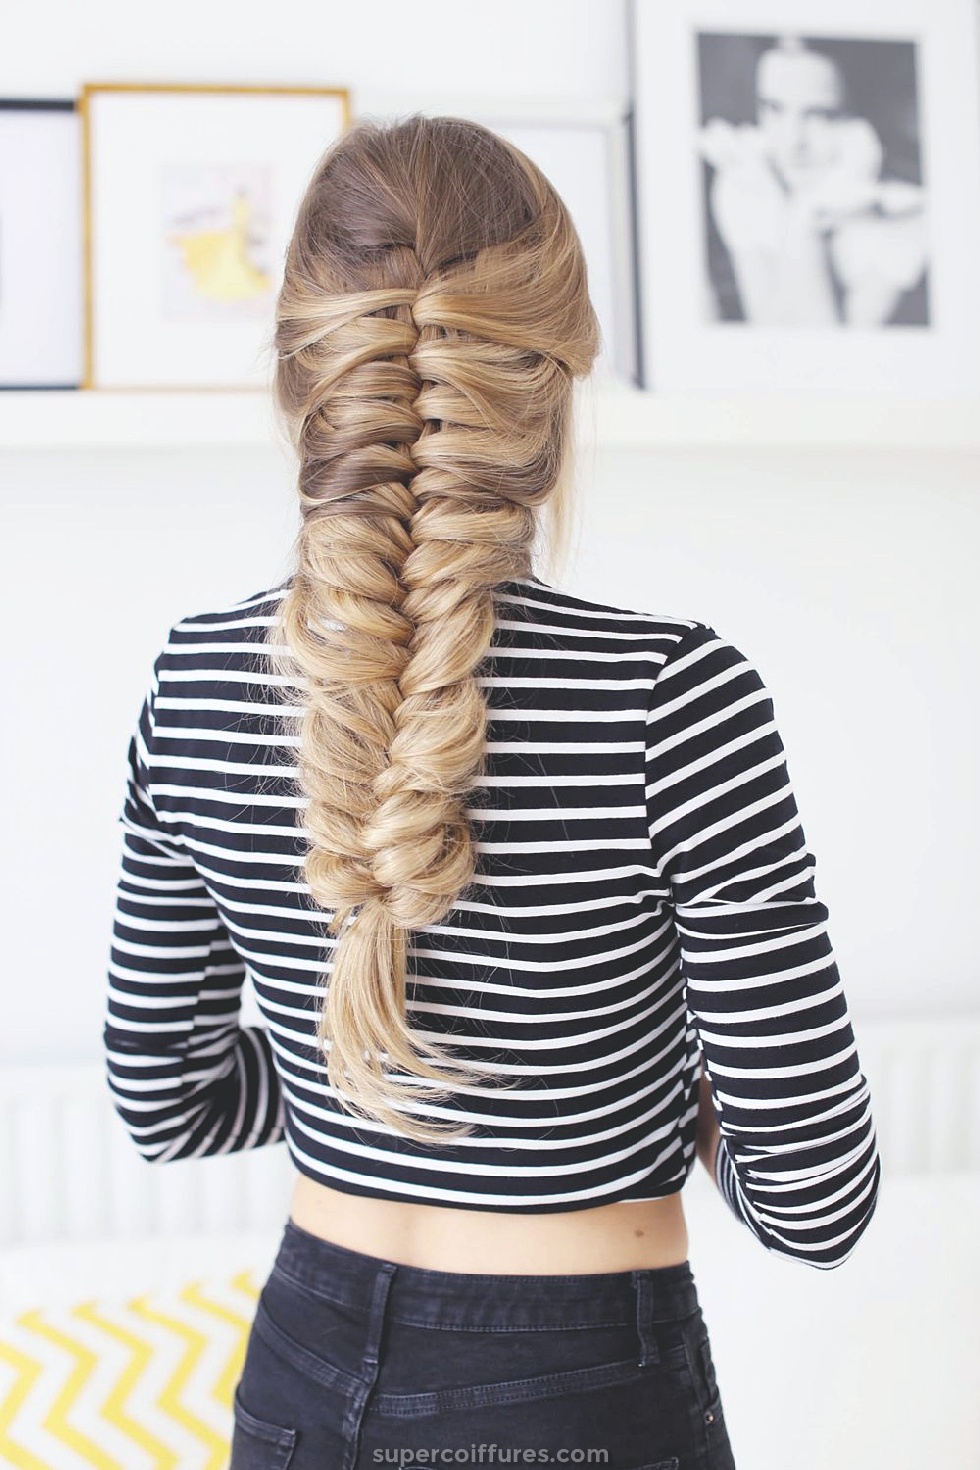
(2) grosse tresse volumineuse
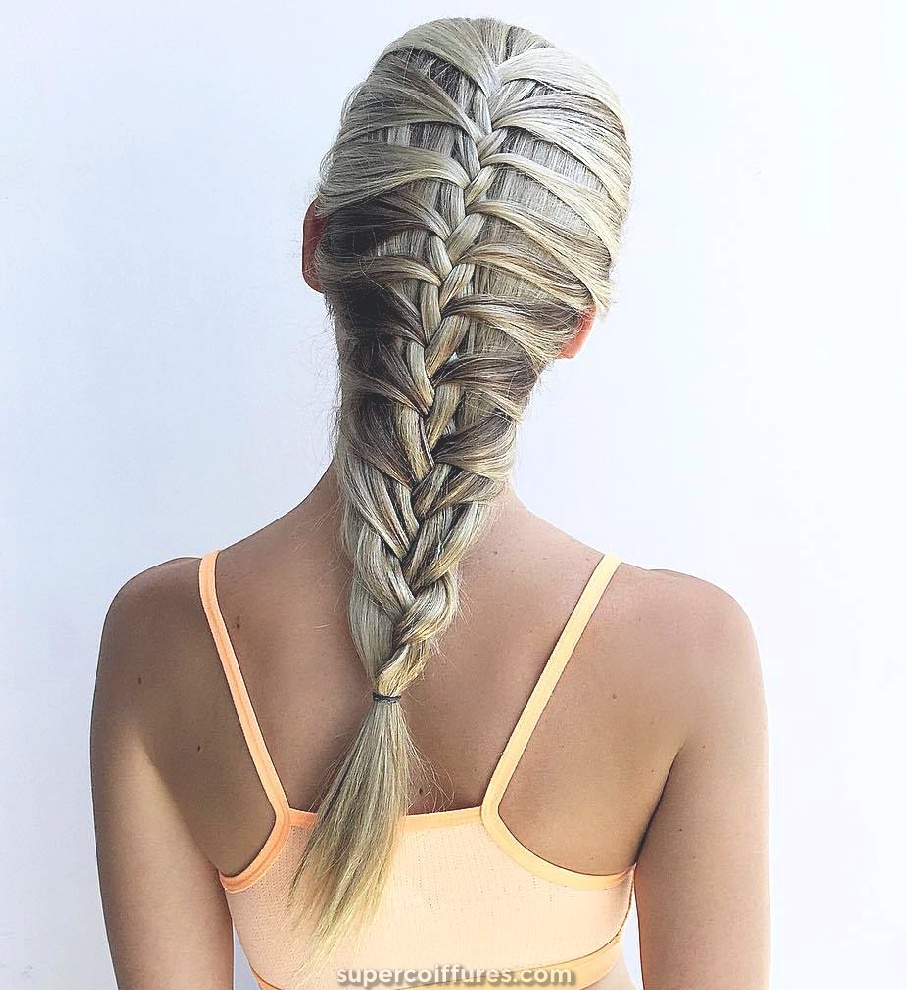
Vous auriez seulement deviné par son nom que c’est le genre de tresse. Comme cette tresse aidera à donner du volume à vos cheveux en faisant la tresse. Comme vous pouvez tous le voir sur la photo, il s’agit d’une belle tresse volumineuse. Cette tresse peut être portée à plusieurs occasions comme une fête de mariage, une réception de mariage, des fêtes informelles et à de nombreuses autres occasions. Il comprend également le tressage en français.
Comment faire une grosse tresse volumineuse:
- Pour commencer cette tresse de cheveux, tout d’abord, boucler vos cheveux, car cela ajoute du volume aux cheveux.
- Laissez quelques mèches de cheveux lâches sur le devant des deux côtés avec la cloison centrale, comme vous pouvez le voir sur la photo.
- Peignez le reste des cheveux en arrière en créant une couronne pour obtenir plus de volume.
- Maintenant, prenez vos cheveux du côté où vous voulez que la tresse de cheveux soit.
- Commencez par tresser vos cheveux avec un style de tressage français. Nous avons mentionné dans cet article comment faire du tressage en français.
- Mais ici, la tresse doit être un peu lâche, car à ce moment-là seulement, elle ressemblera à une grosse tresse volumineuse.
- Continuez à ajouter des cheveux à la tresse en croisant chaque coin par-dessus le milieu.
- Faites le tressage jusqu’à la fin, puis attachez les cheveux avec un élastique.
- Mettez de la laque pour que vos cheveux soient beaux. Votre grande tresse volumineuse est maintenant prête à être affichée.
Conseils pour la tresse volumineuse
Comme vous devez garder le volume, assurez-vous que lorsque vous ajoutez des cheveux à chaque section en tressage français, prenez plus de cheveux à chaque fois. Cela vous donnera une allure parfaite d’une grande tresse volumineuse.
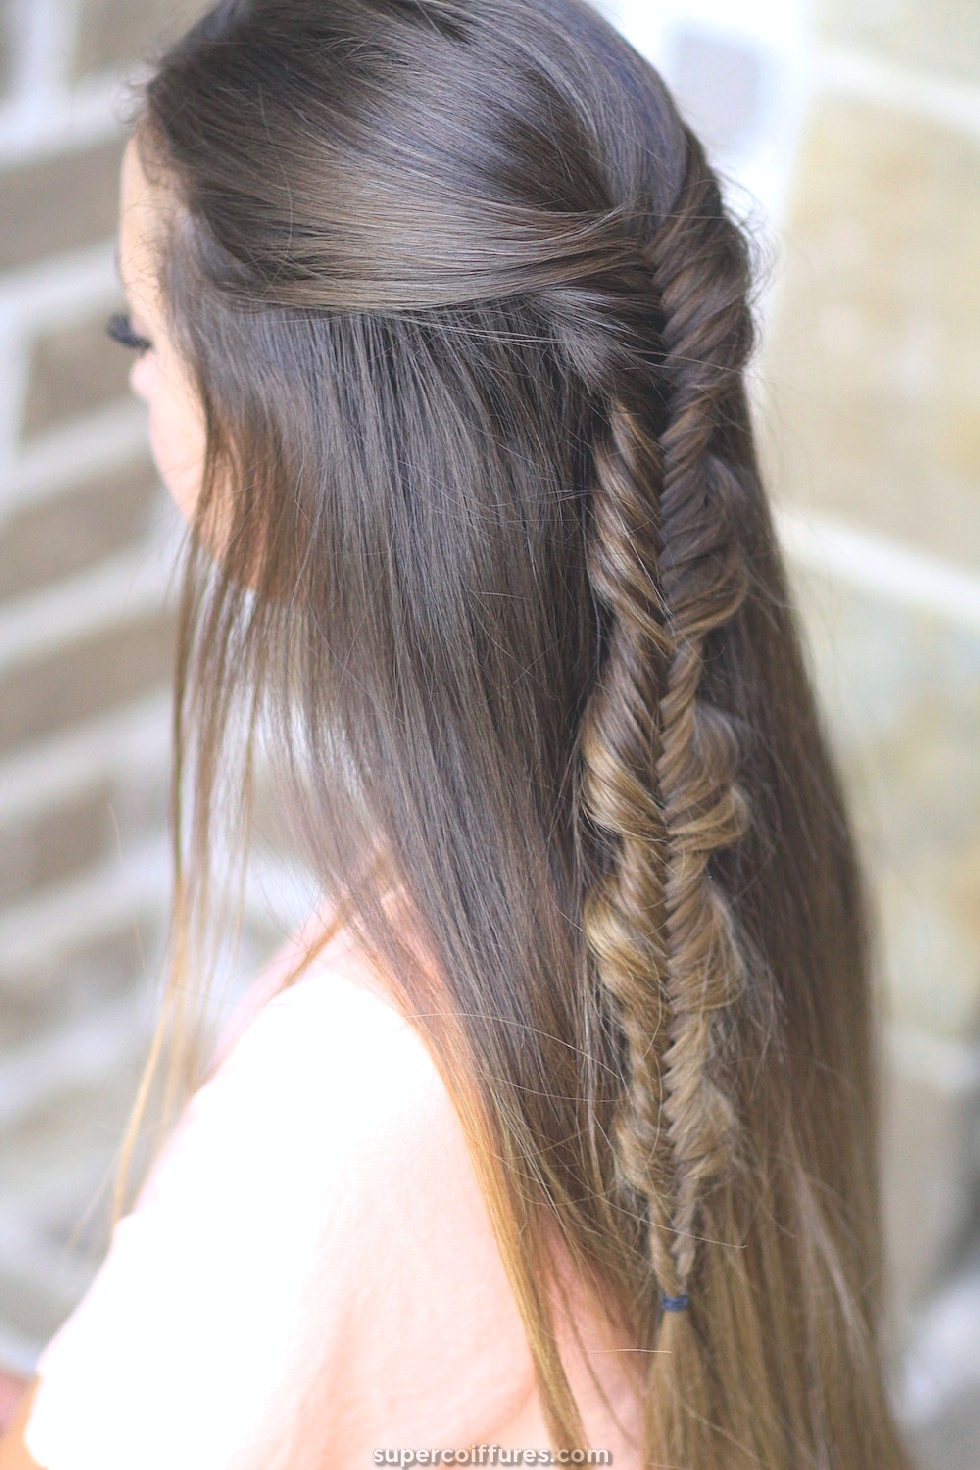
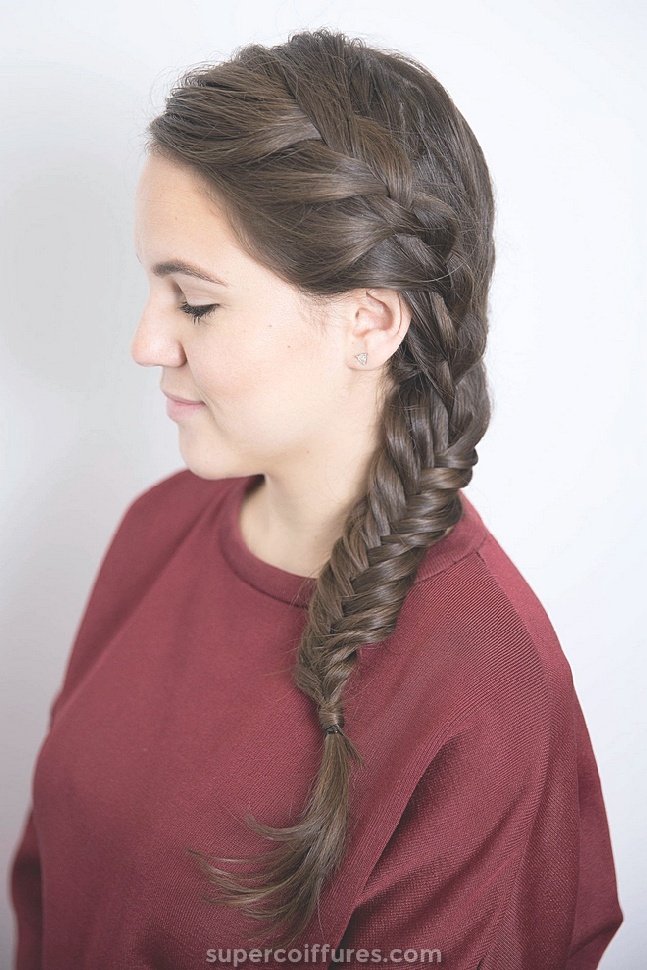
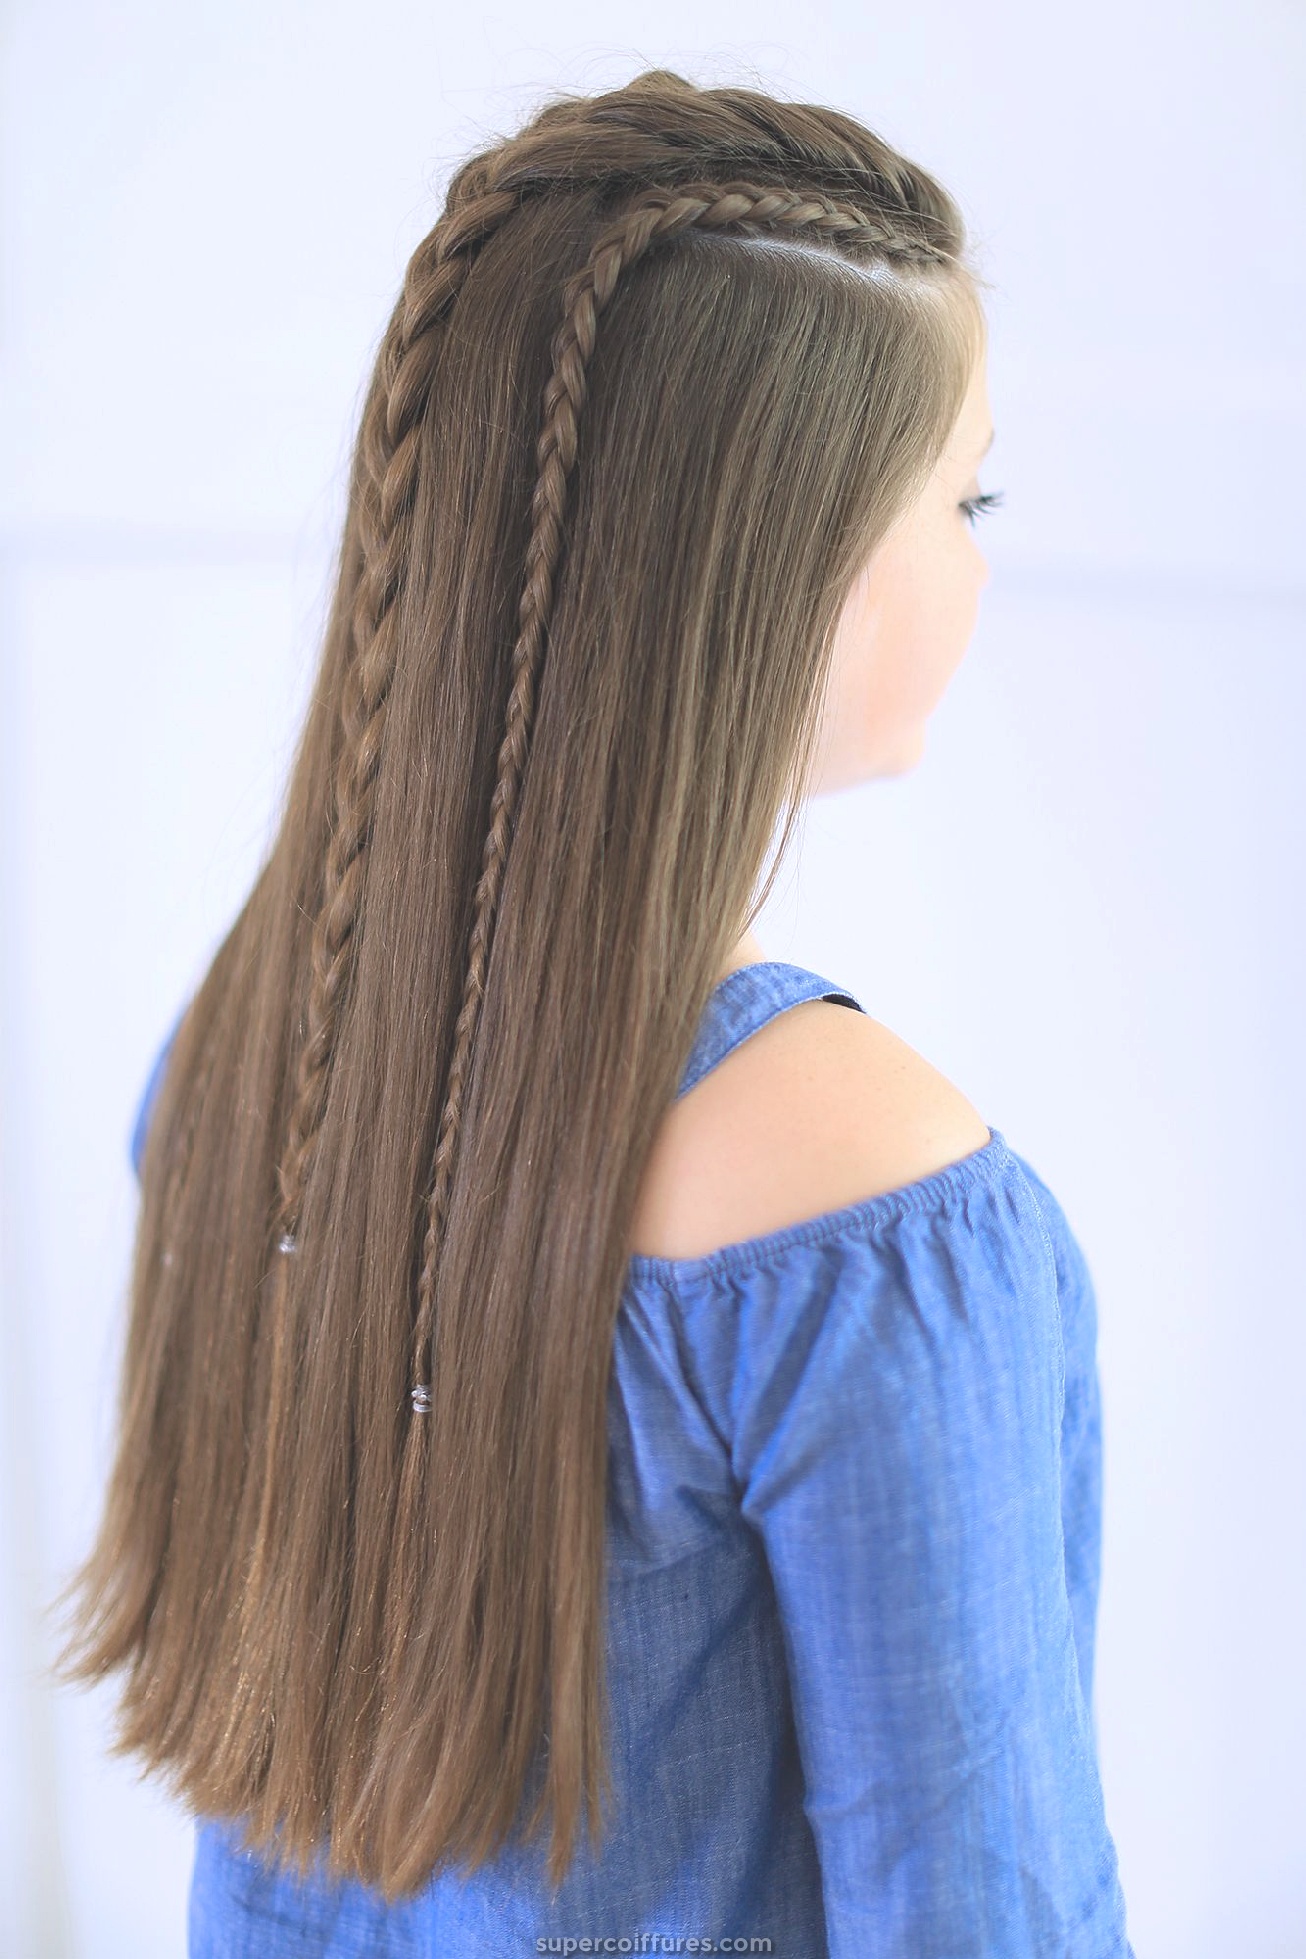
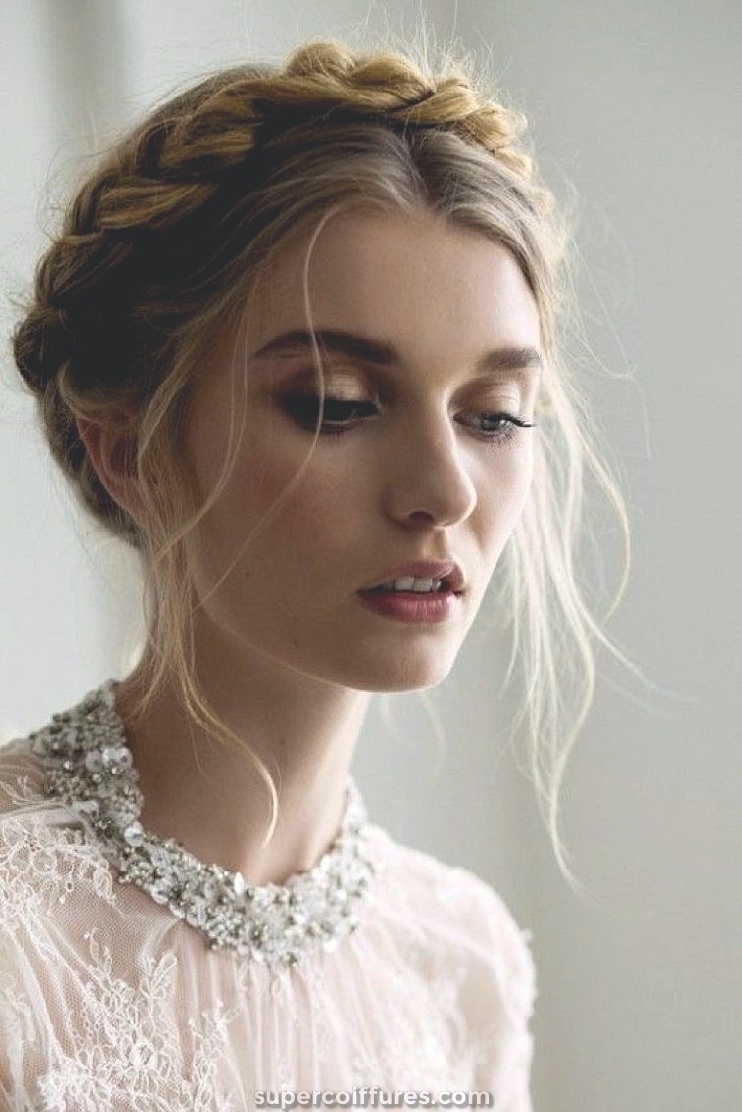
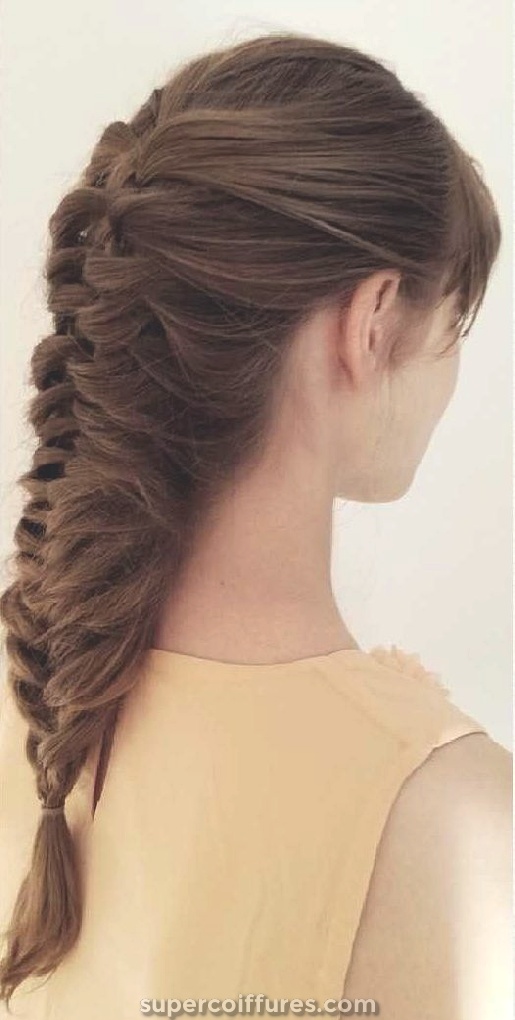
(3) tresse de Boho
Cette tresse est également connue sous le nom de tresse bohémienne et fait partie des célèbres tresses. Ils sont sans aucun doute magnifiques et faciles à faire. Très simple et élégante à sa manière, cette tresse se porte facilement au quotidien. Pour donner un look décontracté à vos cheveux ou pour faire une tresse simple mais attrayante, optez pour Boho Braid. Vous pouvez le porter avec une jolie robe ou une robe ou même avec un jean et un t-shirt. Ce style de tresse boho est un style à moitié rebelle. Voyons comment nous pouvons le faire.
Comment faire Boho Braid:
- Pour commencer avec cette tresse, commencez par séparer vos cheveux.
- Maintenant, prenez les tresses de la zone des cheveux, du côté qui a plus de cheveux après la cloison latérale.
- Commencez à faire une tresse en queue de poisson, mais ce doit être une tresse fine. Vous pouvez lire les étapes de la réalisation d’une tresse en queue de poisson ci-dessous.
- Juste pour ajouter du volume, tirez sur les bords de la tresse en queue de poisson, puis attachez-le à l’aide d’un élastique.
- Prenez quelques cheveux du même côté des cheveux à côté de cette tresse que vous avez faite dans les étapes ci-dessus.
- Vous devez faire une tresse normale en utilisant trois brins. Alors, divisez les cheveux que vous avez pris en trois sections et commencez à faire une tresse régulière.
- Lorsque vous atteignez le bord de la tresse, tirez dessus pour ajouter du volume. Et ensuite attachez-le avec un élastique.
- Maintenant, vous devez prendre une petite quantité de cheveux de l’autre côté. Rassemblez les deux tresses et les cheveux de l’autre côté à l’arrière de la tête.
- Attachez-les avec un élastique, mais ne retirez pas les cheveux de l’élastique. Au lieu de cela, laissez-les à mi-chemin en faisant une boucle comme celle-ci sur la photo.
- Tirez l’élastique des deux tresses mais pas le dernier qui a noué les cheveux des deux côtés dans une boucle.
- Couvrir la bande élastique qui lie les tresses et les cheveux des deux côtés en utilisant vos cheveux. Et rangez-le dans le dos avec une épingle à cheveux.
- Votre Boho Braid est prête de manière élégante.
Conseils pour Boho Braid
Ce style aura fière allure sur des cheveux lisses, mais vous pouvez aussi l’essayer sur des cheveux bouclés. Que vous deviez prendre des cheveux pour une tresse en queue de poisson ou une tresse régulière à trois brins ou pour les cheveux mous, prenez juste une petite quantité de cheveux.
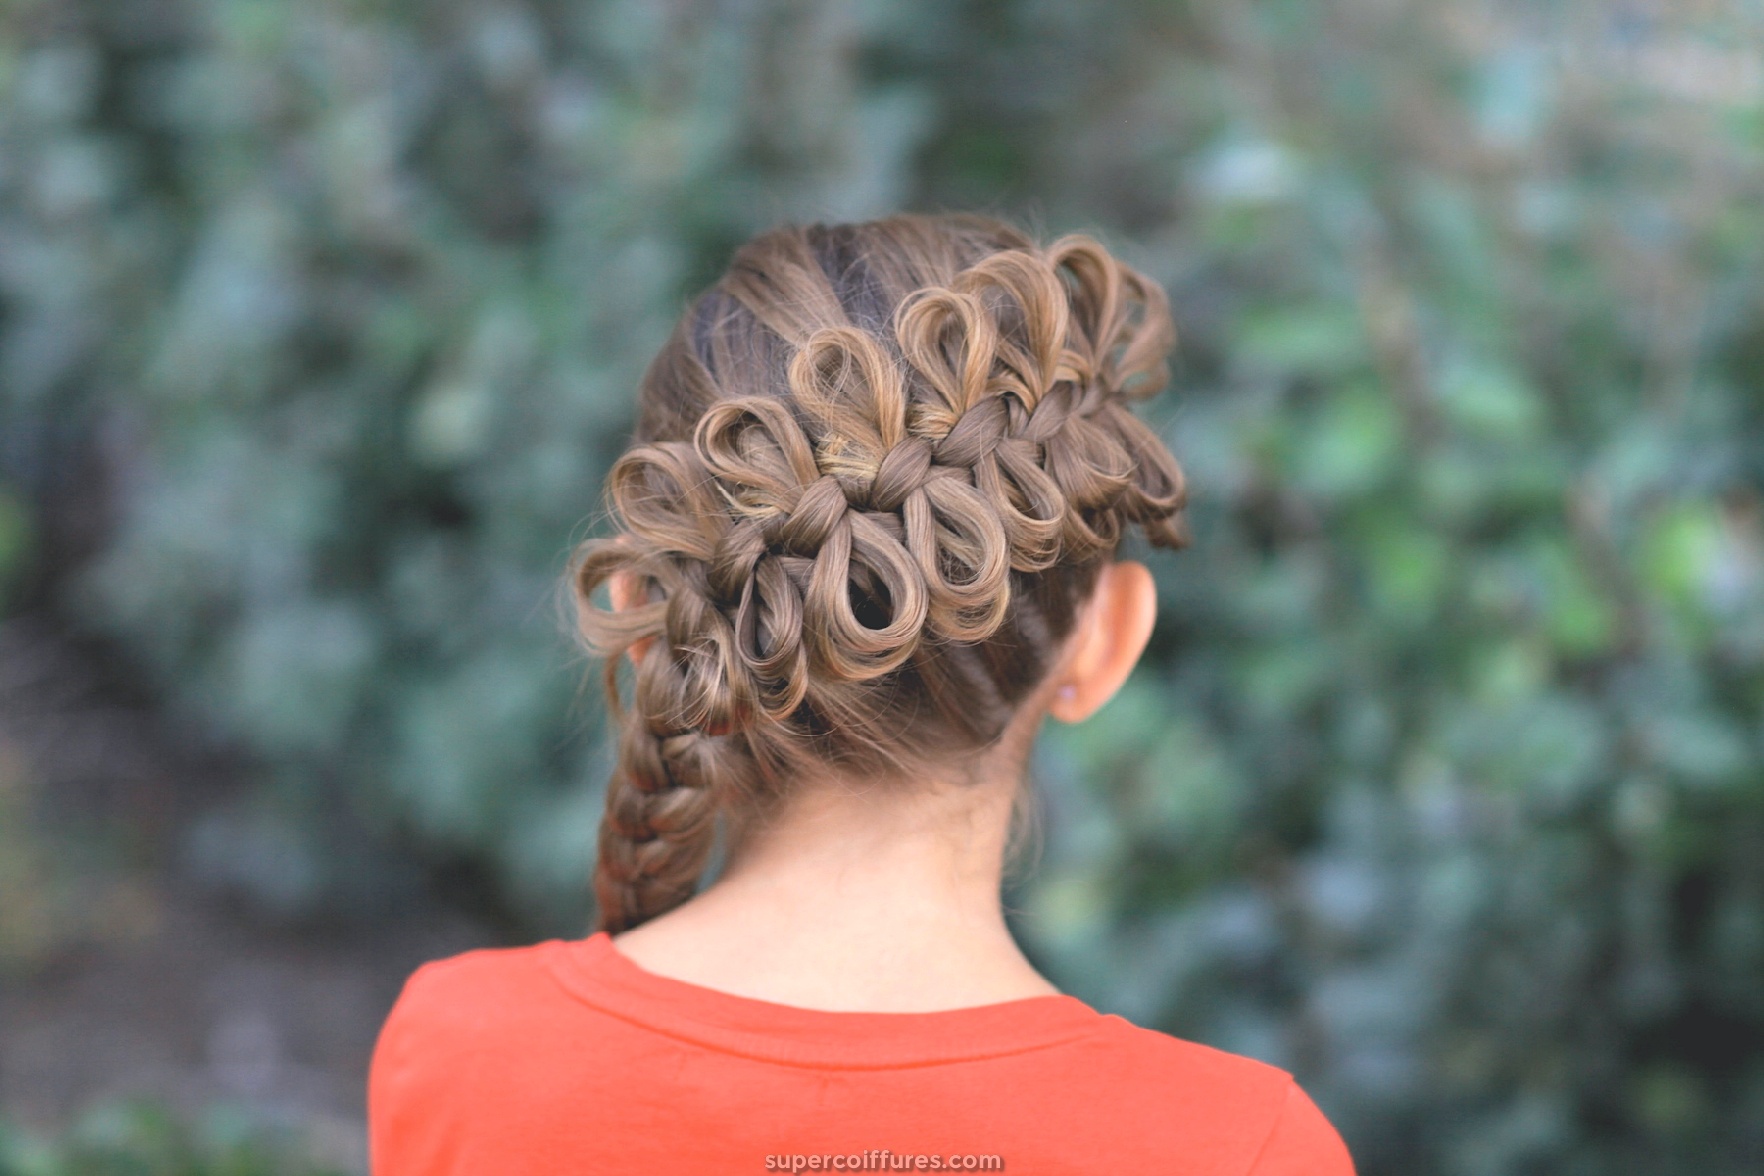
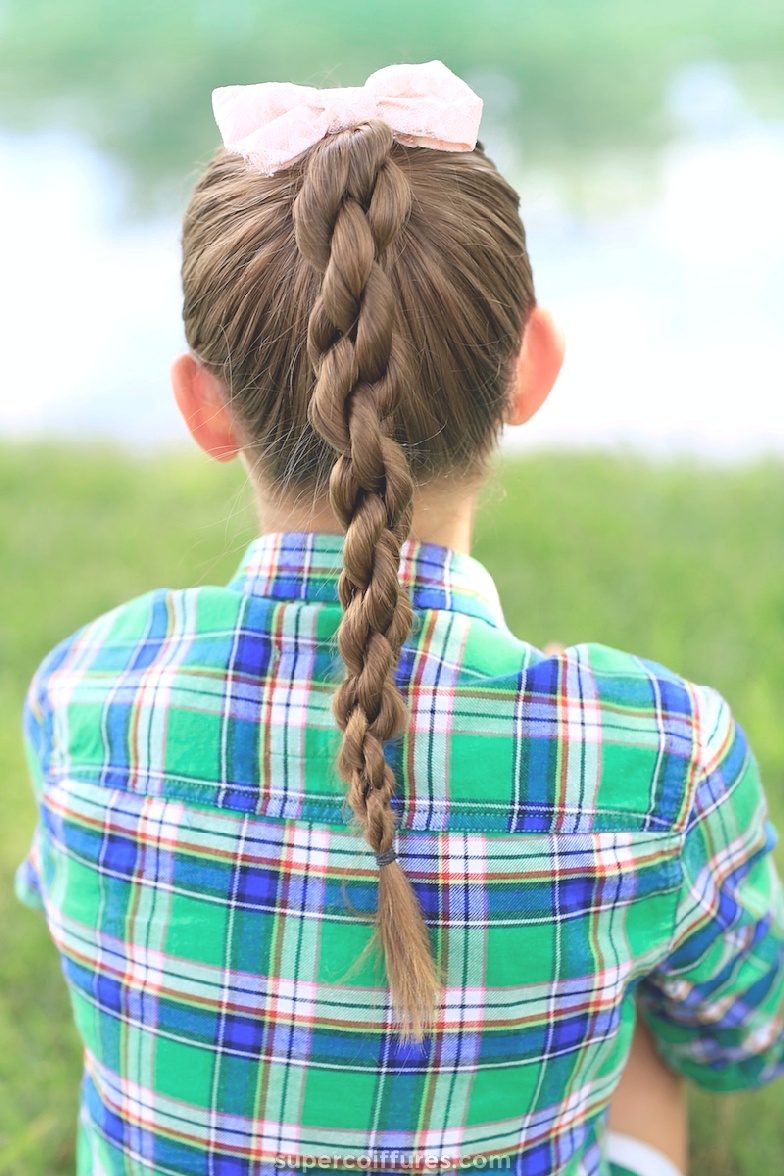
(4) tresses d’arc
Cette tresse est mignonne, qu’elle soit portée par une adolescente ou une femme. Il ajoute un style et un look amusant à vos cheveux. Mais plus il a l’air adorable, plus il est difficile à faire. Si vous essayez ce genre de tresse pour la première fois, nous vous suggérons de prendre de l’aide. Portez ce look pour une fête d’anniversaire ou une fête décontractée, pour tous les événements traditionnels. Et si nous parlons de robes, qu’il s’agisse d’une robe une pièce, d’une robe mi-longue, d’une robe de soirée ou encore d’une paire de veste en cuir et denim, elle aura l’air cool. La femme sur la photo porte une coiffure tressée en diagonale, que nous apprendrons ici.
Comment faire Braid Bow:
- Commencez avec la cloison pour les cheveux juste au-dessus de l’extrémité du sourcil droit et prenez cette cloison en diagonale vers le côté gauche. Arrêtez-vous environ 1 pouce au-dessus de l’oreille gauche. Puis amenez-le droit vers le front en formant une ligne droite.
- Attachez les cheveux de la partie cloisonnée avec une bande de cheveux, car nous devrons l’utiliser plus tard.
- Comme nous devons faire une tresse diagonale avec un arc, la tresse sera également diagonale. Commencez à faire une tresse française en diagonale qui doit aller vers l’arrière de votre tête. Pour savoir comment faire French Braid, lisez ci-dessous le tutoriel French Braid.
- Continuez à faire la tresse française en diagonale jusqu’à la fin. Si les cheveux ne sont pas laissés pour ajouter la tresse française, vous pouvez lui faire tresse régulière. Attachez-le à l’aide d’un élastique.
- C’est maintenant au tour de faire l’arc, qui est la partie principale de cette tresse. Donc, pour cela délier les cheveux cloisonnés. Et vous pouvez utiliser une certaine quantité de gel pour les cheveux ou de cire pour donner à l’arc une apparence parfaite.
- Pour faire des arcs, nous aurons besoin d’épingle à cheveux. Faites glisser l’épingle au premier point de la tresse française. Prenez une petite quantité de cheveux dans la partie supérieure et faites une boucle pour l’utiliser.
- En tenant la boucle de la main gauche, faites-la glisser jusqu’au bout de l’épingle à cheveux.
- Tirez lentement votre épingle à cheveux de la boucle de la tresse. La queue de cheveux viendra aussi avec elle créant une autre boucle. Les deux boucles feront un look arc.
- Une fois, vous créez un arc, retirez l’épingle et commencez à fabriquer l’autre arc en suivant la même procédure.
- Continuez à faire l’arc jusqu’à ce que la tresse française soit là, mais pas à la tresse régulière.
- Votre superbe coiffure Bow Braid est prête.
Conseils pour tresses arc
Les astuces que nous partageons ici sont très importantes pour la réalisation de cette tresse en arc. N’oubliez pas que vous devez placer l’arc au sommet de chaque point de Braid français. Les cheveux de la fin de l’arc doivent être placés sur le côté gauche de French Braid afin que vous puissiez facilement les cacher lors de l’arc suivant. Une fois la tresse de l’arc terminée, utilisez du fixatif pour garder l’arc au même endroit.
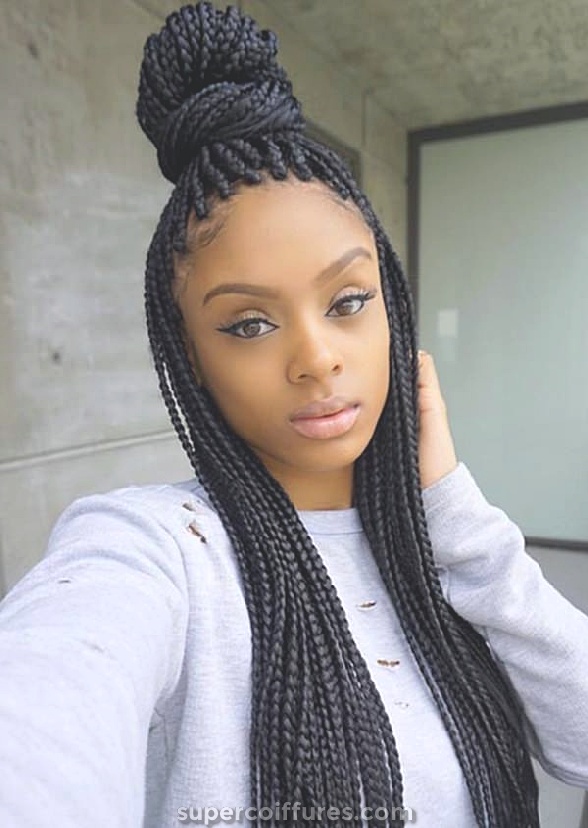
(5) tresses de boîte
Vous auriez vu cette tresse principalement portée par les femmes africaines, mais c’est l’une des tresses tendances. Ce n’est pas si difficile à faire, mais cela prendra sûrement plusieurs heures. Des cheveux longs à moyens aux épaules, ce look peut aller avec tous ces types de cheveux. Même vous pouvez utiliser des extensions de cheveux pour leur donner un aspect plein de volume. Mais là encore, cela deviendra une tâche fastidieuse pour vous. Nous suggérons la coiffure de tresses de boîte pour porter tous les jours ou pour des occasions informelles ou occasionnelles.
Comment faire Box Braid:
- Vos cheveux doivent être propres et lavés avant de commencer avec cette tresse. Ne les conditionnez correctement en utilisant un bon conditionneur.
- Peignez vos cheveux de la racine aux pointes en résolvant tous les nœuds.
- Pour commencer, divisez d’abord les cheveux en 4 sections égales, c’est-à-dire deux à l’arrière et deux à l’avant.
- Prenez l’une des sections à l’avant et attachez les 3 sections séparément à l’aide d’un serre-tête.
- Prenez une petite quantité de cheveux de la section qui est lâche et commencez à tresser. Vous pouvez faire un tressage normal en utilisant 3 mèches de cheveux.
- Assurez-vous que la tresse n’est ni trop lâche ni trop serrée, sinon elle vous blessera et endommagera également vos cheveux.
- Gardez le tressage jusqu’à la fin et pour sécuriser la tresse, utilisez un élastique pour l’attacher ou laissez-le être comme ça seulement.
- De la même manière, tresser les cheveux de toute la section de la racine aux pointes.
- Détachez les autres sections une à une après avoir terminé les tresses de chaque section en suivant les mêmes étapes.
- Vous aurez environ 80 à 100 tresses sur la tête, en fonction du volume de vos cheveux.
- Les tresses longues et élégantes sont maintenant prêtes.
Astuces pour Box Braid
Ne gardez pas ce style de tresse pendant plus d’un mois, car cela pourrait endommager vos cheveux. Soit vous couchez sur un oreiller en soie, soit vous vous couvrez la tête avec un foulard en soie, de manière à ne pas détruire vos tresses. Faites, nettoyez votre cuir chevelu chaque semaine et appliquez de l’huile de cheveux. Si vous lavez votre cuir chevelu et vos tresses doucement, vos tresses ne seront pas dérangées.

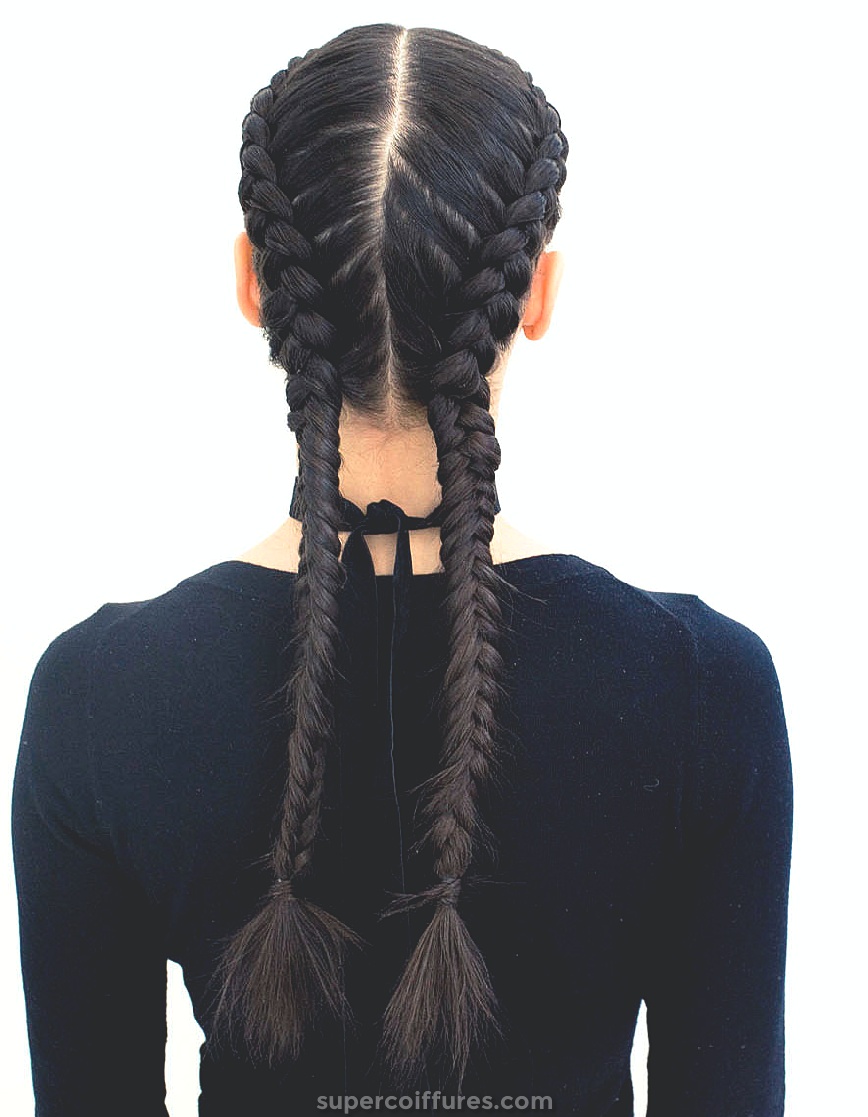
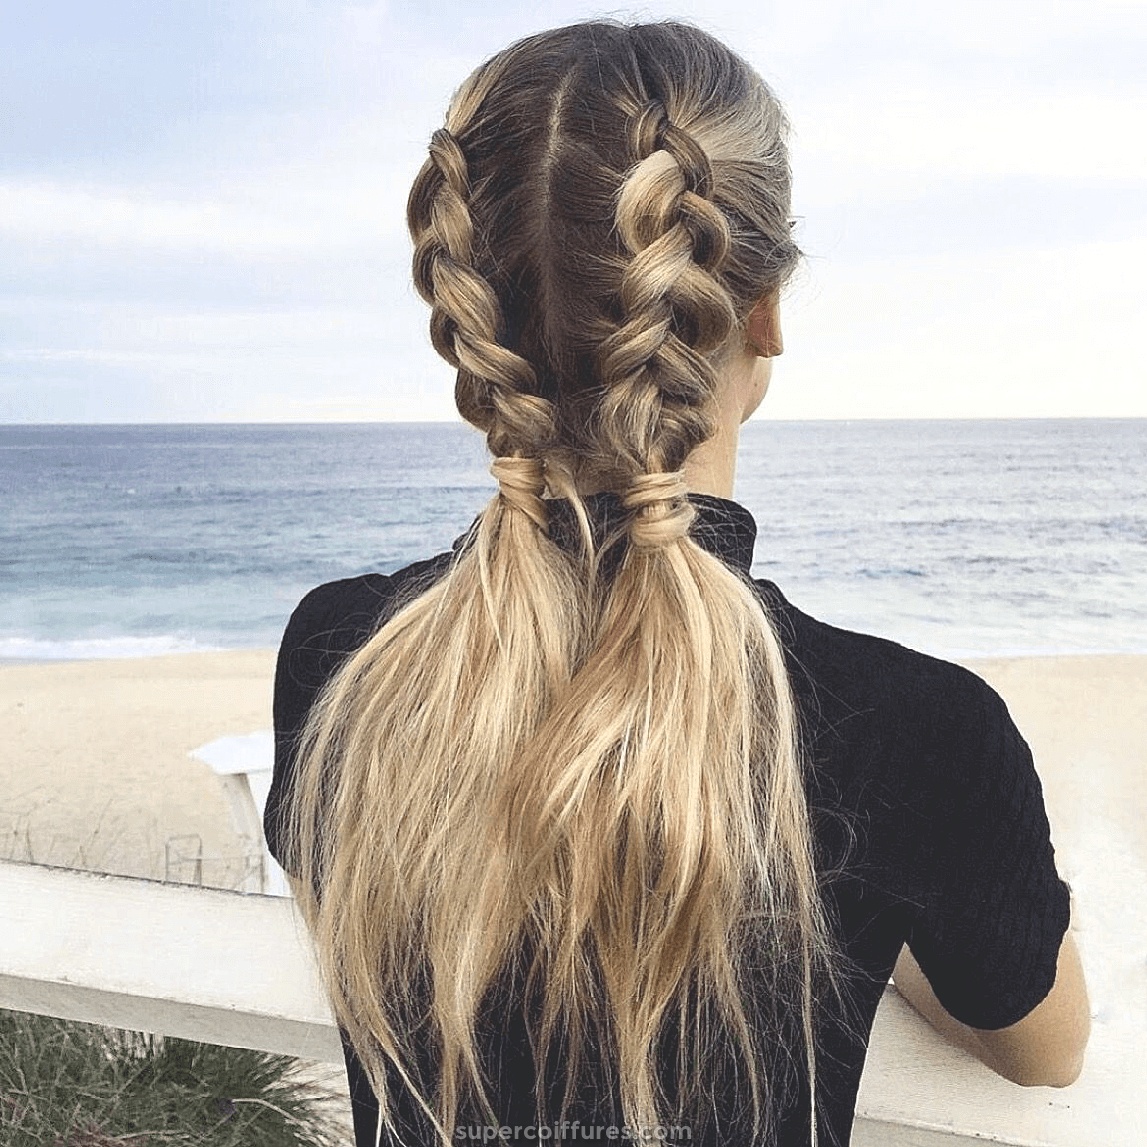
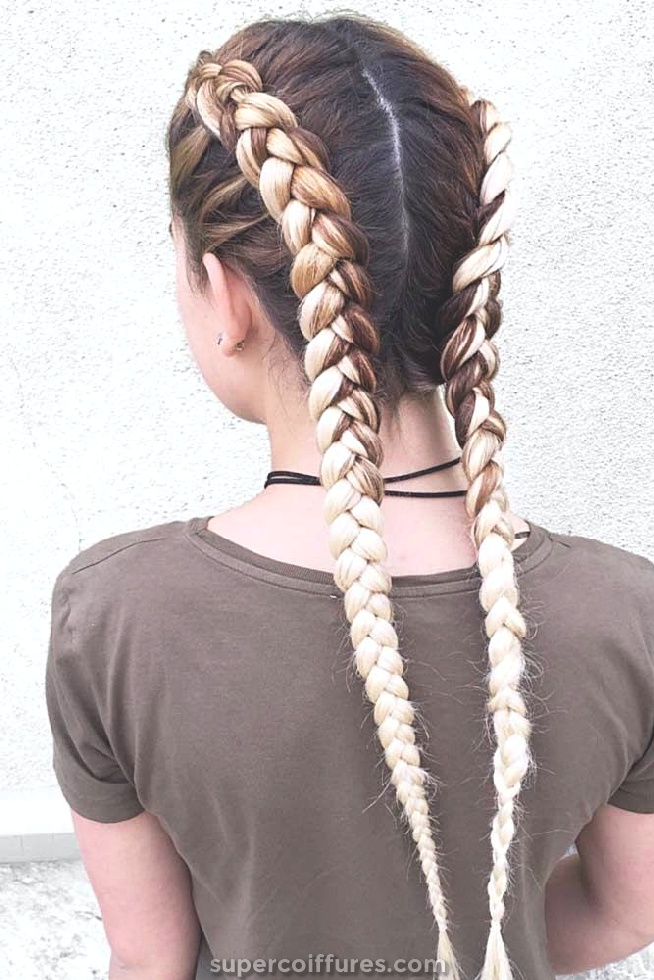
(6) tresses de boxeur
Les tresses Boxer vous donnent un look rock chic. Vous pouvez porter cette tresse pour différentes occasions, par exemple si vous assistez à un concert de rock, à une soirée entre filles ou à un club. Au début, vous allez prendre du temps pour confectionner des tresses de boxeur, mais lorsque vous le ferez de temps en temps, il deviendra facile pour vous de porter des tresses de boxeur.
Comment faire des tresses de boxeur:
- Avant de commencer, assurez-vous que vos mèches de cheveux sont propres et non démêlées. Aussi, appliquez un peu d’huile ou de fixatif pour fixer la coiffure.
- Faites deux divisions égales de vos cheveux en les séparant du milieu au dos jusqu’au cou, comme vous le feriez pour faire des tresses. Assurez-vous que la cloison et la division des cheveux sont bien faites.
- Attachez les deux sections séparément avec des élastiques.
- Détachez maintenant une mèche de cheveux et prenez quelques mèches de cheveux de la tête avant de cette mèche. Commencez à faire des tresses françaises et continuez à ajouter de plus en plus de cheveux pour obtenir des tresses longues et épaisses. Rappelez-vous que les mèches de cheveux en vrac doivent être laissées pendant le tressage. Faites la tresse jusqu’au bout et attachez-la avec une bande de cheveux.
- C’est au tour de l’autre section, alors détachez-le. Et commencez à faire la même chose que ce que vous avez fait dans la 1ère section.
- Mettez de la laque pour que le style ne se gâche pas en desserrant les mèches de cheveux.
- Votre style de cheveux Boxer Braids est maintenant prêt.
Conseils pour les tresses de boxeur
Si vous faites des tresses de boxeur, rappelez-vous qu’elles ont fière allure quand elles sont soignées. Donc, si vous avez les cheveux rêches ou les cheveux bouclés, vaporisez de l’eau sur vos cheveux. Ne laissez pas de mèches de cheveux entre les tresses pendant le tressage.

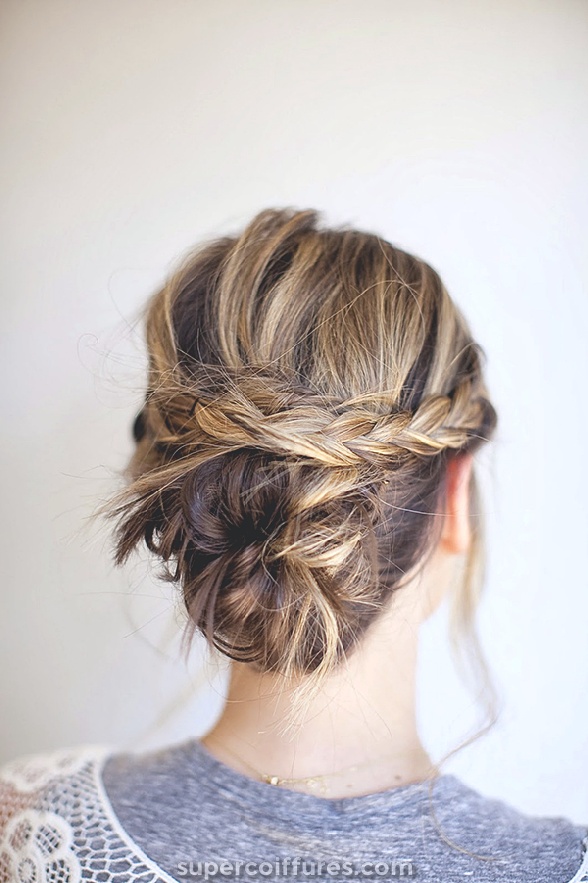
(7) tresse à chignon
À bien des égards, vous pouvez essayer la tresse au look chignon. Cela peut être n’importe quelle tresse que vous pouvez raccorder au chignon ou autour du chignon. Donc, il n’y a pas de forme fixe de cette coiffure, car elle comprend différentes tresses et petits pains. Mais celui sur la photo a l’air impertinent avec ce petit pain en désordre. Nous allons donc apprendre à créer cette tresse pour un look chignon. C’est un style amusant et décontracté, qui a l’air dynamique. Vous pouvez le porter le soir, à la maison ou pour toute session de jeu ou tout autre événement amusant.
Comment faire Braid to Bun:
- Contrairement à une autre coiffure tressée, il n’est pas nécessaire de commencer par vous peigner proprement. Commencez simplement avec un look de cheveux naturel. Peu importe qu’il soit bouclé ou ondulé ou droit.
- Tout d’abord, taquinez votre couronne de cheveux. Et faites la partition en prenant une section des poils avant et latéraux. Attachez-les avec une épingle ou une bande.
- Prenez les cheveux laissés à l’arrière qui sont lâches. Tenez-les doucement ensemble dans votre main en queue de cheval.
- En utilisant votre autre main, rentrez les cheveux dans le dos pour former un chignon en désordre. Sécurisez le pain en utilisant un élastique ou un élastique.
- Nous aurons besoin de pinces à cheveux maintenant, car vous devez ranger tous les cheveux qui restent à l’arrière de la tête.
- Relâchez les cheveux à l’avant et séparez-les en deux parties.
- Commencez à faire une tresse régulière en utilisant l’une des sections.
- La tresse ira dans la direction arrière de la tête.
- Une fois que vous avez fait la tresse à partir d’une mèche de cheveux, glissez-la au-dessus du chignon à l’aide d’épingles à cheveux.
- De même, faites une tresse avec une autre section également et glissez-la sous la première tresse à l’arrière de la tête à l’aide d’épingles à cheveux.
- Aussi, rentrez les cheveux qui sortent de la tresse en utilisant des pinces à cheveux.
- Vous obtiendrez le même look que celui de la photo d’une tresse avec un chignon en désordre.
Conseils pour Braid to Bun
Pour obtenir le même aspect sur la photo, vous pouvez donner à vos cheveux un aspect ondulé à l’aide du fer à lisser ou du lisseur à torsion.
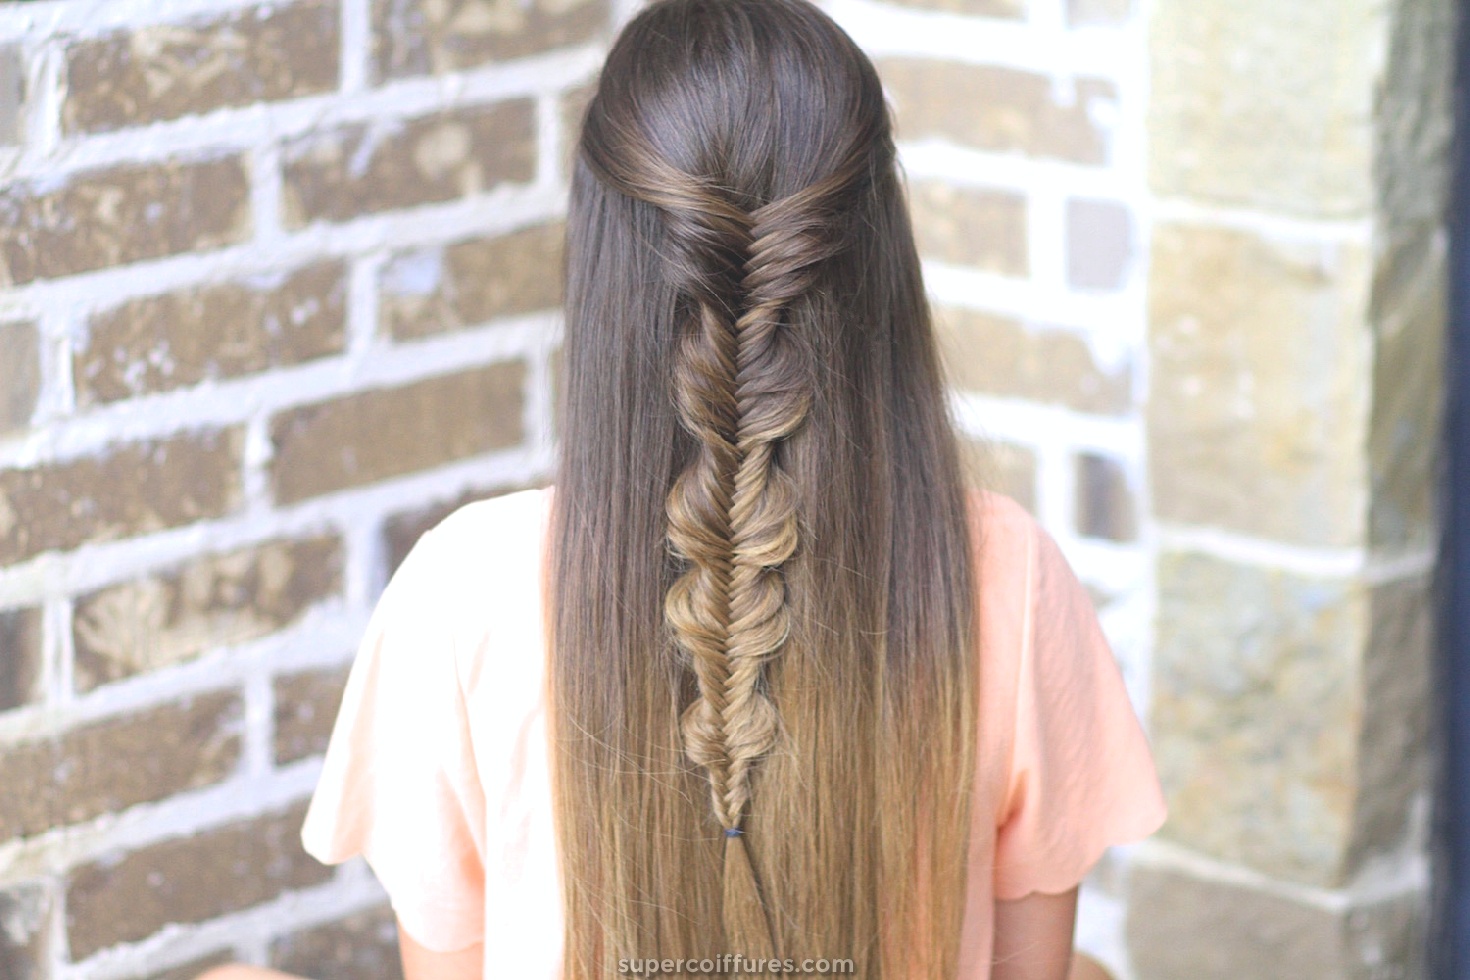
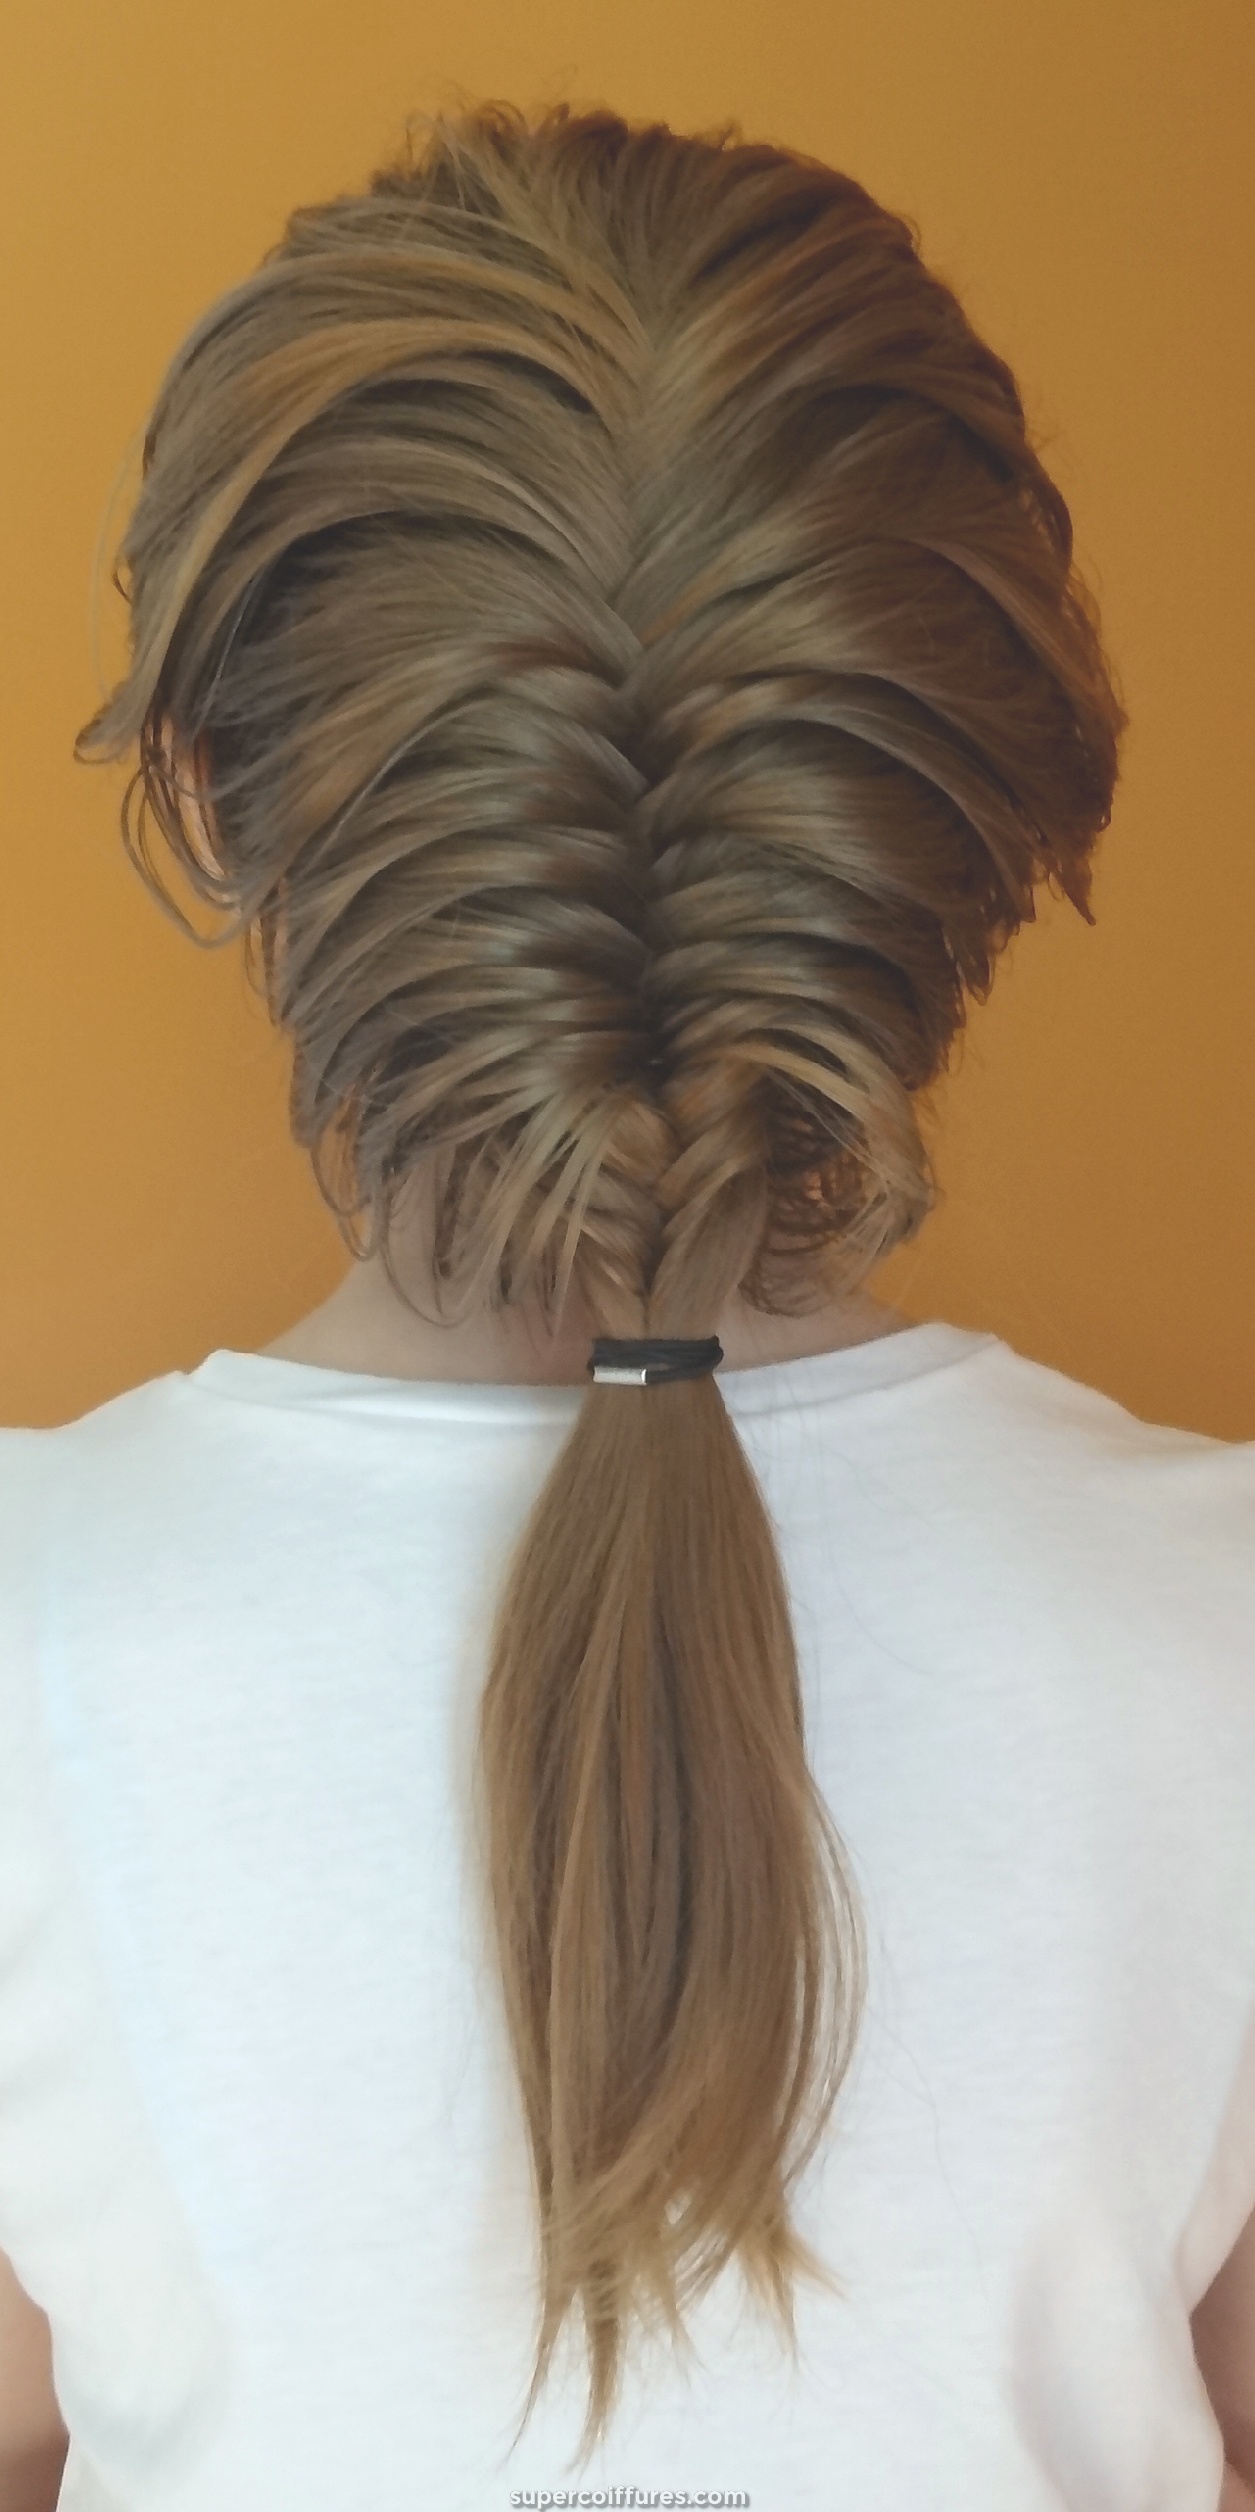
(8) tresse à bulles de poisson
Voulez-vous être la reine d’une tresse du groupe de votre fille? Ensuite, vous devriez absolument essayer cette tresse à bulles de poisson en queue de poisson. Il a l’air génial, pas seulement à cause de son apparence, mais de la façon dont il est fait. Sur la photo, vous pouvez voir que cela a été fait sur un cheveu lisse et texturé. Pas de soucis pour les femmes aux cheveux bouclés ou ondulés, vous pouvez également essayer cette tresse à bulles de poisson.
Comment faire tresse Bubble Fishtail:
- Faites des sections de cheveux, environ 1 pouce au-dessus de vos oreilles. À l’aide de vos mains, ramassez le dos de la tête ou la couronne.
- Maintenant, nous allons commencer par faire une tresse en queue de poisson. Tout comme nous, en sélectionnant une mèche de cheveux du bord extérieur vers l’extérieur, puis en haut, puis en l’ajoutant à un autre côté.
- C’est le tour du côté opposé maintenant. Et nous ferons la même chose de ce côté.
- Continuez à répéter, jusqu’à ce que vous tressiez environ 4 pouces vers le bas
- Maintenant, crêpe au moins 4 points de queue de poisson en revenant. Cela aide à former facilement les bulles.
- Une fois que vous avez terminé avec le pancake, encore une fois faire le tressage en queue de poisson pour les 4 pouces suivants.
- Répétez les étapes de la recette à nouveau, jusqu’à ce qu’il ne vous reste plus de cheveux. Fixez les cheveux à l’aide d’un élastique.
- Pour donner plus de volume aux bulles, rendez-les parfaites.
- Votre tresse Bubble Fishtail est terminée maintenant.
Conseils pour tresse à bulles de poisson
Faites des pancakes correctement pour que les bulles formées soient belles et pleines de volume. Au lieu de cela, vous pouvez utiliser du fixatif à la fin pour fixer la tresse à un endroit.
(9) tresse de maillon de chaîne
Vous auriez tous vu ce style de tresse de cheveux maintes fois porté par de nombreuses sportives ou de nombreuses danseuses ou filles faisant de l’aérobic. C’est une sorte de tresse très sportive, qui vous fera paraître impertinent même en vous préparant pendant les séances sportives. Et étant une tresse facile, la plupart des femmes pourront faire la tresse à mailles.
Comment faire une tresse de maillon de chaîne:
- Comme vous le voyez sur la photo, il y a trois sous flips en haut de la tête. Donc, si vous souhaitez le faire, vous pouvez également y aller en créant trois partitions séparées en haut de la tête. Et puis en retournant les cheveux sous le nœud. Ou si vous souhaitez continuer sans le faire, vous pouvez simplement suivre les étapes ci-dessous.
- Tirez tous vos cheveux dans une queue de cheval au sommet de la couronne comme une queue de cheval haute. Et sécurisez-le avec l’aide d’un clip.
- Divisez la queue de cheval en 2 sections égales. Et enlevez une des sections du clip.
- Divisez maintenant la mèche de cheveux non coupée en deux mèches.
- Vous devez tordre les deux mèches de cheveux vers la droite.
- Maintenant, rapprochez-les et tournez-vous vers la gauche.
- Continuez à faire la tresse en torsadant la corde jusqu’au bout. Et ensuite attachez-le avec un élastique.
- C’est maintenant au tour de l’autre partie de la queue de cheval qui est encore coupée. Alors, inclinez ça aussi.
- Commencez par la première section en la divisant en deux parties égales. Et ensuite en les tournant séparément vers la droite. Après cela, tordre les deux ensemble vers la gauche. Continuez à tresser de la même manière jusqu’à la fin et nouez-le au groupe.
- Maintenant vous avez 2 tresses de torsion de la corde, alors commencez à les tordre ensemble vers la droite.
- À la suite de cette torsion des tresses ensemble, le verrouillage sera créé et formera une tresse en mailles de chaîne.
Conseils pour tresse de maillon de chaîne
Rappelez-vous la direction dans laquelle vous allez tordre la corde. Vous pouvez donner une finition à cette tresse en y ajoutant de la laque pour cheveux.
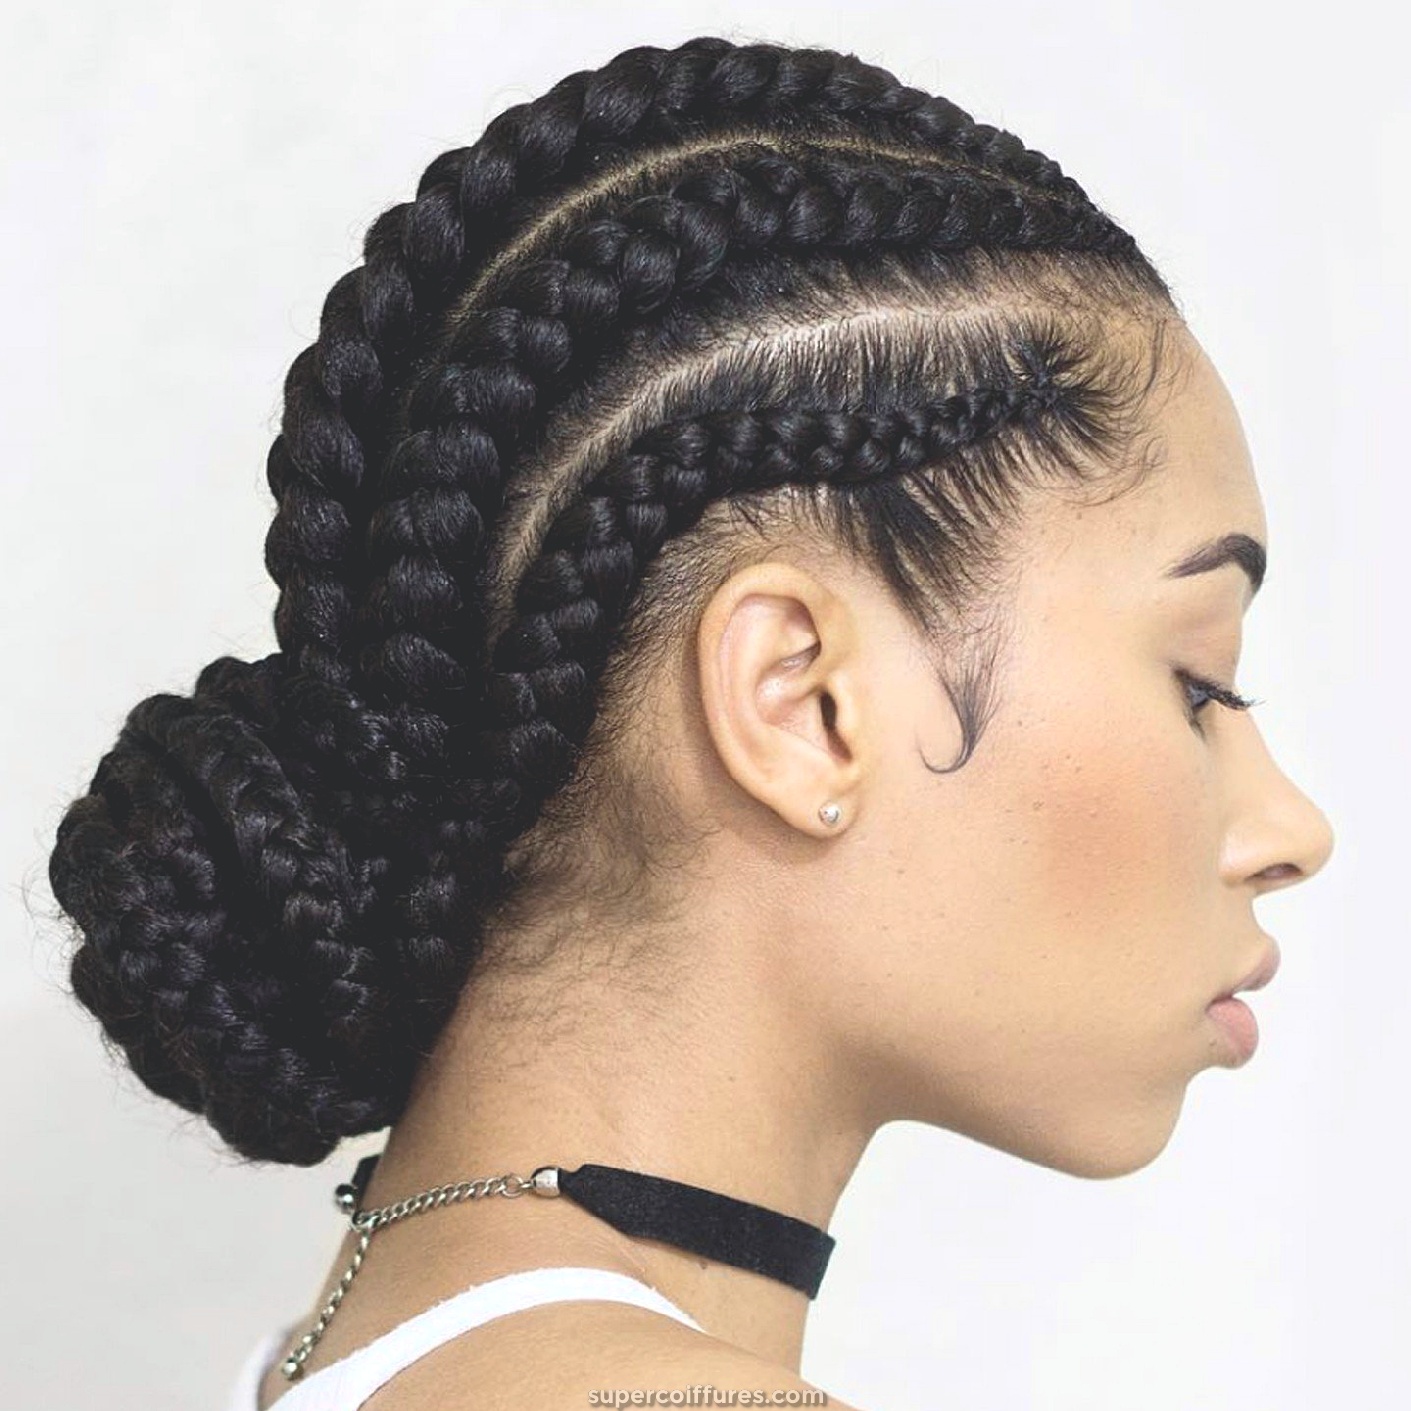
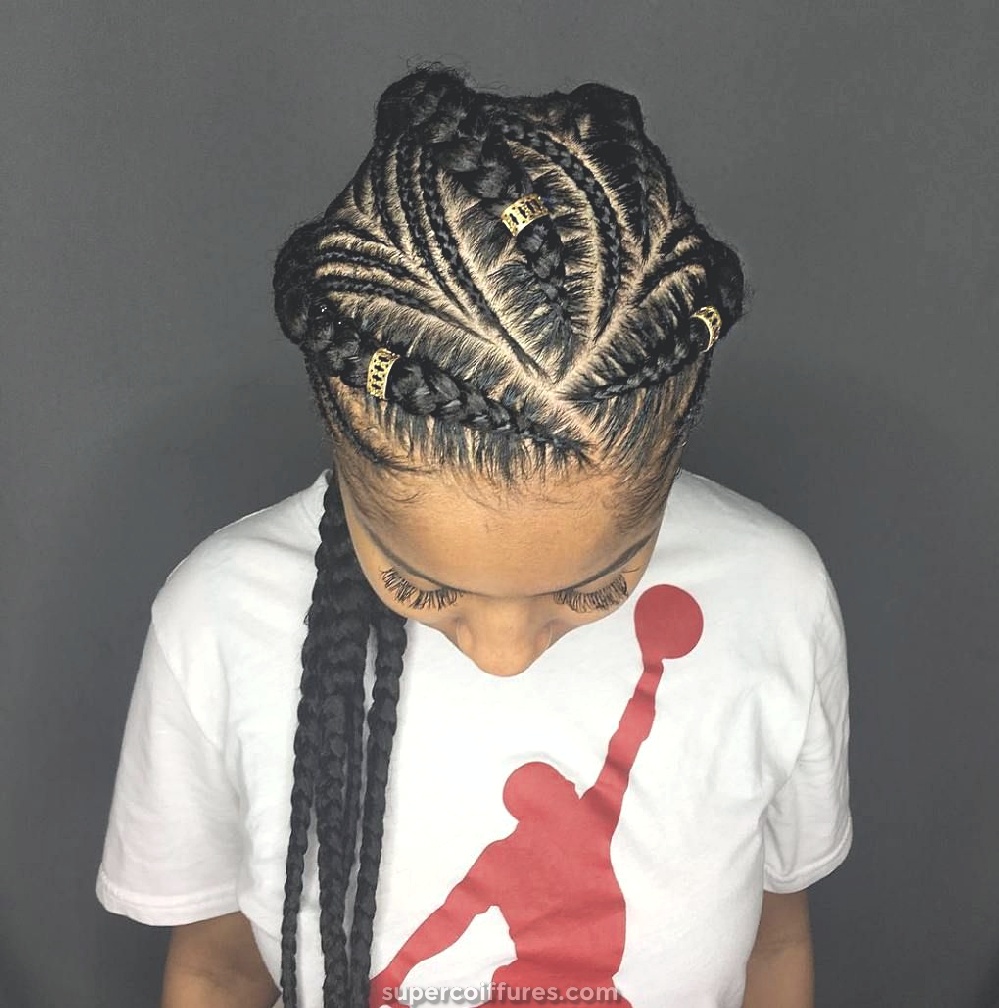
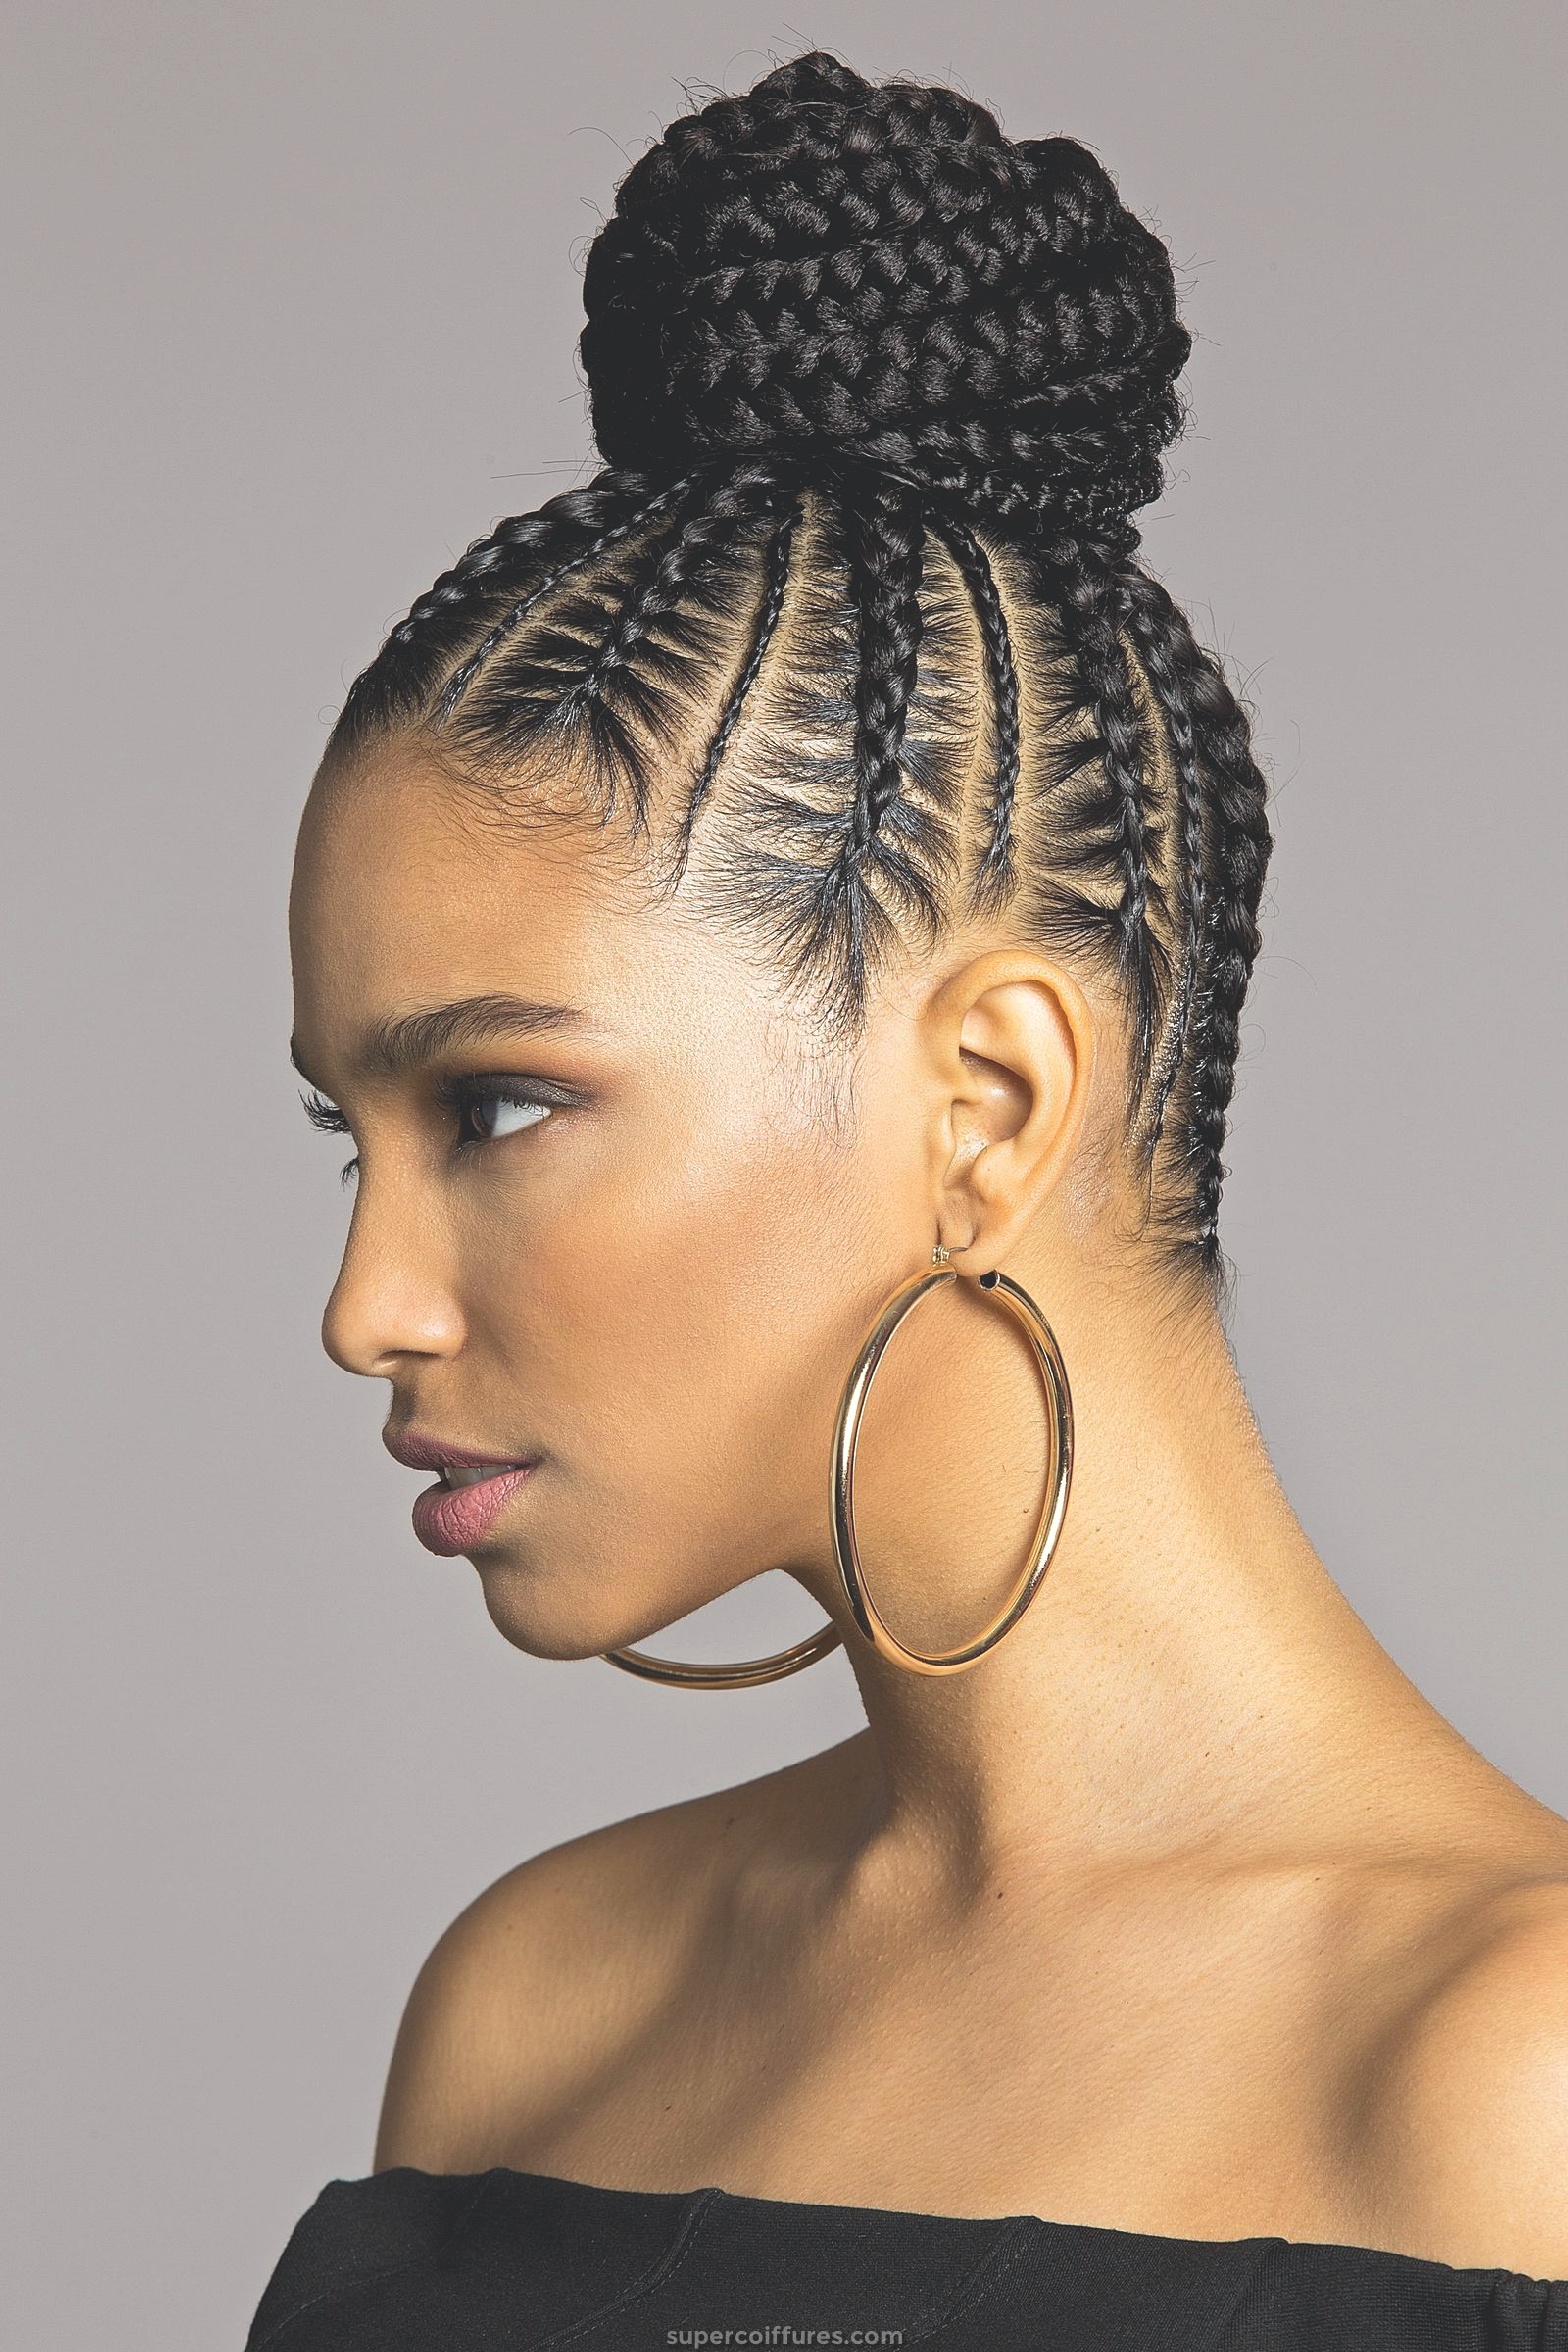
(10) tresses de cornrow
Le nom et l’aspect de cette tresse nous font sentir à quel point les tresses de cornrow sont élaborées. Une fois que vous savez comment faire les rangées, vous pourrez le faire avec perfection. C’est différent des autres tresses parce que c’est fait sur le cuir chevelu. Faire ces tresses demande beaucoup de patience et de temps. Des maigres cornes aux cornes épaisses, vous pouvez en choisir une. Même si vous avez la possibilité d’ajouter des extensions pour les rendre plus belles. Sur cette image, vous pouvez voir les tresses courbées qui sont ensuite assemblées pour former un chignon.
Comment faire des tresses Cornrow:
- Nettoyez bien vos cheveux avec un bon shampooing et un après-shampoing. Ensuite, peignez vos cheveux directement après les avoir séchés avec une serviette.
- Maintenant, vous pouvez diviser vos mèches de cheveux en sections épaisses à l’aide d’un peigne.
- C’est sur vous comment vous voulez que votre cornrow soit. Alors, divisez vos paquets de cornrow en conséquence.
- En général, les cornrows sont fabriqués de l’avant à l’arrière, nous le ferons donc uniquement.
- Maintenant, placez des pinces à cheveux à chaque extrémité des faisceaux de cornrow, en en laissant une qui vous aidera à les maintenir ensemble pendant le tressage de chaque rangée.
- Appliquez de la cire ou de la graisse pour cheveux sur chaque faisceau de cornrow en partant du cuir chevelu jusqu’à la fin du faisceau de cornrow.
- Divisez maintenant le paquet de cornrow qui est non coupé en trois parties égales.
- Maintenant, commencez à tresser en déplaçant le milieu au-dessus du côté gauche, puis le nouveau au milieu, qui était précédemment laissé, au-dessus du côté droit. Tirez fermement vos cheveux.
- Maintenant, continuez à suivre le même processus, ramassez et ajoutez des poils dans le faisceau de cornrow pour en avoir assez pour le tressage.
- Faites du tressage jusqu’à la fin.
- Maintenant, vous devez faire la même chose avec les autres faisceaux de cornrow en tant que Alors, continuez à retirer leur clip un par un et continuez à tresser avec le même processus.
- Vos tresses de cornrow seront prêtes une fois que vous aurez fini de tresser tous les faisceaux de cornrow.
- Si vous souhaitez les laisser comme cela vous pouvez, ou vous pouvez les faire tous dans un chignon également à l’arrière de la tête.
Conseils pour les tresses de cornrow
Utilisez de la cire ou de la graisse pour cheveux avant de commencer le tressage de cornrow. Tirez-les fermement au début du paquet de cornrow après le premier point, pour qu’ils aient l’air beau et parfait. Ils devraient être serrés, alors tirez-les pendant le tressage.
(11) tresses de crochet
Nul doute que cette tresse de cheveux a l’air extrêmement fascinante de la façon dont elle est faite. Mais connaissez-vous un secret sur les tresses au crochet? Les tresses au crochet ne sont pas les vraies tresses, car elles sont les tresses artificielles ajoutées ou placées sur votre tête pour vous donner un magnifique look crochet. Il existe une variété de tresses au crochet disponibles sur le marché de différentes tailles et couleurs, vous pouvez les acheter et apprendre ici comment les placer. En ce qui concerne le look, beaucoup de femmes aiment ce look et il peut être porté sur le lieu de travail, lors d’événements officiels, dans les clubs et les concerts.
Comment faire des tresses au crochet:
- Pour ajouter une extension de tresse au crochet à votre tête, vous devez d’abord effectuer le tressage de l’arc de maïs. Vous pouvez lire à ce sujet ci-dessus.
- Commencez à ajouter les tresses au crochet aux cheveux à l’aide d’une épingle à cheveux ou d’une aiguille à crochet.
- Pour ajouter une tresse au crochet, vous devrez faire glisser l’aiguille au crochet sous la tresse de votre cornrow avec le loquet fermé.
- En ouvrant le loquet, les cheveux doivent être accrochés à l’aiguille. Après cela, fermez le loquet.
- Maintenant, vous devez tirer les cheveux et l’aiguille sous la tresse de cornrow. Assurez-vous de le faire jusqu’à ce que vous voyiez un cerceau se former de taille moyenne.
- Maintenant, vous verrez la boucle d’un côté et la queue d’un autre côté de la tresse de cornrow.
- Vous devez maintenant passer les queues dans la boucle en les repliant sur la tresse de cornrow.
- Mais ne le faites pas serré.
- En utilisant vos doigts, vous devez tordre la boucle.
- Encore une fois, passez la queue dans la boucle, puis resserrez les cheveux en les tirant.
- Maintenant, la première tresse au crochet ou les cheveux au crochet sont sécurisés.
- Faites ceci jusqu’à ce que vous couvriez votre tête complète. Et alors seulement vous serez prêt avec vos tresses au crochet.
Conseils pour les tresses au crochet
Nous vous suggérons de faire appel à un expert au lieu de le faire vous-même si vous le faites pour la première fois. Appliquez de l’huile sur votre tête pour les garder hydratés.

(12) tresse à double texture
Ce type de tresse a l’air très classe car il montre le mélange de deux tresses de styles différents. Comme il peut être fabriqué en utilisant de nombreuses combinaisons, vous pouvez donc porter le regard à différentes occasions. Cette tresse à double texture a l’air dans la photo est très jolie. On peut le porter au collège, à n’importe quelle fête ou événement, en voyage ou pour de nombreuses occasions.
Comment faire une tresse à double texture:
- Tout d’abord, pour ajouter de la texture à vos cheveux, vous devez les friser.
- Maintenant, faites une séparation profonde du côté droit et tirez tous vos cheveux vers l’épaule gauche.
- Choisissez les cheveux du haut de la tête pour faire une tresse française.
- La tresse devrait descendre derrière votre oreille gauche.
- Commencez à ajouter des cheveux à la tresse française en ramassant les cheveux de la racine des cheveux.
- Arrêtez de faire la tresse une fois que vous atteignez la frontière où la tête et le cou se rencontrent, même si les mèches de cheveux sont laissées.
- Assurez-vous que la tresse est serrée, sécurisez-la avec un clip.
- Commencez à faire French Braid à partir des cheveux laissés à droite.
- Mais vous devez faire la tresse en suivant l’arrière du cou jusqu’à ce qu’elle rencontre la première tresse du côté gauche.
- Si les deux tresses se rencontrent maintenant, combinez les cheveux maintenant.
- Faites une tresse en queue de poisson maintenant en combinant les cheveux jusqu’à la fin.
- Vos cheveux à double texture avec la combinaison de tresses en français et en queue de poisson sont prêts, tout comme celui de la photo.
Conseils pour tresse à double texture
Pour rendre cette tresse belle et parfaite, vous pouvez utiliser la laque comme solution de rechange.
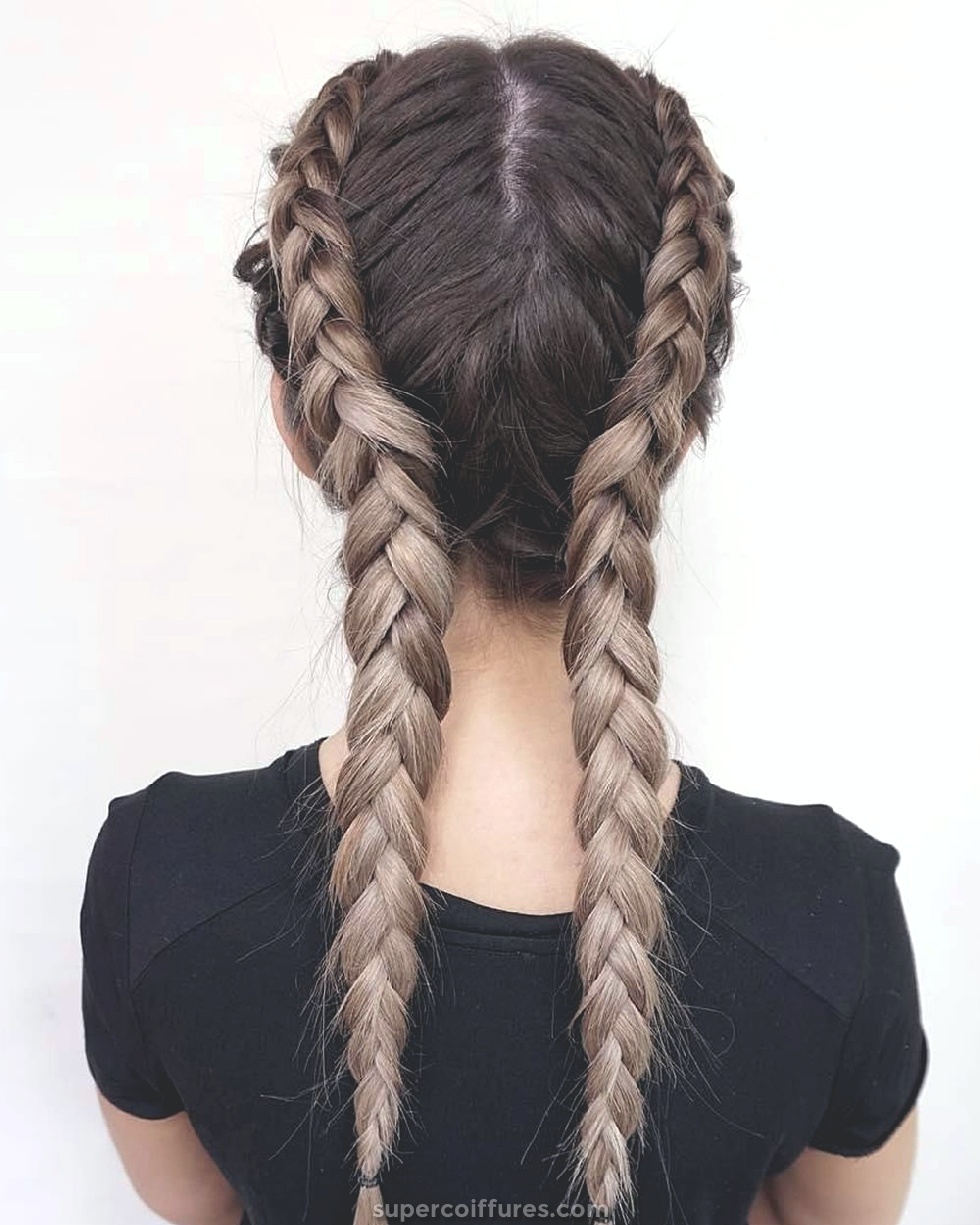
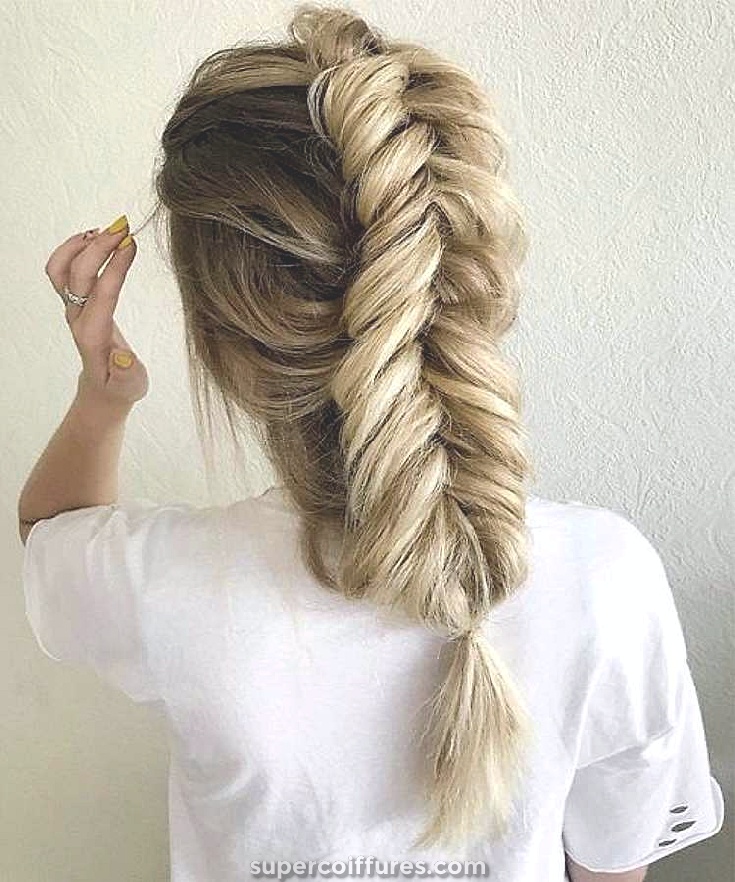
(13) tresses néerlandaises
Un facile à faire une tresse, et ça va bien pour les occasions décontractées. Faire des tresses hollandaises n’est pas une chose très difficile à faire. Et vous obtiendrez de plus en plus de perfection à chaque fois que vous essaierez ceci. Vous obtiendrez un look funky avec cette tresse en seulement 10 minutes. Et la façon dont la fille a réussi à ajouter une nuance de couleur aux tresses en faisant une image plus géniale.
Comment faire des tresses hollandaises tressées:
- Commencez par séparer vos cheveux du milieu de la tête à l’arrière de la tête, en créant deux sections.
- Sécurisez l’une des sections à l’aide d’un clip et nous travaillerons sur l’autre.
- Peignez rapidement l’autre partie pour résoudre les nœuds. Nous allons maintenant commencer la partie tressée.
- Choisissez une petite quantité de mèches de cheveux de la tête avant près de la racine des cheveux et faites-en trois parties.
- Maintenant, vous devez faire un ou deux points de suture sous la tresse.
- À partir du troisième point, commencez à ajouter des cheveux à la tresse, comme dans le tressage français. Mais rappelez-vous, c’est un croisement sous tresse qui ne traverse pas tresse. Donc, vous devez travailler les fils de dessous pas les uns sur les autres.
- Continuez à ajouter des cheveux sur les deux côtés pendant le tressage.
- Assurez-vous que votre tresse se déplace vers l’arrière de la tête en ligne droite.
- Arrêtez-vous une fois que vous atteignez l’arrière de votre tête ou au début du cou.
- Maintenant, sécurisez votre Dutch Braid en utilisant un élastique.
- Retirez la pince à cheveux de l’autre côté et suivez la même procédure de ce côté.
- Assurez-vous que l’autre section tresse également jusqu’au début du cou et fixez-la également avec l’élastique.
- Vos tresses hollandaises sont maintenant terminées.
Conseils pour les tresses néerlandaises
Continuez à ajouter des cheveux à la mèche après le premier ou le deuxième point.
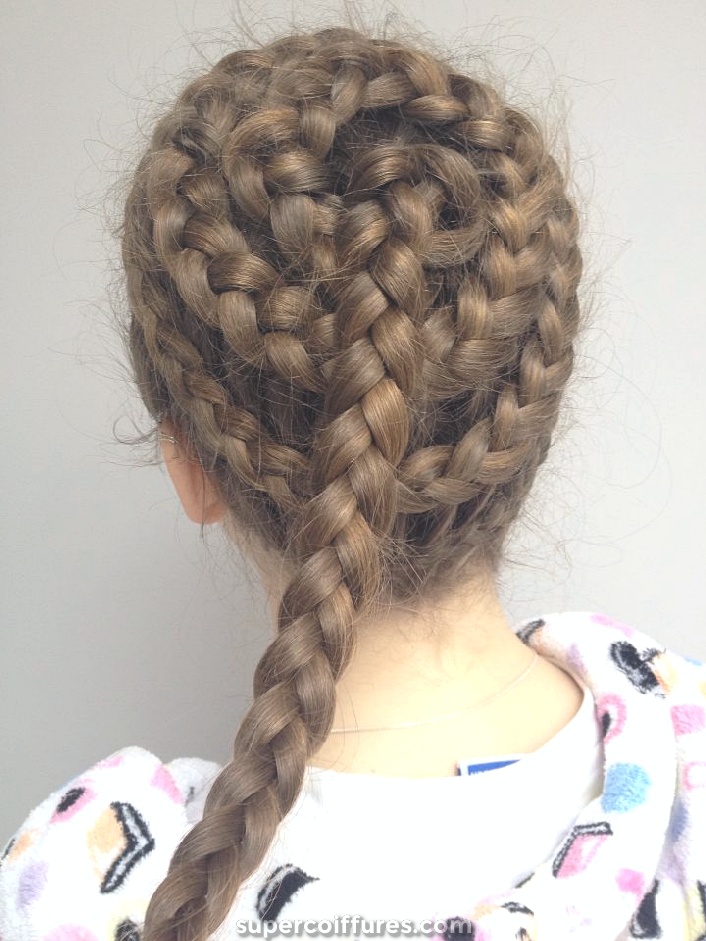
(14) tresse néerlandaise
Tout comme les tresses hollandaises en queue de cochon, la tresse hollandaise simple est également très belle. Ce que nous aimons de Dutch Braid, c’est que vous pouvez le faire facilement par vous-même. Et la tresse néerlandaise peut être faite sur les cheveux longs aussi bien que les cheveux mi-longs aussi, donc c’est un avantage si vous avez les cheveux mi-longs. Une simple tresse hollandaise peut aller avec différentes tenues sur différents événements, du plus décontracté au formel. On peut aussi utiliser ce style au quotidien. Ici, nous allons apprendre à faire les doubles tresses néerlandaises comme sur la photo.
Comment faire Dutch Braid:
- Peignez vos cheveux pour résoudre tous les enchevêtrements, puis faites la partition centrale de manière égale en partant de l’avant vers l’arrière. Donc, maintenant nous aurons 2 sections de cheveux égaux.
- À l’aide d’un élastique, sécurisez une section. Et laissez l’autre section être lâche.
- La mèche de cheveux qui est ouverte, nous allons commencer à en faire Dutch Dutch.
- Choisissez des mèches de cheveux sur le devant de la tête. Divisez les brins en 3 sections de manière égale.
- Maintenant, prenez le volet du milieu et traversez-le sous le volet de gauche. Maintenant, le brin gauche va se situer entre les deux.
- Vous devez maintenant choisir le brin gauche qui se trouve entre les deux et le croiser sous le brin droit.
- Répétez cette étape une fois de plus en croisant les brins intermédiaires sous les brins des deux côtés.
- Avant de commencer le troisième point, ajoutez des cheveux sur le brin latéral sous lequel vous croiserez le mi-brin. Donc, ce devrait être le brin gauche.
- Maintenant, faites-le également en ajoutant des cheveux sur le brin droit.
- Alors, continuez à tresser comme ceci uniquement en ajoutant des poils sur les deux côtés et en croisant le mèche sous les mèches latérales.
- Votre tresse ira vers l’arrière de la tête.
- Si vous n’avez plus de cheveux à ajouter dans la tresse, faites la croix normale sous le tressage jusqu’à la fin. Et attachez ensuite à la fin avec un élastique.
- Déclippez l’autre section de cheveux et suivez les mêmes étapes avec cette section de cheveux également.
- De même, fixez cette tresse également à la fin à l’aide de l’élastique.
- Les doubles tresses hollandaises sont ici.
Conseils pour Dutch Braid
Assurez-vous d’ajouter les cheveux uniformément des deux côtés lors du tressage, sinon ils auront l’air bizarre.
(15) tresse de poisson hollandaise
Une autre tresse hollandaise, avec le style Fishtail. Comme vous pouvez le constater, il s’agit d’une tresse en queue de poisson hollandaise qui ressemble à une tresse classique. Les tresses hollandaises nous fournissent différentes variétés de tresses qui peuvent résoudre notre problème pour chaque occasion. Désormais, qu’il s’agisse de vos projets de voyage avec vos amis ou de votre envie d’organiser un bal de fin d’année ou un concert, vous aurez l’air superbe avec cette coiffure tressée.
Comment faire une tresse de poisson hollandaise:
- Séparez les cheveux et peignez-vous bien avant de commencer le tressage.
- Maintenant, prenez un côté des cheveux et choisissez les cheveux près de la racine de vos cheveux et divisez-les en trois mèches égales pour obtenir une tresse hollandaise. Votre tresse devrait aller derrière votre oreille au moins 1 pouce au-dessus d’elle.
- Faites la tresse hollandaise jusqu’à la nuque et ramenez-la de l’autre côté de l’arrière.
- De plus, amenez les cheveux laissés de ce côté de l’autre côté seulement.
- Et maintenant, commencez à en faire une tresse en queue de poisson.
- Vous devez le faire en utilisant deux sections de cheveux. Après cela, ajoutez une mèche de cheveux mince à l’extérieur des cheveux du côté gauche.
- Placez les cheveux sur la tresse en queue de poisson en la combinant avec les cheveux de la section gauche.
- De la même manière, amenez les mèches de cheveux de l’extérieur des poils droits. Et placez-le sur la tresse en le combinant uniquement avec le mèche de cheveux de la section gauche.
- Sécuriser la tresse des cheveux en utilisant un élastique.
- Ébouriffez la tresse hollandaise en écartant doucement les tresses des tresses.
- Faites la même chose avec la tresse en queue de poisson aussi, en la tirant légèrement.
- Vous allez maintenant avoir une tresse de poisson hollandaise parfaite.
Conseils pour tresse de poisson néerlandais
Cela aura l’air bien que si vous avez les cheveux longs. Laissez quelques mèches de cheveux au niveau des tempes pour donner une forme à votre visage.
(16) tresse en spirale néerlandaise
La combinaison des deux tresses aura fière allure, mais ce n’est pas si facile à faire. Les tresses spiralées néerlandaises peuvent être formées de nombreuses façons. Il peut également être transformé en un boudin tressé en spirale hollandais. Ou peut être laissé comme une queue de cheval dans l’image. Nous ne le suggérerions pas pour un événement officiel. Mais vous pouvez l’essayer au quotidien, ou lors des fêtes de chatons, des anniversaires ou des soirées entre filles comme des événements.
Comment faire Dutch Spiral Braid:
- Avant de commencer à faire cette tresse, assurez-vous que vos cheveux ne sont pas gras et qu’ils sont correctement nettoyés avec un shampooing. Faites le conditionnement des cheveux aussi.
- Séchez bien vos cheveux puis démêlez-les à l’aide d’un peigne.
- À l’aide de votre peigne uniquement, localisez le centre de votre tête, puis prenez une petite quantité de mèche de cheveux exactement au milieu de la tête.
- Maintenant, vous devez faire une tresse hollandaise, alors divisez-la en trois parties égales.
- Nous avons déjà mentionné ci-dessus comment faire une tresse néerlandaise.
- Ajoutez les petites mèches de cheveux à votre tresse hollandaise tout en tressant dans un mouvement circulaire.
- You will see, that spiral shape is already building.
- Keep braiding till your reach the end and then tie it with an elastic band.
- Now it’s your wish either you can add the extra braid by passing it along the circular braid you have created to make it spiral and can then secure it using Bobby Pins. It will be a Dutch Spiral Braid Bun.
- Or you can tuck the extra braid at the center or at the back from the head and leaving it in the ponytail form. Tuck the hair coming out from the spiral braid on the head using hair pins.
Tips for Dutch Spiral Braid
If you want to keep this braid for a long time, it is better to put hairspray, once you finish it off.
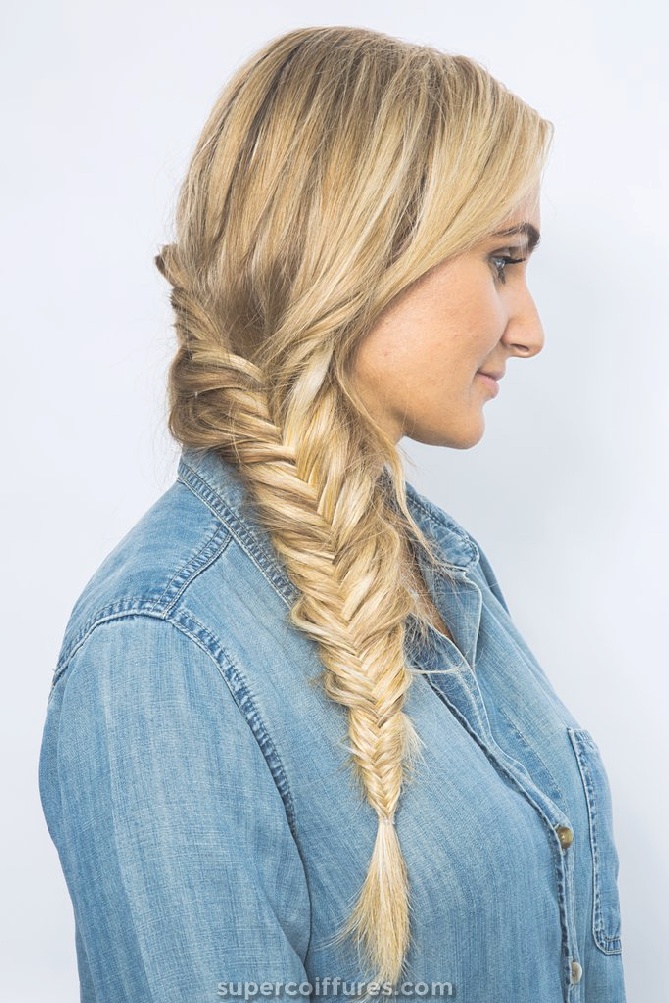
(17) Fishtail Braids
Fishtail Braids look really very attractive if done properly. Especially those done with the thick plaits are really admirable because of the elegance they carry. Many people even after trying for a number of times are not able to do the fishtail braiding neatly. It comes in the category of braids, which one can carry with almost every outfit and on every occasion.
How to do Fishtail Braids:
- To start the fishtail braid, first untangle your hair properly by combing.
- Now take your hair together, bring it to the back of the head and make a low ponytail by tying it.
- Split the hair of your low ponytail into 2 equal sections.
- Now to make the fishtail braid, pick hair from the back of the right-side section. Cross this hair strand over the left-side section.
- Pick hair from the back of the left-side section and cross it over the right-side section.
- Keep repeating the same steps by moving downwards. Secure your hair using an elastic band at the mid-length.
- Again, start the plaiting in a similar way, this time pulling hair more tightly for a tidy finish.
- When you will reach the end, again secure your hair with an elastic band.
- With the help of a scissor, cut the elastic band you used at the top for tying your hair into a ponytail.
- If required, you can gently pull plaits a little bit away. Or else let it be like that only.
- You will now get a beautiful fishtail braid.
Tips for Fishtail Braids
Use elastic band only, so that you can cut it easily. Pull hair tightly to give the braid a perfect look. For avoiding and saving hair from flying or coming out, you can use a hairspray.
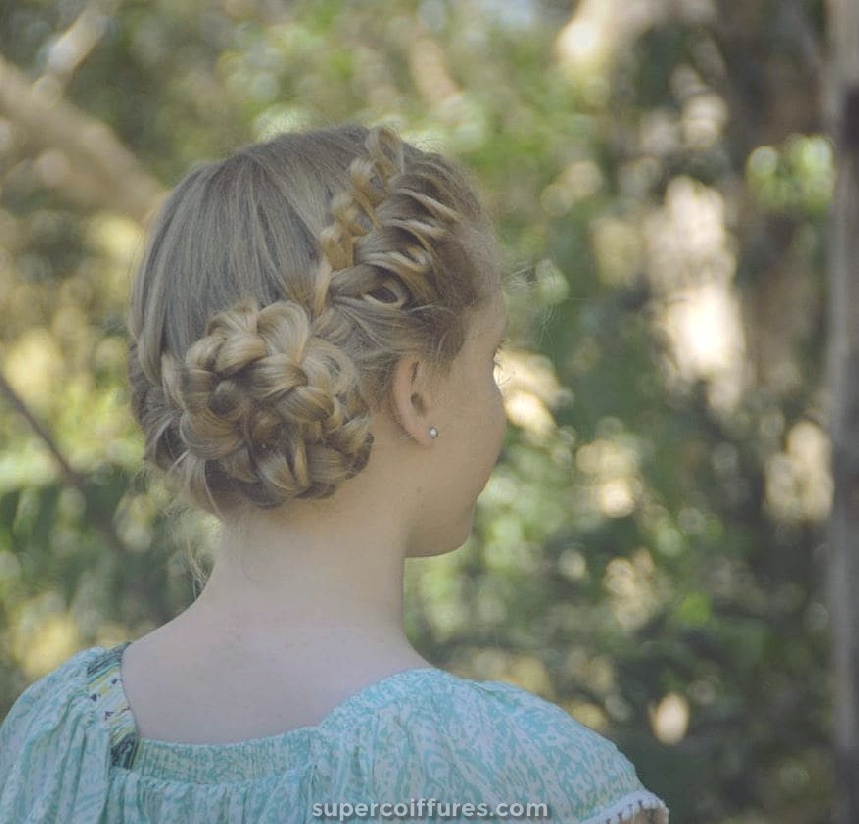
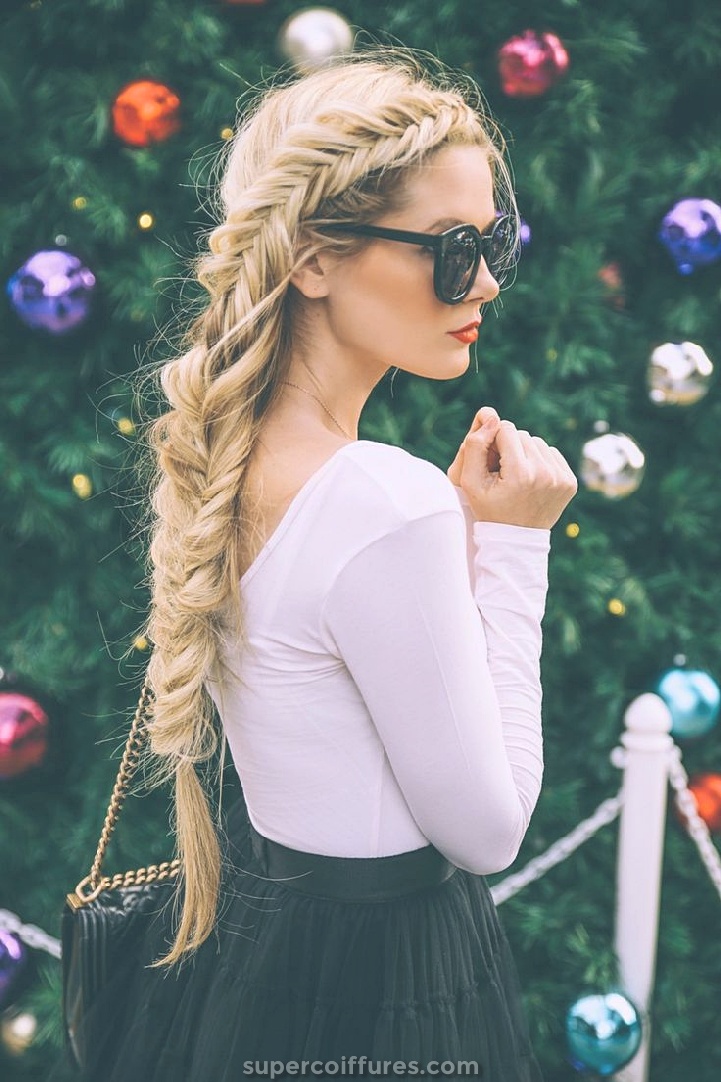
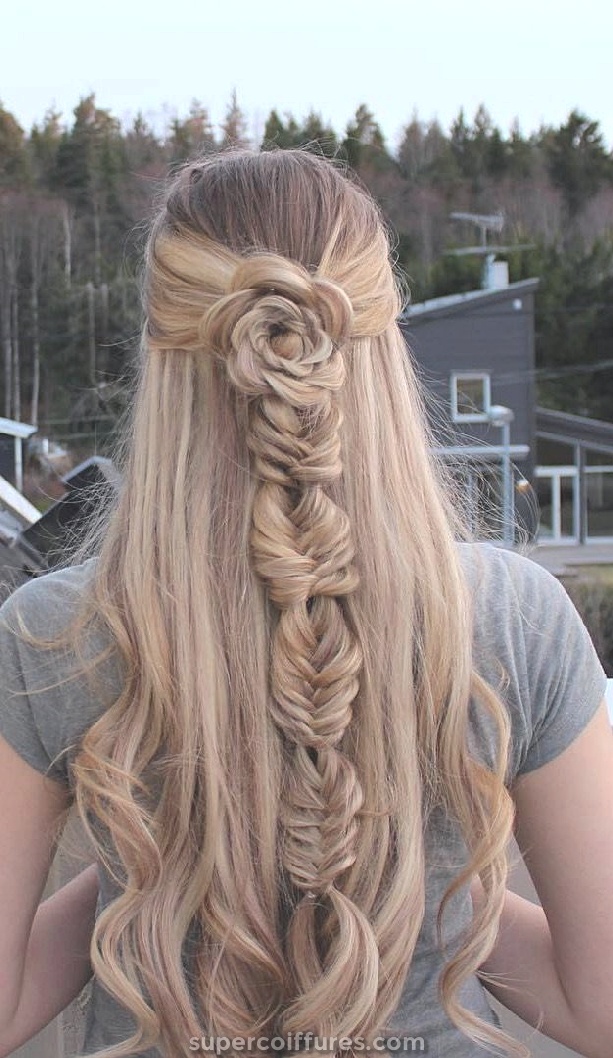
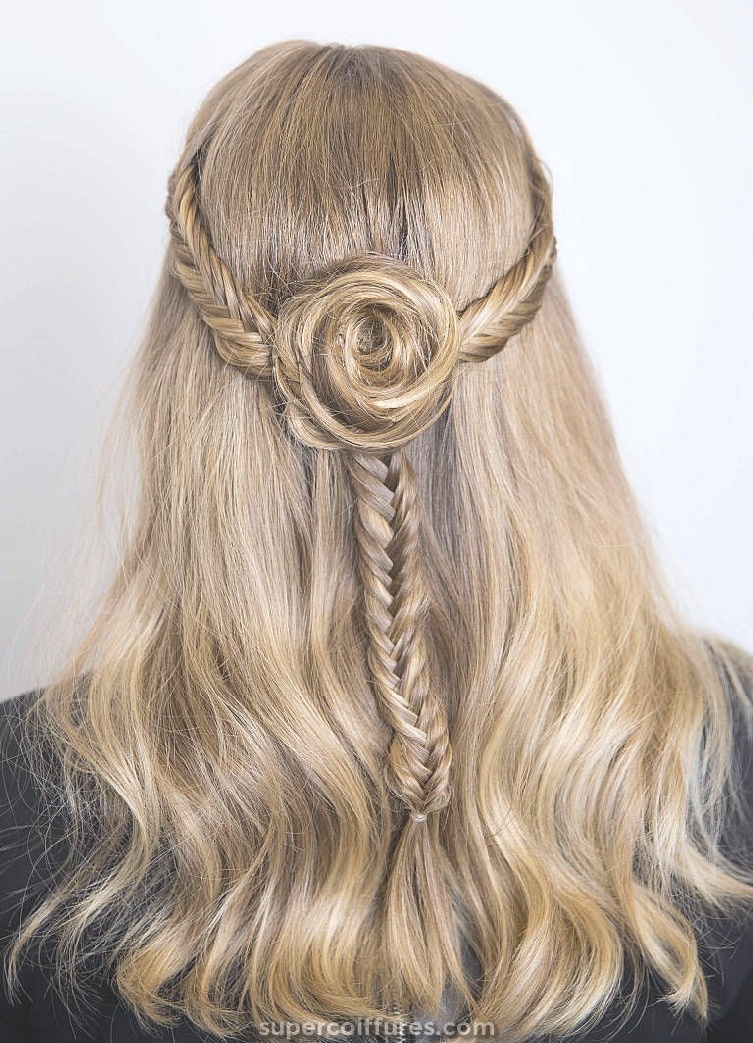
(18) Fishtail Flower Braid
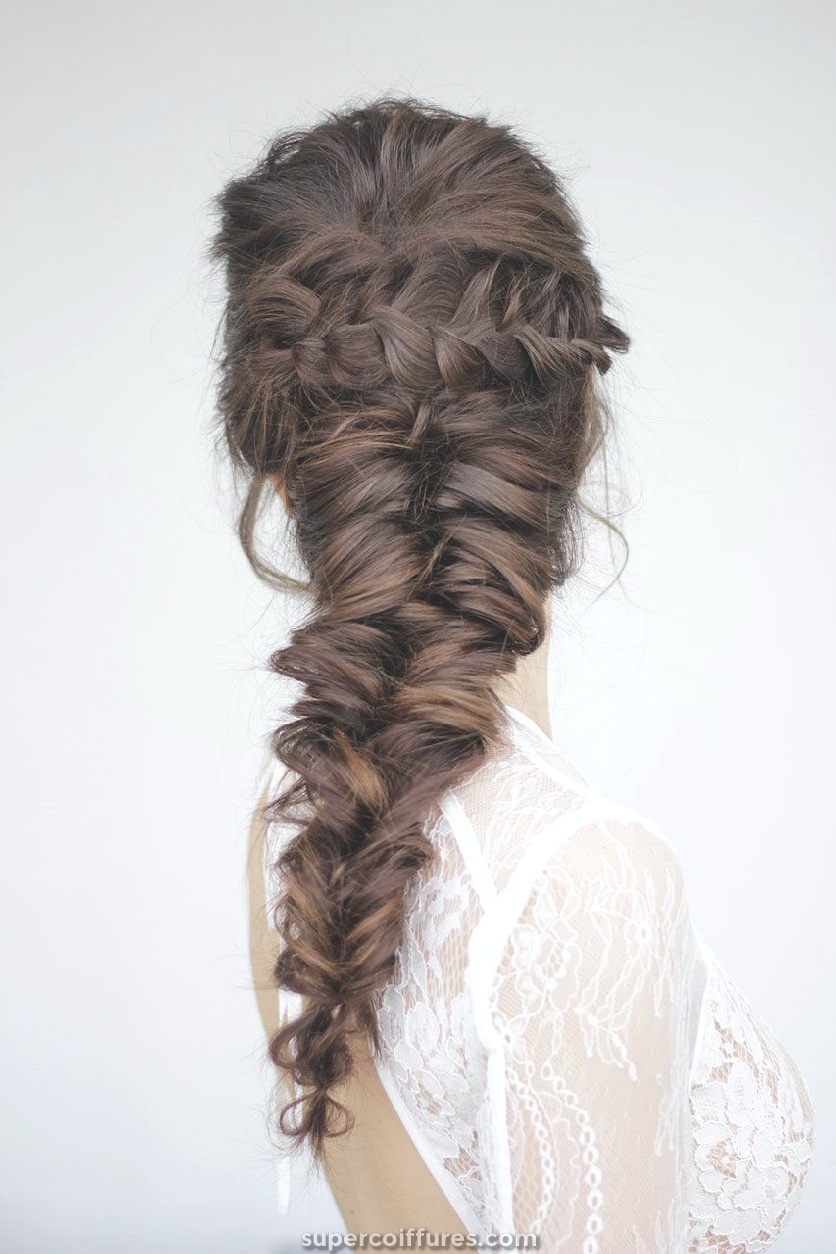
This hair braid style looks lovely for all the occasions and parties. You will catch many eyes looking at you and many women talking about your hairstyle. If you have long hair, you can go for this Fishtail Flower Braid without any doubt. It is not very easy to do but also not the difficult one. With patience, you will surely be able to do this.
How to do Fishtail Flower Braid:
- Firstly, comb all your hair towards the back.
- Then take some hair strands from the right side and some from the left side. And tie them together at the back with the elastic band.
- Start making a three-strand braid now, with the help of which we will make the flower.
- Once you are done with making a three-strand braid, tie it using an elastic band after pulling one side’s braid to add volume to the braid.
- Start rolling the braid, in the shape of a cinnamon bun.
- Make sure that the side having more volume should be kept out.
- This will look like a flower, which is arranged by rolling up the braid from the end. It should be in a round shape.
- To secure the flower braid, tuck it at the place using bobby pins.
- Now pick some hair strands below the flower braid bun. And divide it into two sections.
- You have to now make a fishtail braid.
- Bring an outer strand from the right and cross it over left. And add it to left section hair only.
- In a similar way, pick an outer strand from the left and cross it over right. After that join it to the right section of hair.
- Don’t pull hair very tightly, as we need not make a tight fishtail braid. Repeat it again and again. While reaching too few inches, you can tie an elastic band to the braid.
- Again, start fishtail braiding as you did in the above steps. Depending on the length of your hair, you can divide your fishtail braid in 3 to 4 fishtails braid sections by securing with elastic bands and then doing braiding as we told you in the above step and in this step.
- Once you reach the end, you can tie your fishtail braid using a hair tie.
- You will love this style of fishtail flower braiding.
Tips for Fishtail Flower Braid
Do not make the braid very tightly, as it should look full of volume. Spray hairspray on your fishtail flower braid, so that hair should not come out of the flower braid bun and fishtail braid.
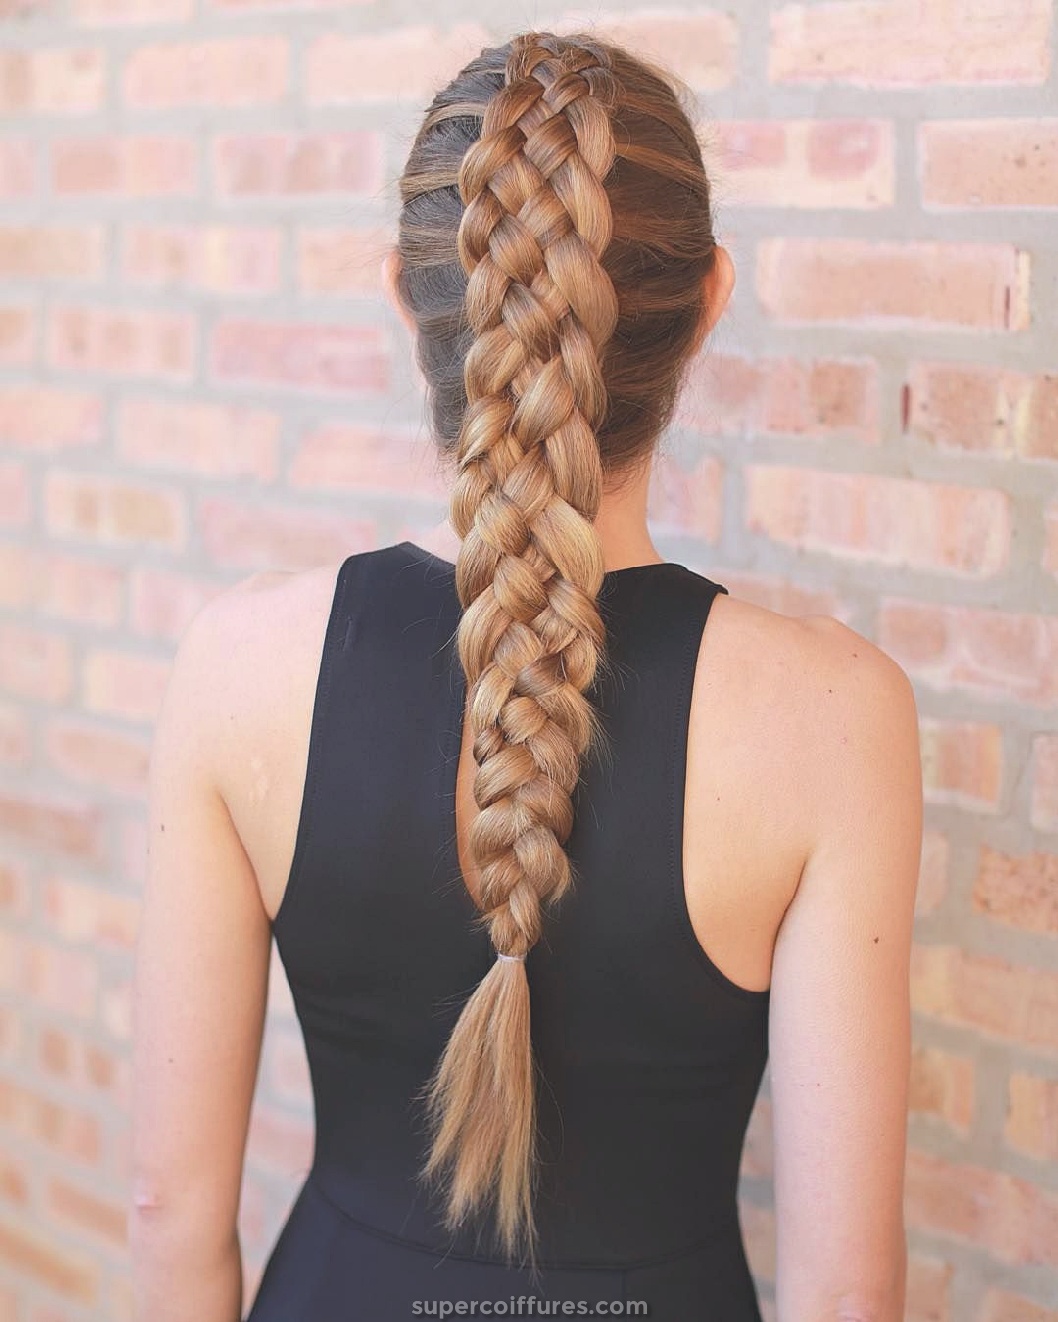
(19) Five Strand Braid
Are you bored of the typical three-strand braid? Then here, we bring for you the five-strand braid. It does look like a tricky hair braid style. And is not that easy to do. So, if you want to get this braid done, you can even ask any expert who can do the Five Strand Braid neatly. Like the one in the picture, you can make a bun from it at the back of your head or can simply let it loose.
How to do Five Strand Braid:
- Part the hair from the front from mid as we have to make two five-strand braids.
- Take hair from one of the sides and make five section out of it. So, as you have to make five sections out of it, take thick hair strands.
- Start braiding by taking the three middle strands and then making a stitch of the regular three-strand braid.
- Now we have to take the two side strands from the three strands braid.
- Pull the left-side strand of three strands braids over the extreme left strand which is not being used yet.
- Similarly, pull the right-side strand of three strands over the extreme right strand which is not being used yet.
- In a similar manner, keep braiding the three-strand braid first and then pulling the side braids of three strand over the extreme side braids of each side, as mentioned above.
- Make the braid 1-inch above the ear and keep doing it till you finish the braid. After that tie the braid.
- Now, take the thick hair section from the other side, and divide it into 5 strands equally.
- Braid this section also, just like you did the previous one till you finish it.
- If you wish to keep the braids like the five strand pigtails braid you can.
- Or you can fold them and make the bun out of the braids by tucking both side five-strand braids at the back of the lower head.
Tips for Five Strand Braid
If you want a thick five strand braid to choose thick hair strands. And if you want a sleek five strand braid, then you can take less hair.
(20) Four Strand Braid
If you do not want to spend much time in braiding your hair but want to look good, then the Four Strand Braid is for you. Just slay with the Four Strand Braid look. It can be worn normally also or at the workplace. And if talking about casual parties or travel plans, then also you can go with this look.
How to do Four Strand Braid:
- Comb your hair to the back of your head. And then gather all the hair in a ponytail shape.
- Divide it into 4 hair strands as we are doing a Four Strand Braid.
- Start with the strands in the middle. So, there are 2 strands in the middle.
- Now, bring the hair strand on the left corner under the two middle strands.
- The left middle strand will become the corner strand on the left side. And the second middle strand will become the left middle strand.
- Place the third strand from the left over the second strand from the left.
- Now, bring the strand to the right corner under the 2 middle strands.
- So again, the right middle strand will become right corner strand. And you have to place the third strand from the right over the second strand from the right.
- Repeat the above steps again for both the sides one by one until you reach the end.
- Secure the Four Strand Braid using the elastic and your braid will be ready.
Tips for Four Strand Braid
If you want to do the four strand braid exactly like the one in the picture, so you have to keep adding the hair from outside to the side strand when you take it underneath for both sides.
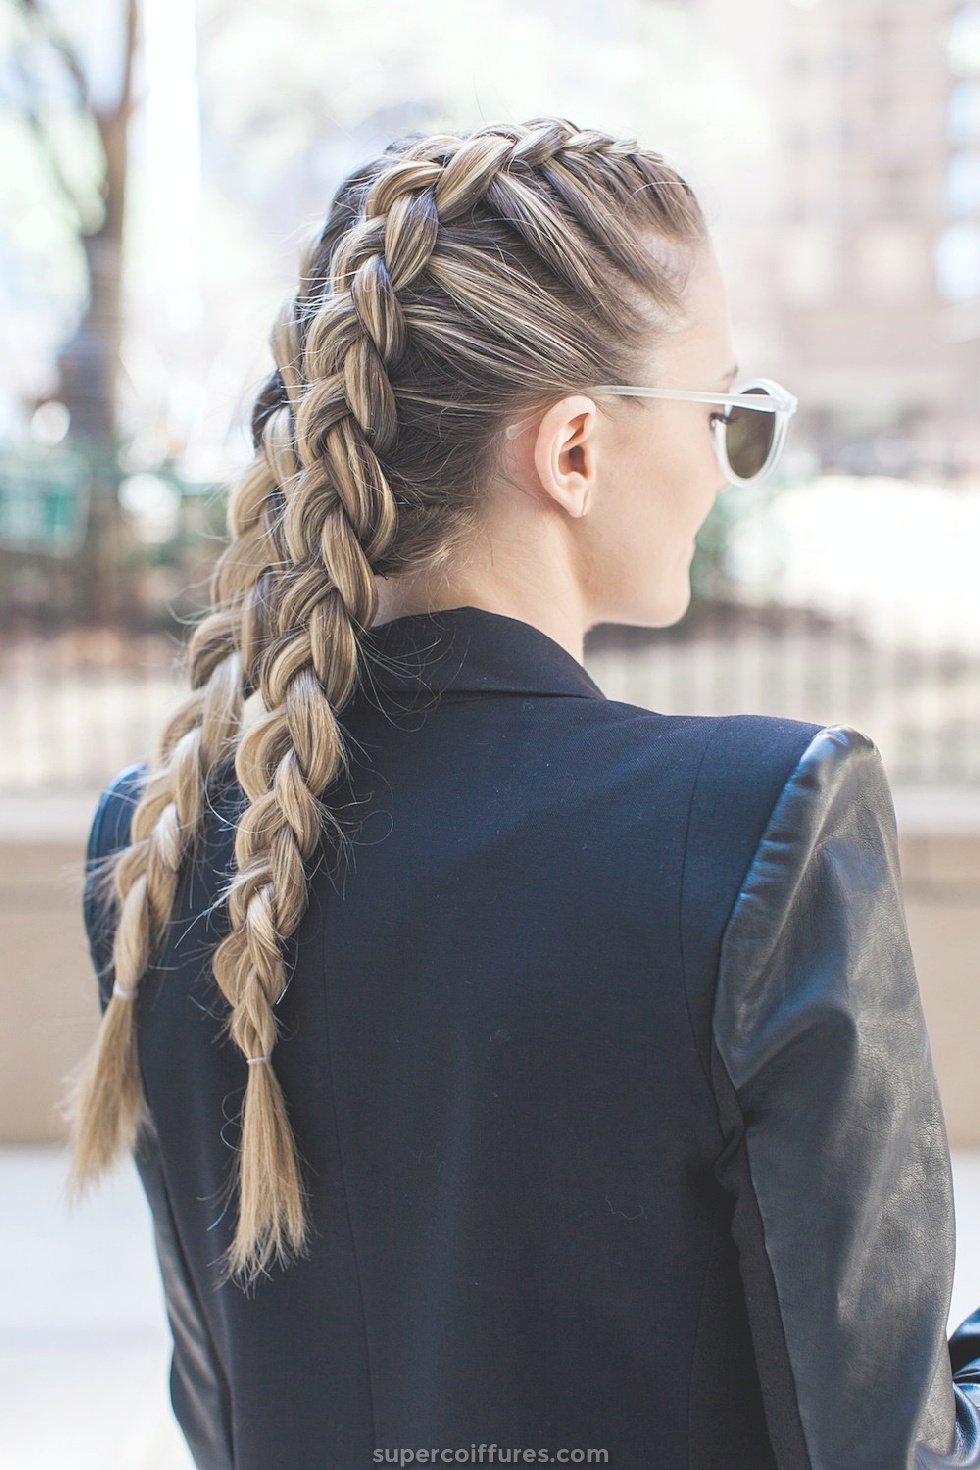
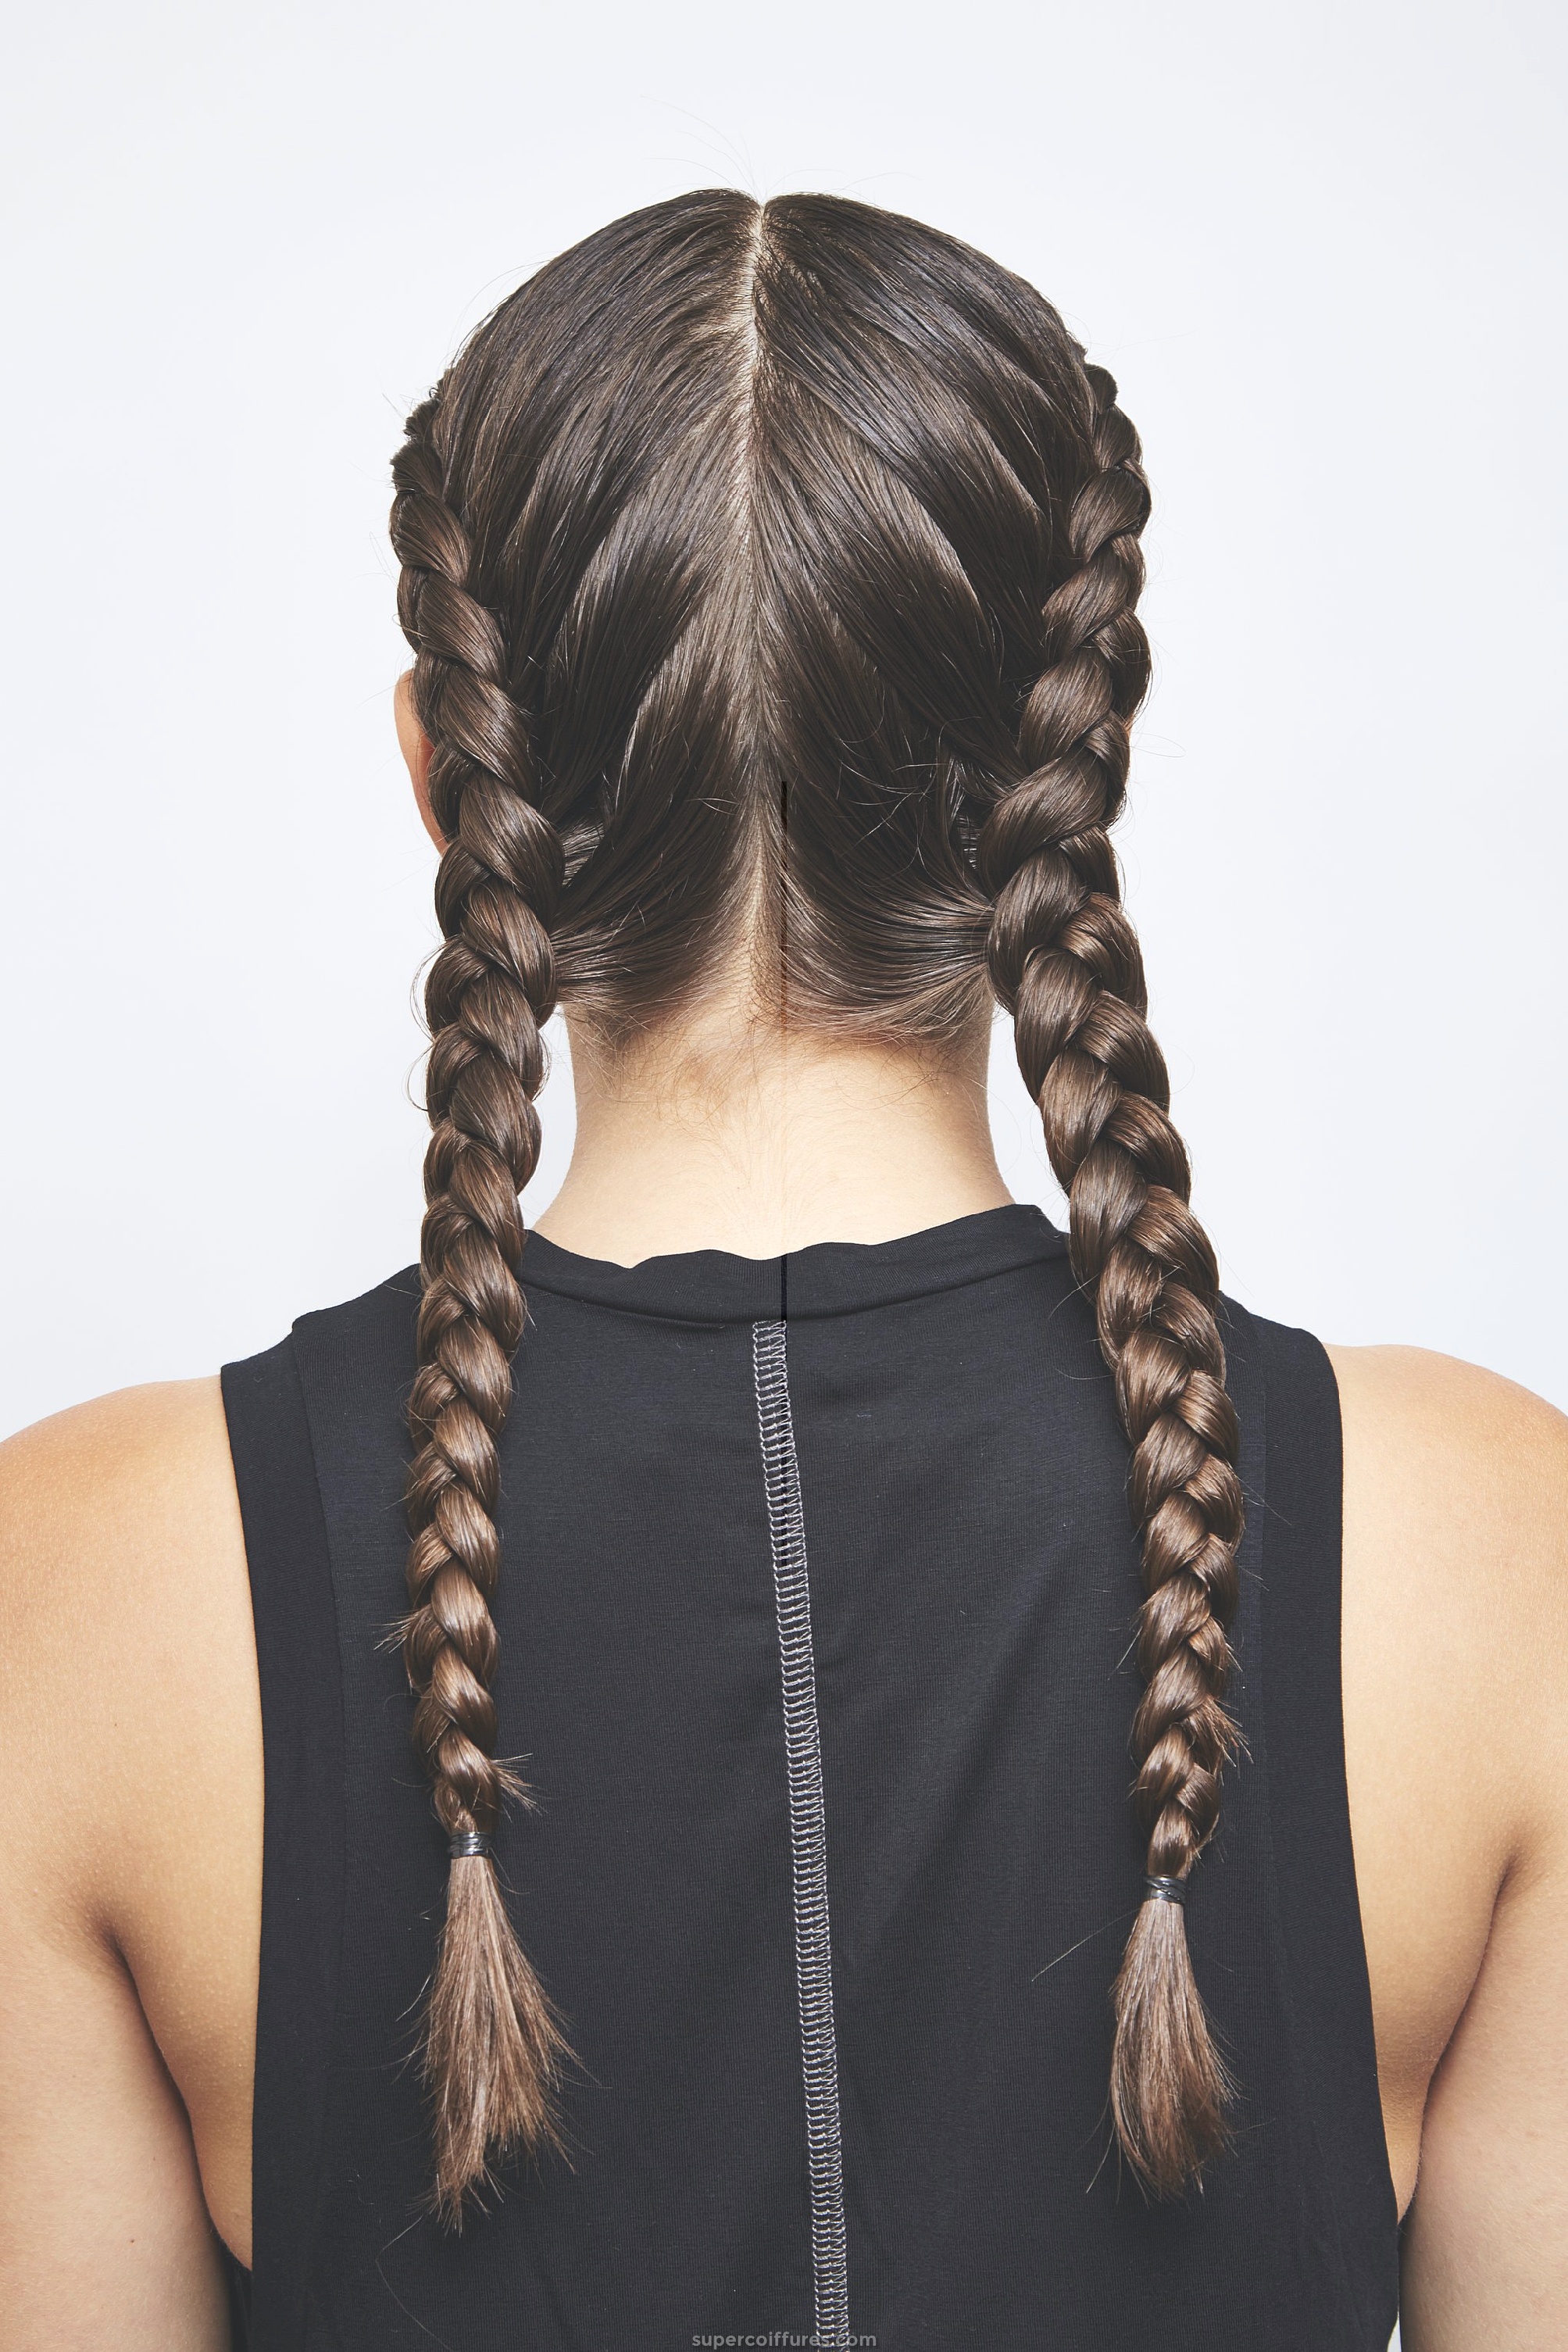
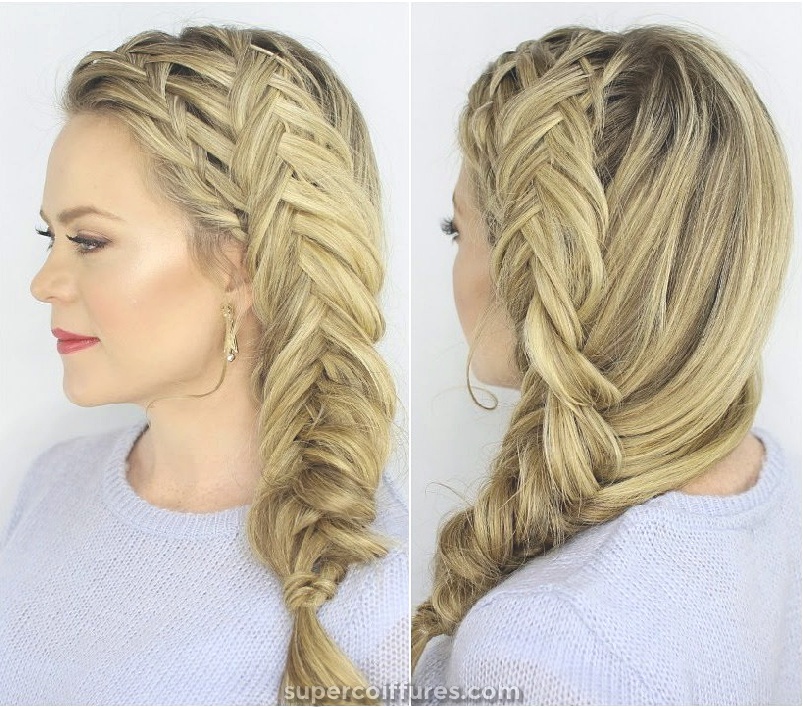
(21) French Braid
French Braid is favorite of many women. And it is one classic braid style which every woman can carry easily with medium to long hair. It is one of those hairstyles which are in for every occasion. Be it a wedding party, or socializing in the club, or even at the workplace as well. As you will look at the picture, you can see two French Braids. So here, we will tell you how to make these pigtail style two French braids.
How to do French Braid:
- Comb your hair, so that no knots are left. And then part your hair from mid from front head to back head till the neck. The partition should be straight without any zig-zag in between.
- Now, using a hair band tie the hair of one side, so that it does not come in between when you will do the French Braid of another side.
- Comb the hair of another side in an upward direction, away from your head.
- Once you finish combing, divide the hair at the top into three sections using your hand.
- As you have 3 sections now, start making the braid by adding some hair to one of the sections at the corner. And cross that section above the middle section making it in middle and the middle section will now be at the corner.
- In a similar way, add some hair to the other corner section and bring it over the hair section which is in the middle. And middle section at the place of that corner.
- Continue doing this by adding some amount of hair to both the corner section and making them cross over the hair section in the middle.
- Do it till you reach the end of the braid and tie it using a hair band at the bottom.
- Open the hair of another side, which you tied earlier.
- Repeat the same steps on that side also for making a French braid.
- Your two side French Braids are ready now.
Tips for French Braid
Use some hair gel before making the French Braid, so that it looks perfect without any hair coming out. While making the braid, make sure it is tight by pulling the hair of both the corner section and middle section tightly. After both the sides of French Braids are done, use a hairspray to prevent hair from flying and coming out of the braids.
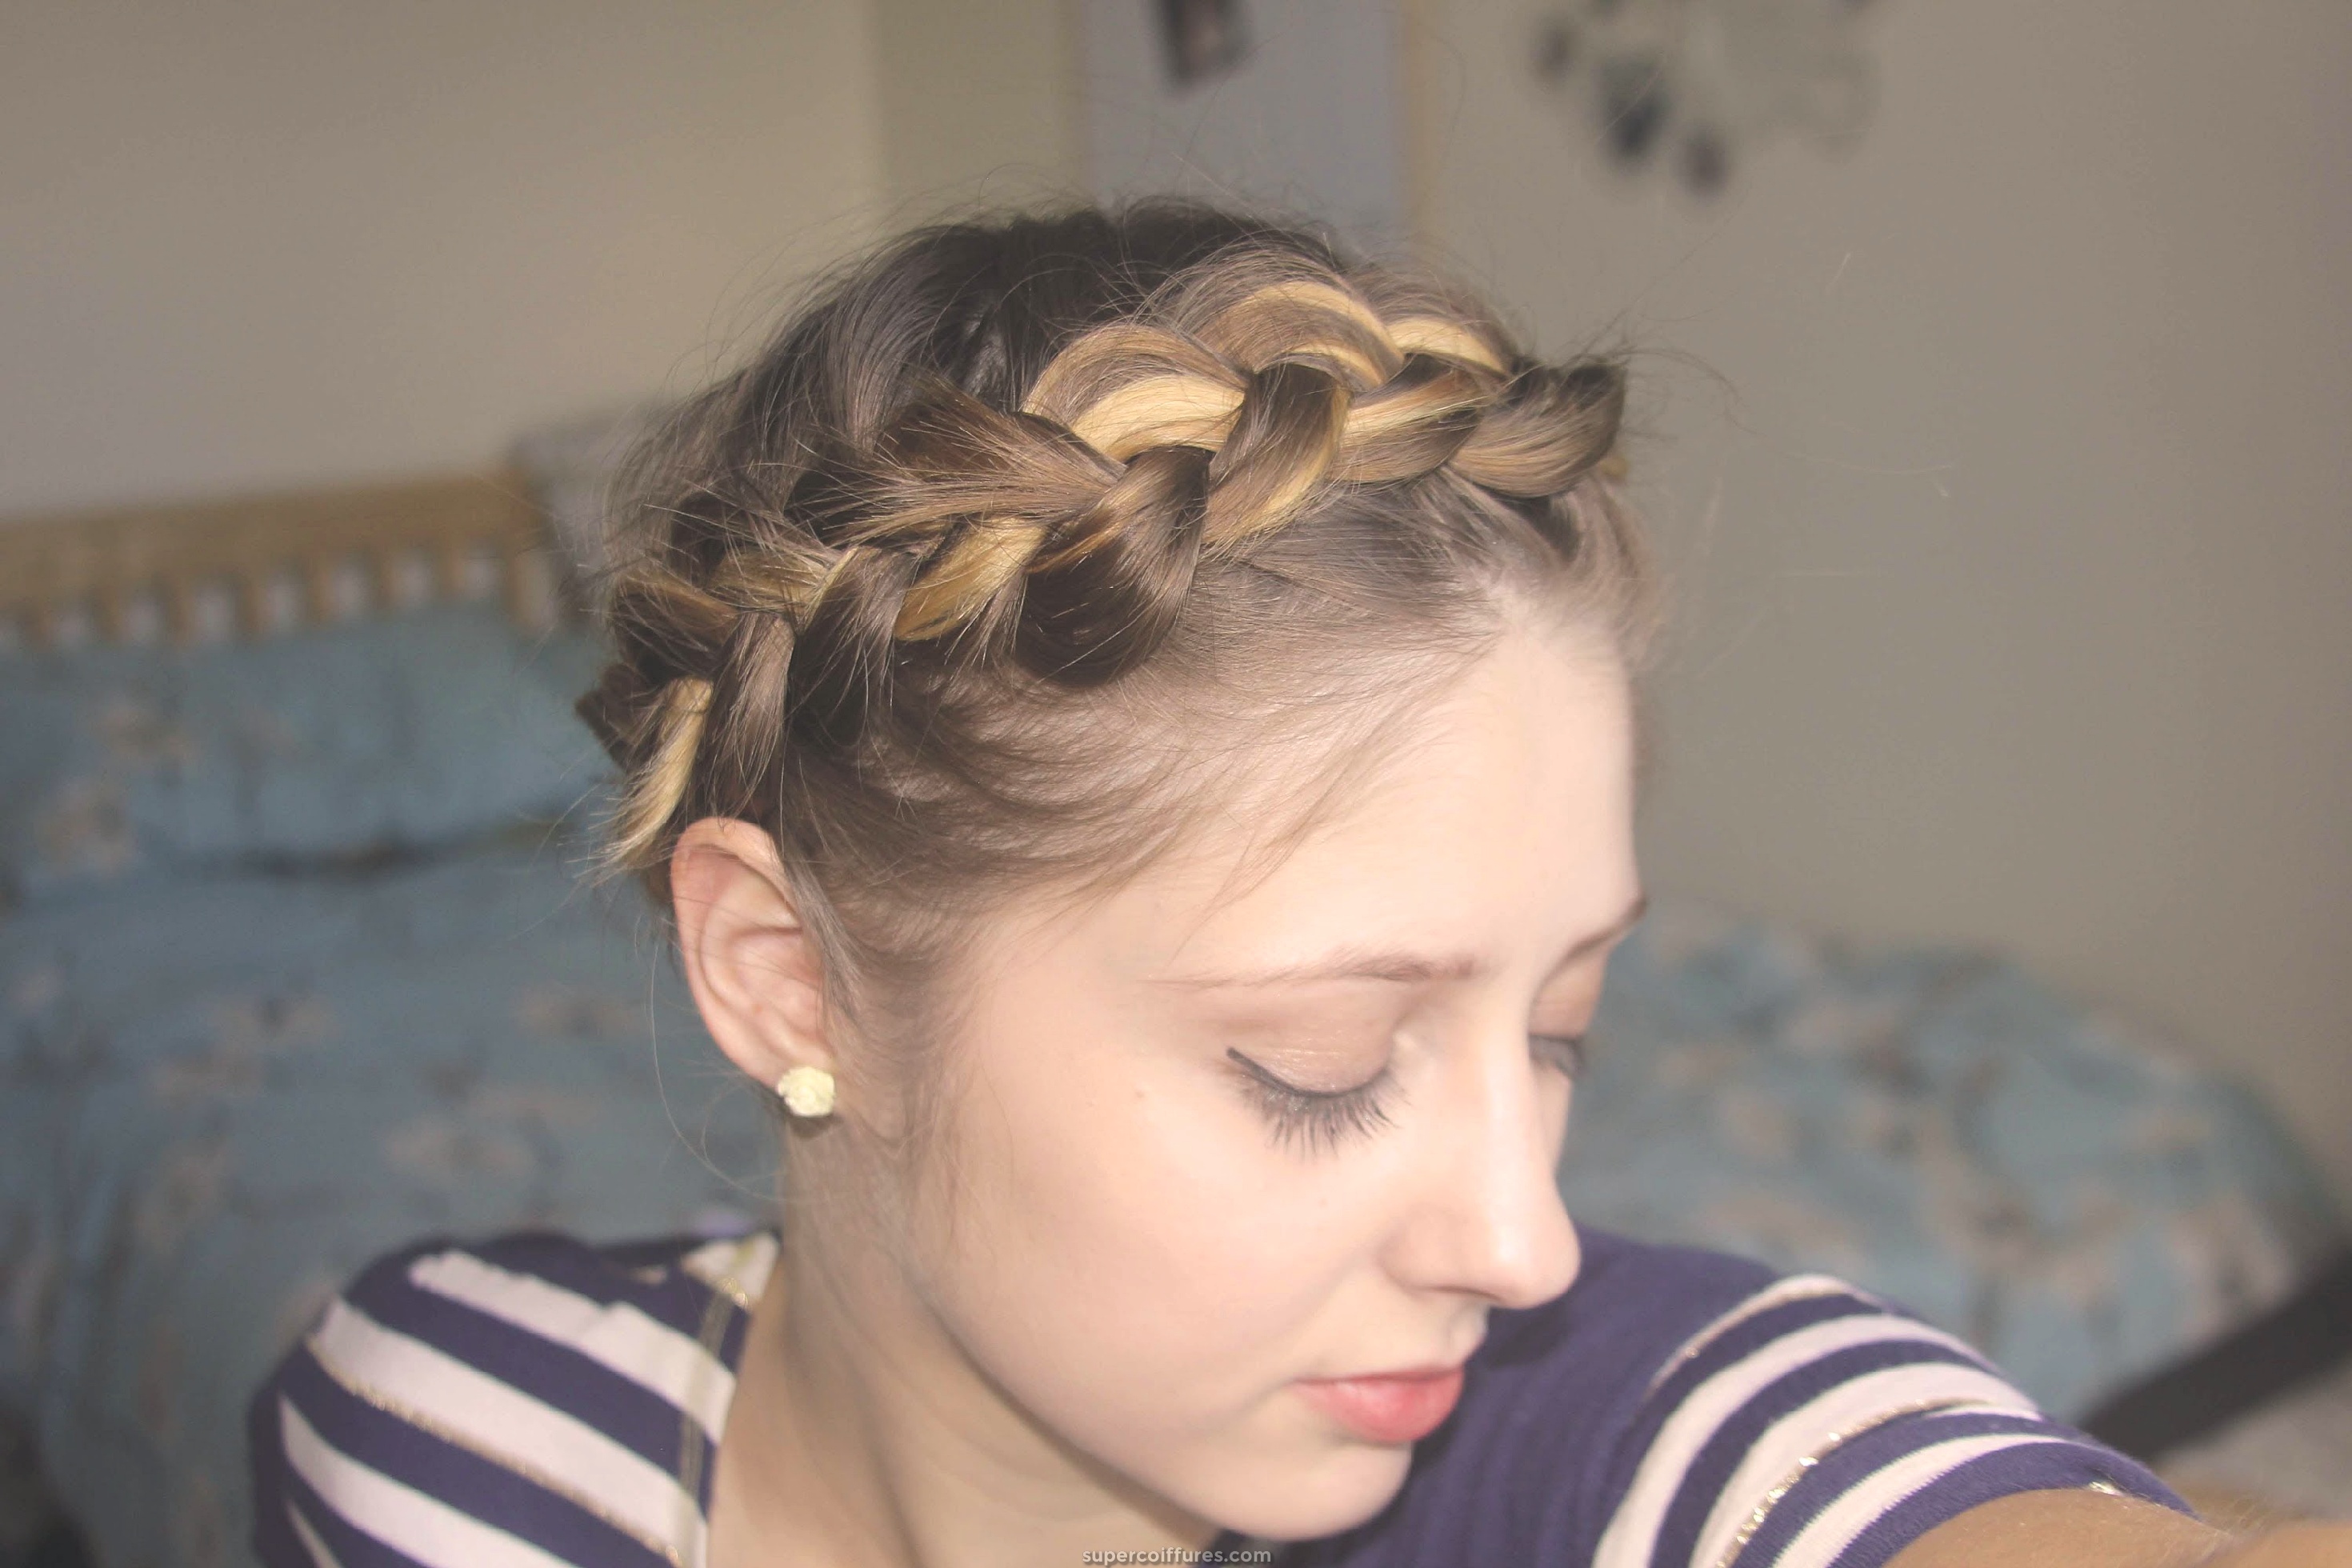
(22) French Crown Braid
This braid style is a bit complicated one. And it’s not easy or possible to do this hair braid style alone. You will need a helping hand or someone else to make this French Crown Braid on your head. But once it’s done, it looks amazing and very stylish. Wearing this kind of hair braid with a party gown or by a cool chic is going to give a very glamorous look. But it is not possible to make it with the short or middle length hair, as it will look good on the one with long hair.
How to do French Crown Braid:
- As we say in every hairstyle, comb your hair from root to bottom, making them smooth without any knots.
- In this hairstyle we will need more of hair from the center, so comb the hair from the center only making half of the front hair coming all over the face or hanging in front of the face.
- Do partition of the hair from the center corner of one side or you can choose the left side above the ear. The hair will be parted in a way, like hair above the ear at the front and below the hair at back.
- From the hair above the left ear, take hair and divide it into three sections to make French braid.
- Start making French braid as we mentioned in the previous braid hairstyle. Remember, that you have to keep adding the hair from the center.
- The braid should go from the left ear to the front head around the center of the head.
- Continue making the French Braid around the head going from front head to right ear, and then back side of the head. While making the braid, make sure you do not miss on adding hair from the center head.
- Once, you reach the original position from where you started your braid, you can now make a normal braid with the hair which is left.
- Now tie the braid using a rubber band and pin it up using the bobby pins behind French Braid.
- Your French Crown Braid is now ready.
Tips for French Crown Braid
Do not forget to add the hair from the center. And to get a neat French Crown Braid, apply some hairspray or hair gel before doing this hairstyle.
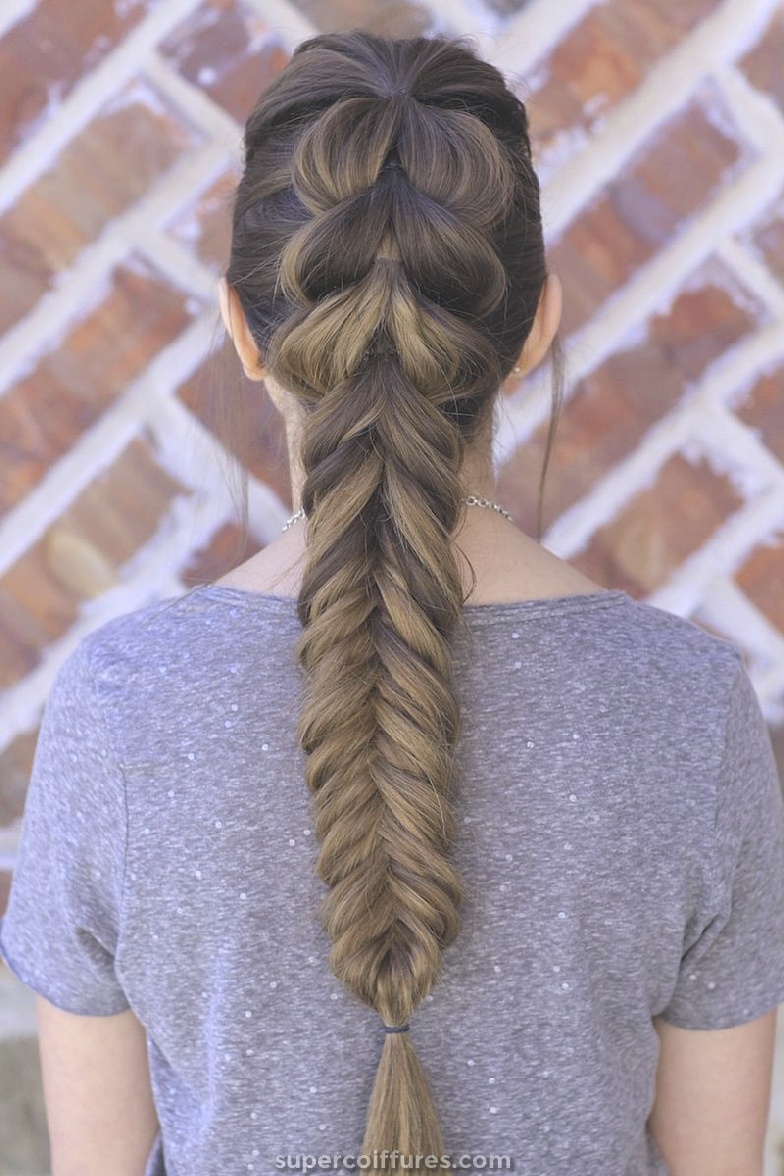
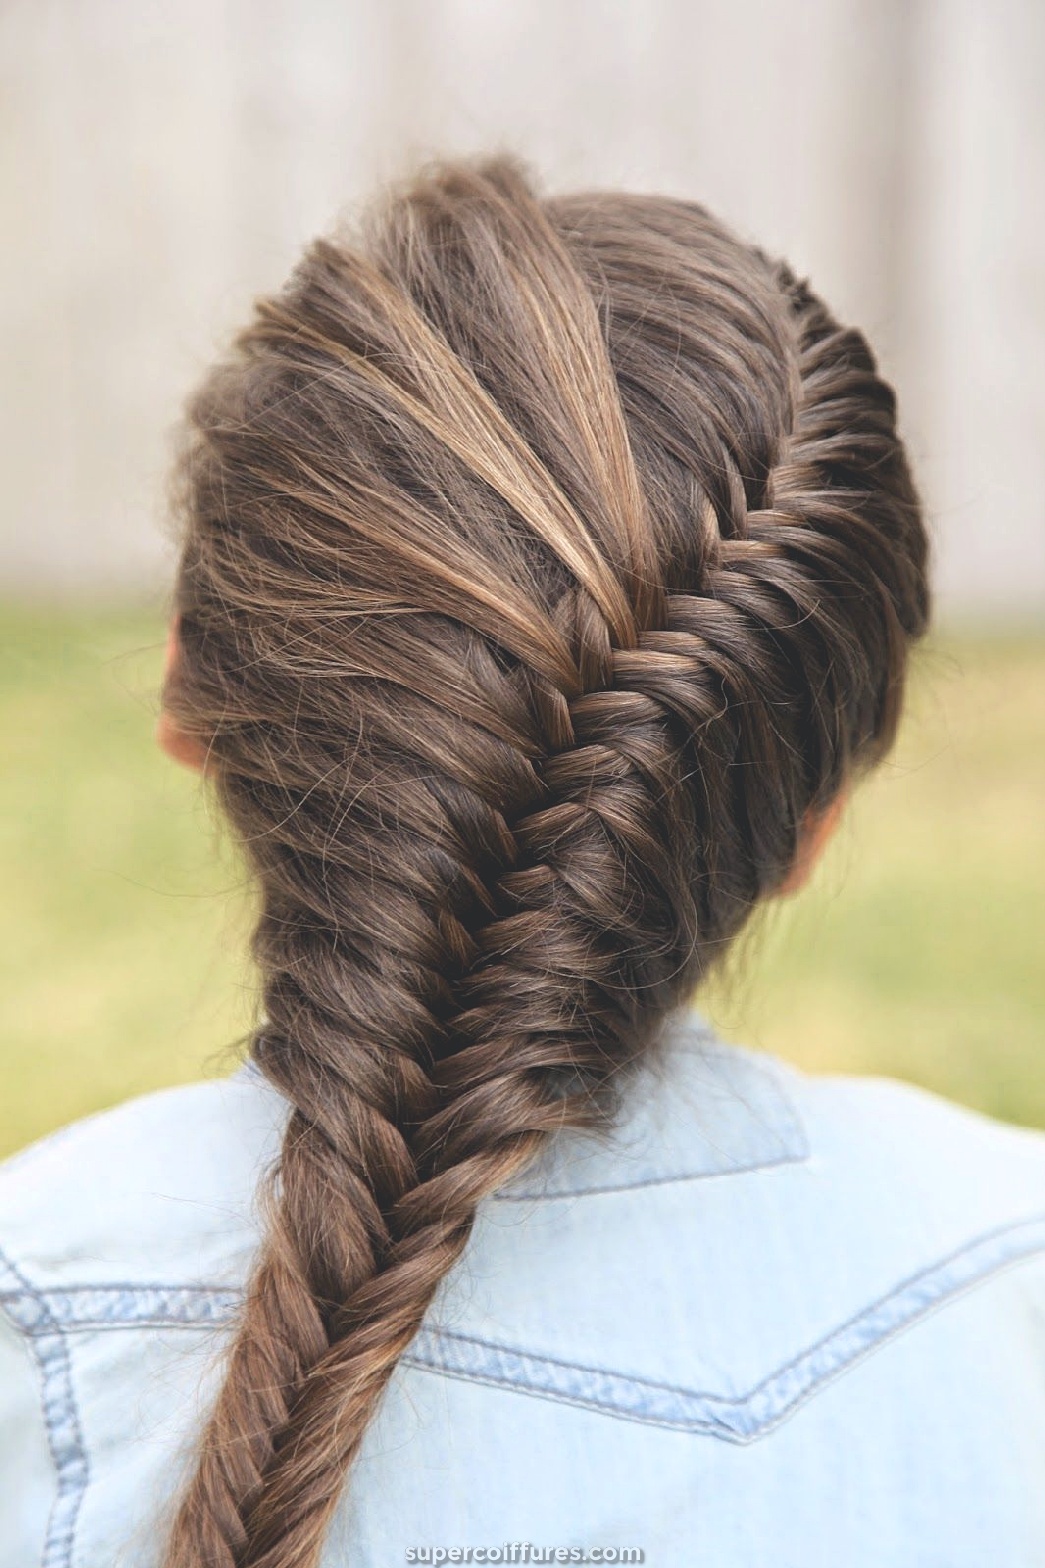
(23) French Fishtail Braid
When someone says French Braid or Fishtail Braid, the oh so classic and stylish look comes in our mind. And when there is a combination braid of French and Fishtail Braid, then imagine how attractive you are going to look. Wherever you will go, you will seek all the attention because of your attractive look. You can go with this look anywhere, except the office meetings, or formal meetings and sports events. Otherwise, in every kind of party, you will look amazing with the full volume French Fishtail Braid.
How to do French Fishtail Braid:
- Comb the hair neatly, and then do mid parting of your hair just from the front.
- Now gather the hair from the crown of the head using your hands and divide it into 2 equal strands.
- Start making the regular fishtail braid with the two strands by adding the hair each time from the outer part. You can read above how to do fishtail braiding.
- Now after making 2 or 3 stitches, you can then start adding the hair from the front side in a similar way like you do in the fishtail braid.
- Keep switching the place from where to add the hair in the braid. So for once, you have to add the hair just from the outside of the braid which is next to the braid for both sides. And then you will switch to adding hair from the extreme right and left side or you can say from the front side.
- Keep doing it till you reach the neck’s nape. And after that make a regular fishtail braid till the end. And secure your French Fishtail Braid using a rubber band.
Tips for French Fishtail Braid
If you like your French Fishtail Braid to be tight then let it be like that. But if you want it to be a little loose, Then, you can slowly and smoothly pull the plaits without bringing the hair out from the braid.
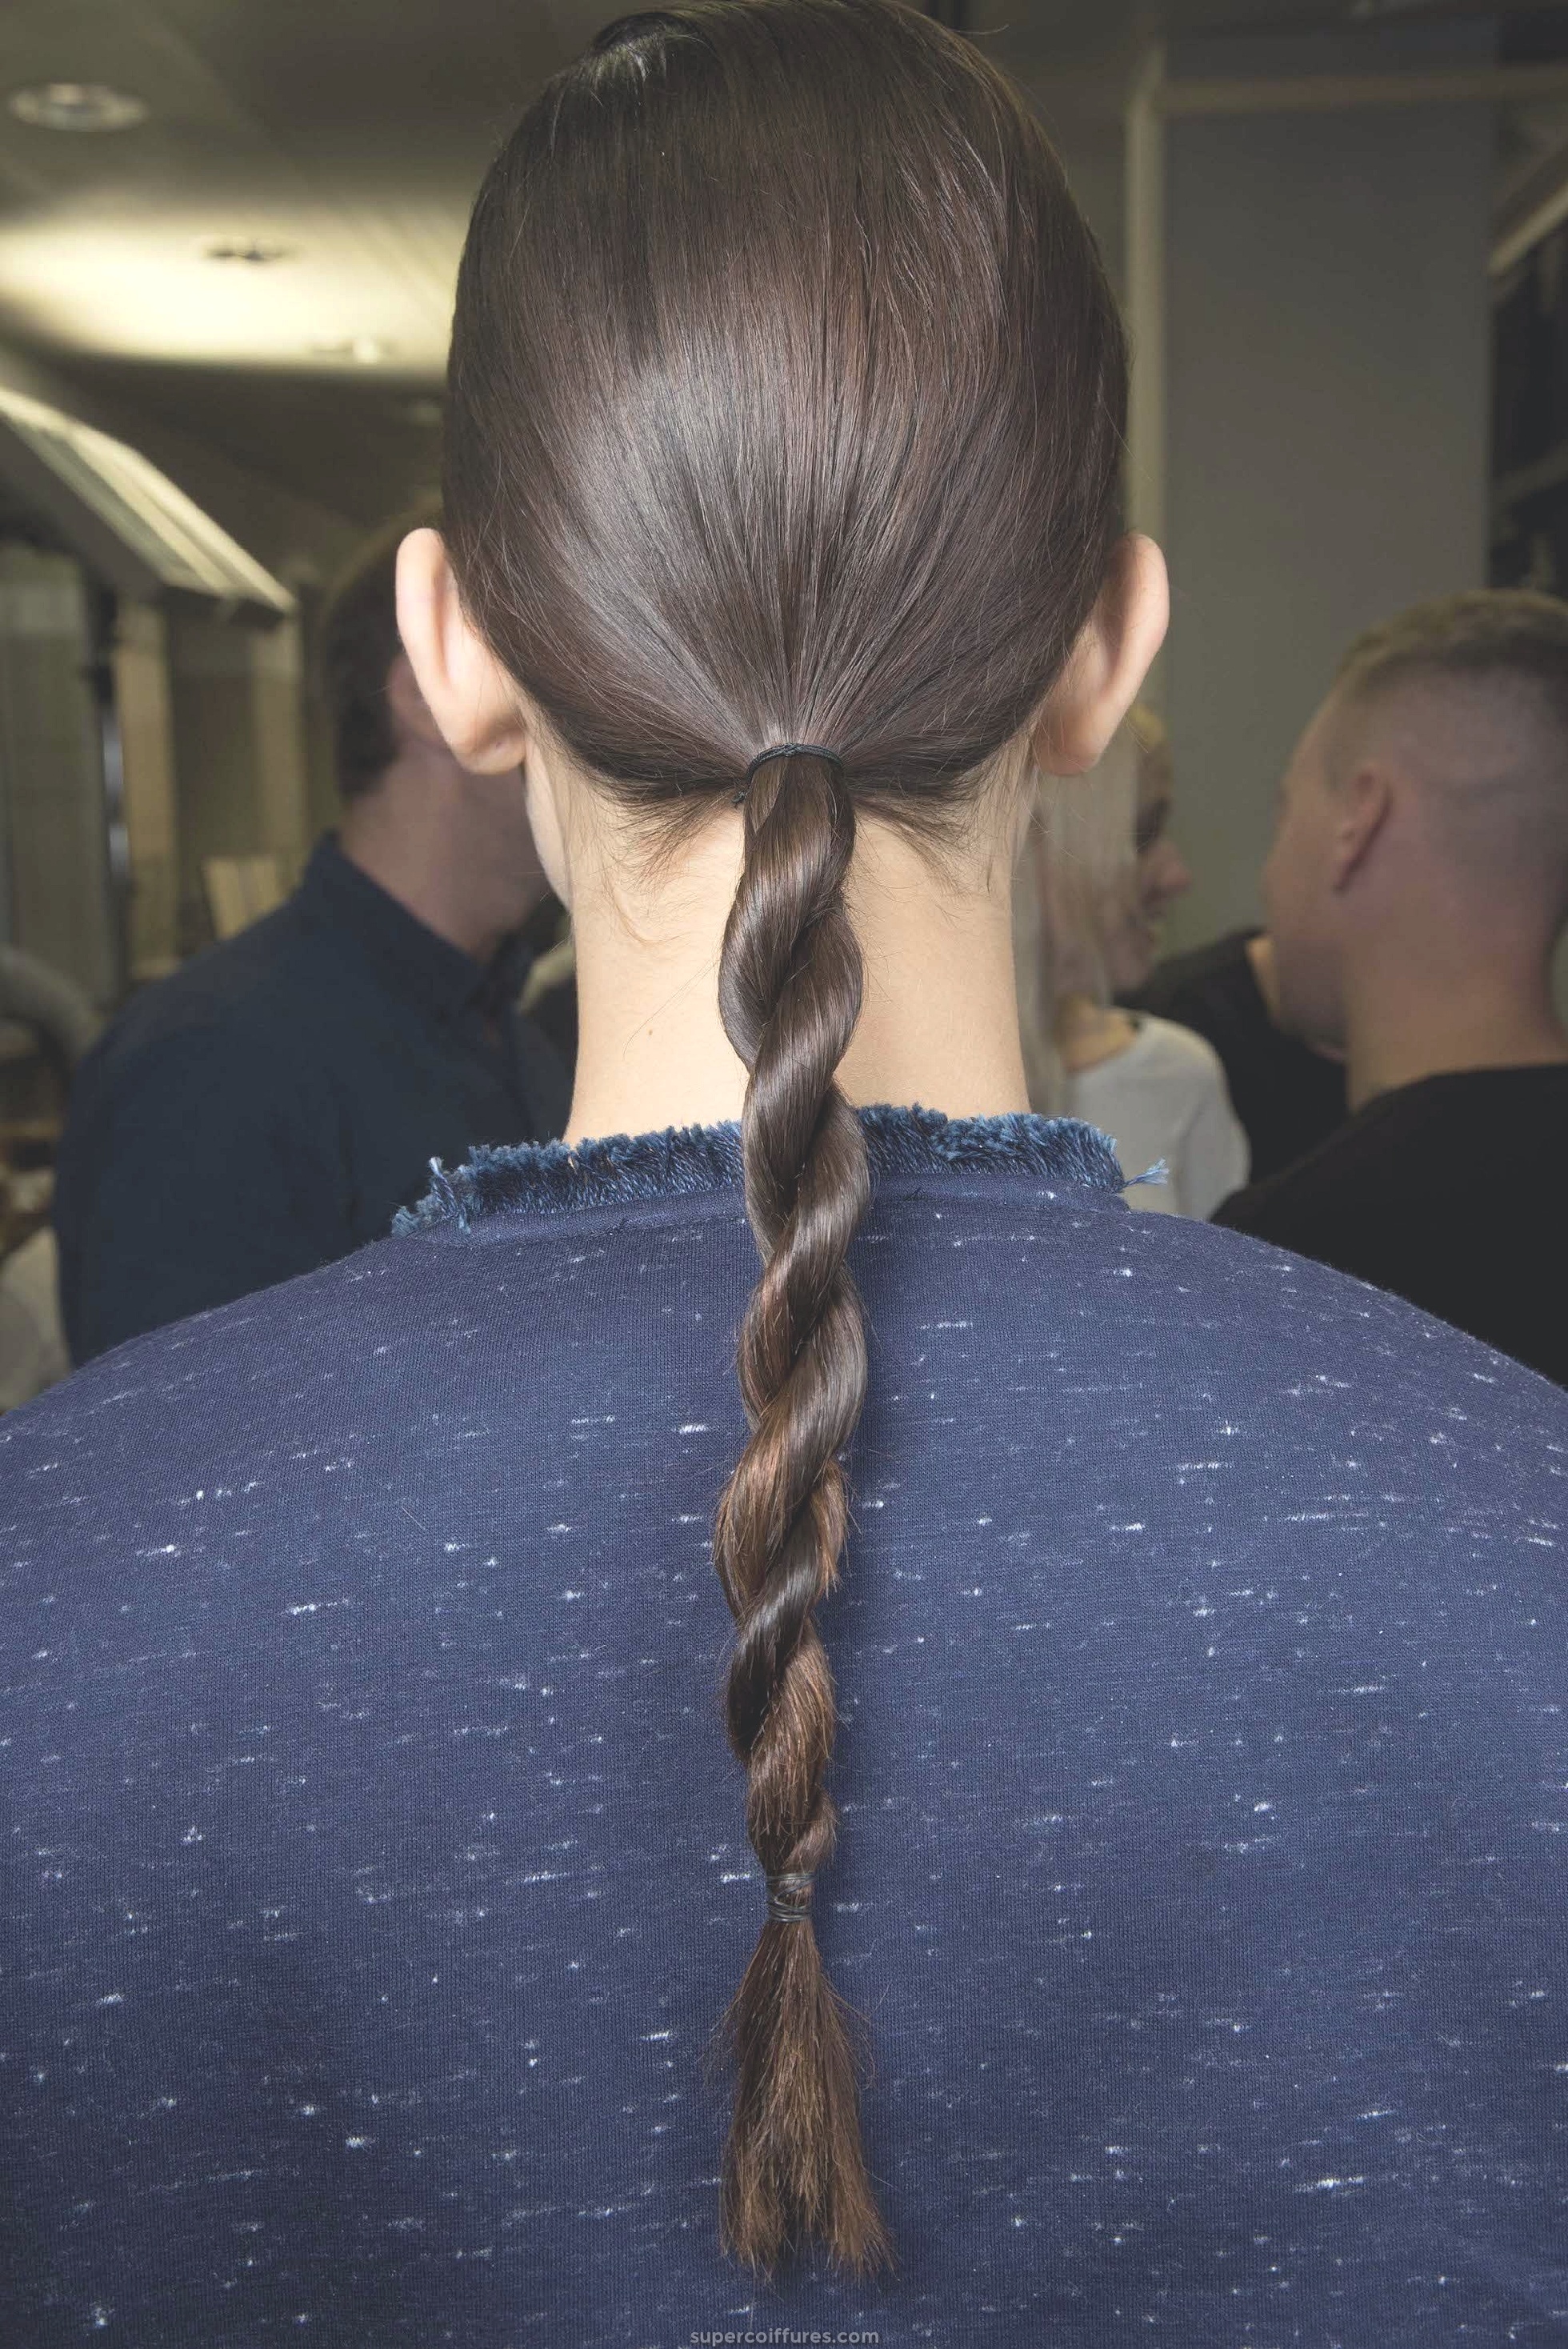
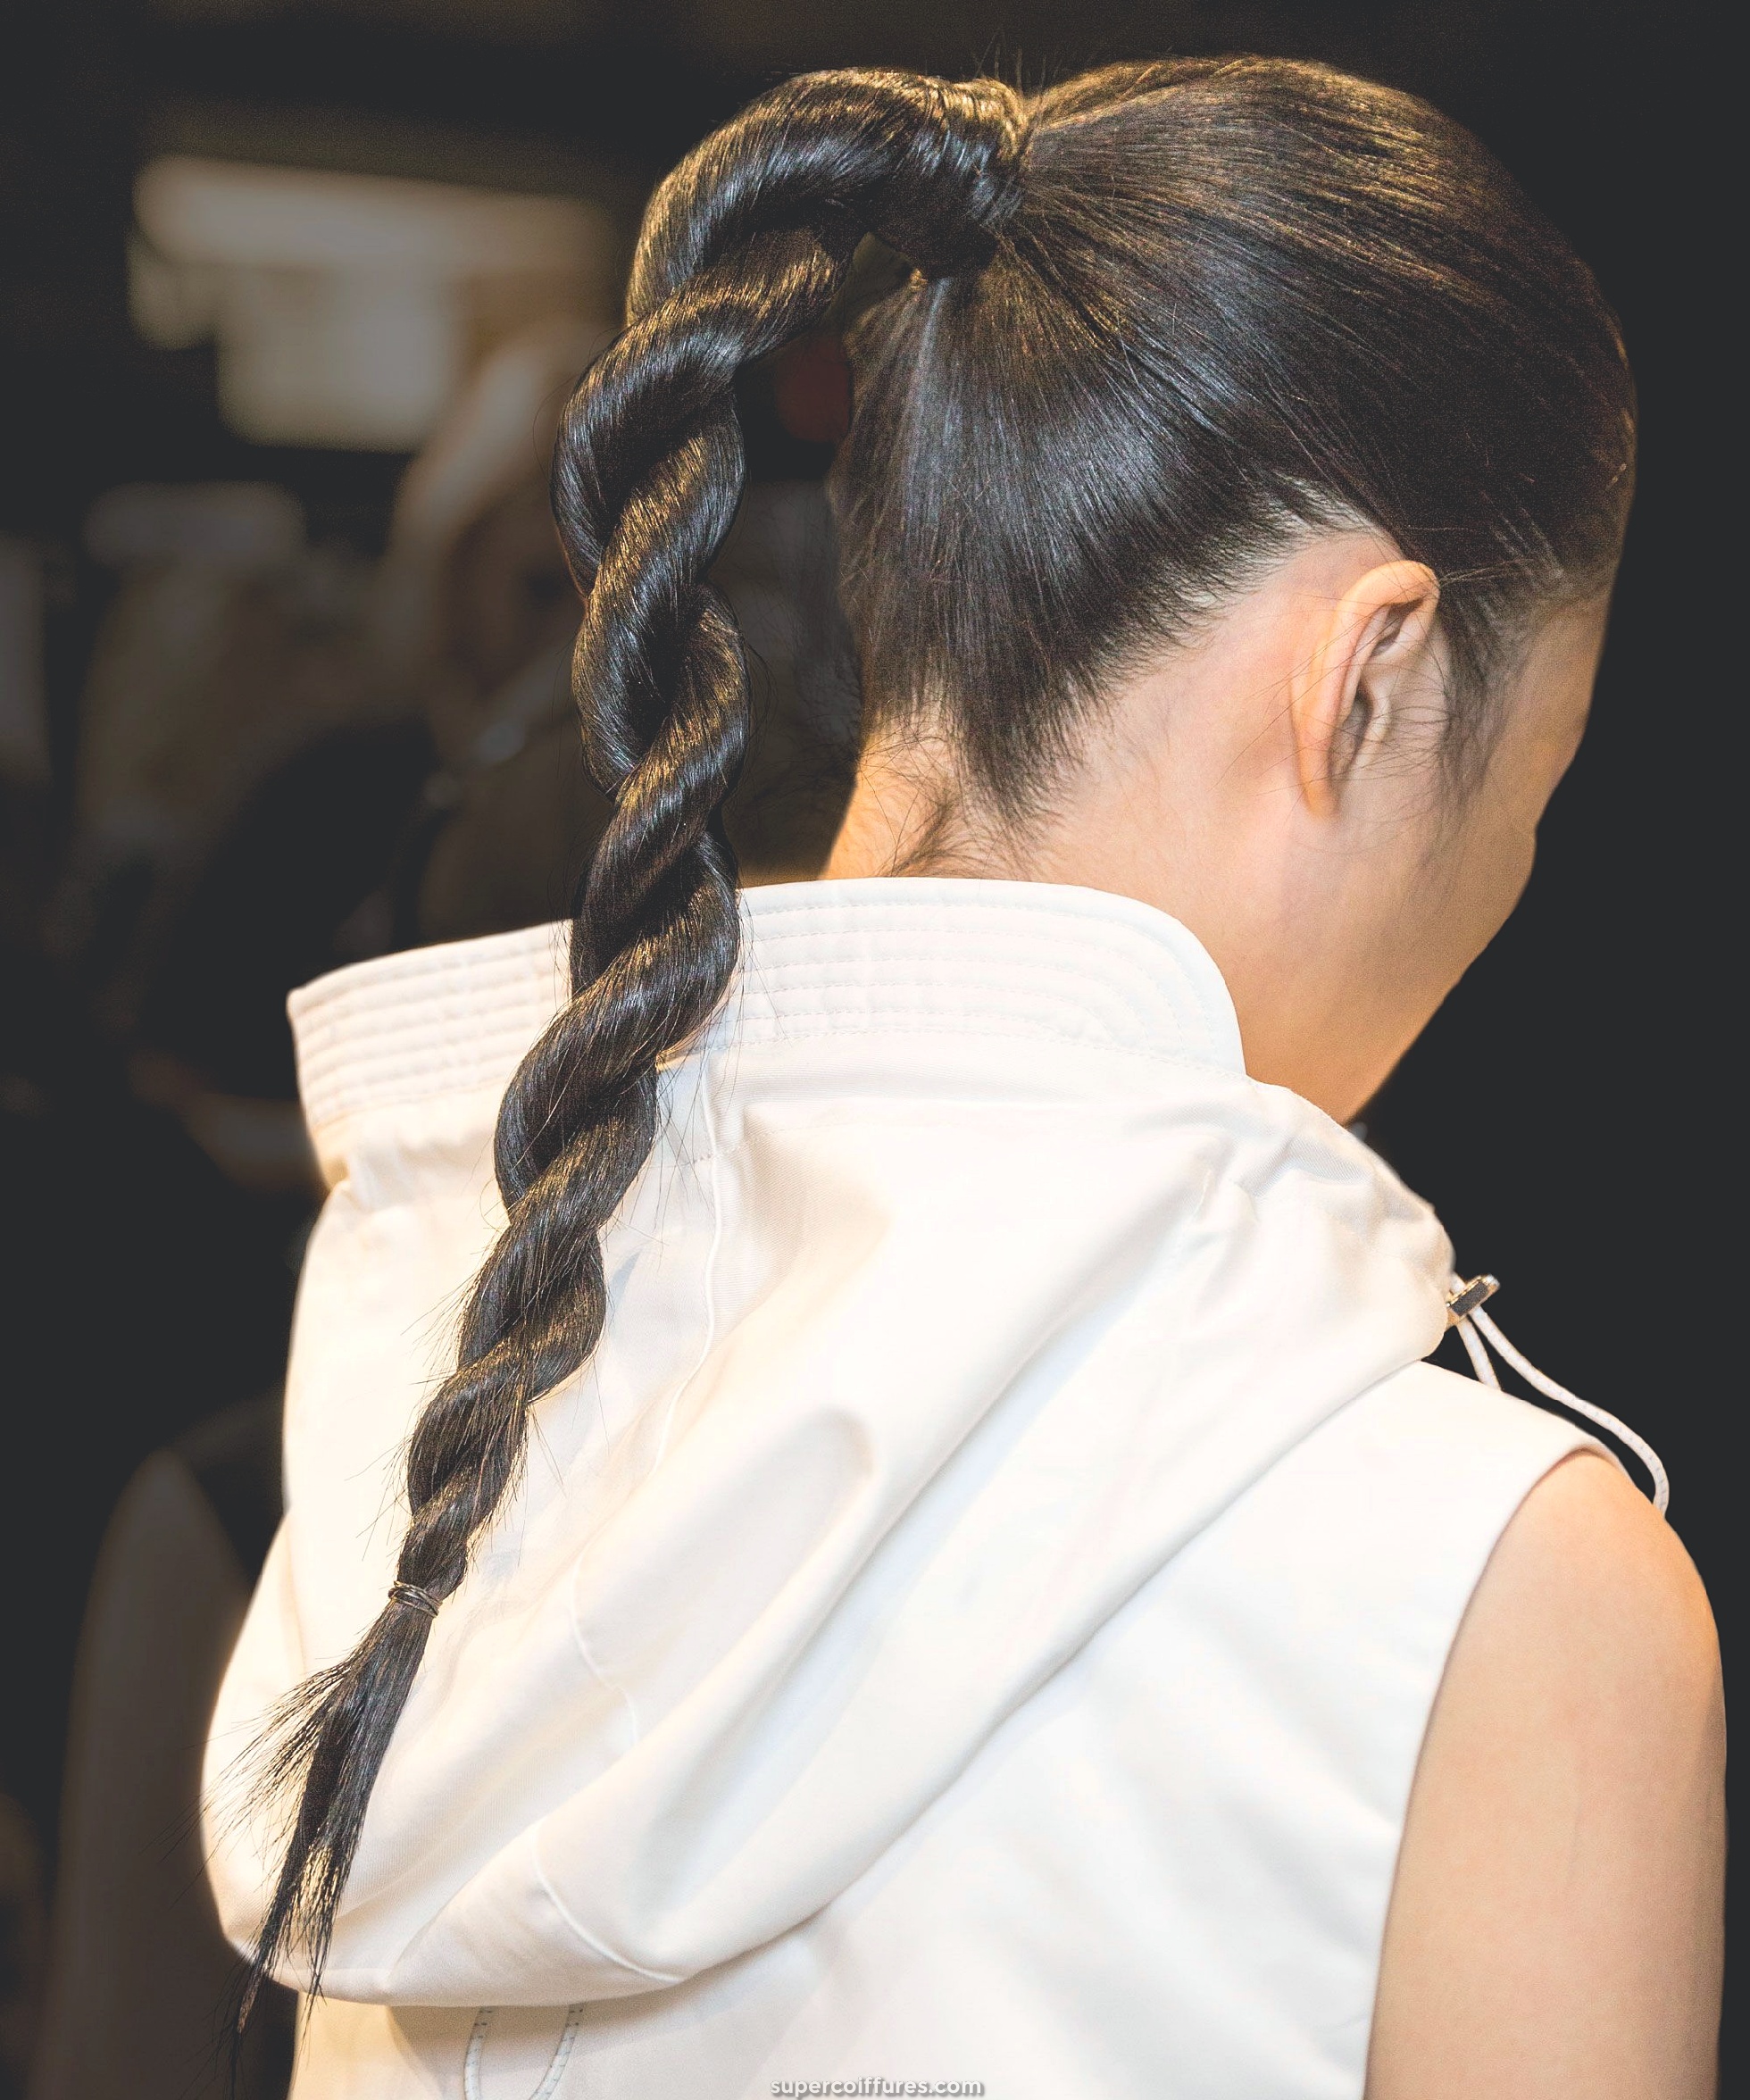
(24) French Rope Braid
The French Rope Braid is a kind of French Twisted Rope Braid, which can be worn mostly during some active or sporty events. However, if given some other look like that on the side, it can be worn regularly also. It is not a very difficult braid to do but is not so easy also.
How to do French Rope Braid:
- In the French Rope Braid also, you have to start by combing your hair back and parting the hair from the mid in the front.
- Now to make this braid, firstly you have to divide the section on the front into 2 parts equally.
- And cross these sections over each other 2 times.
- Now add some more hair to both the strands from outside.
- You will now have to do twisting of the strands and have to again pass it over each other one by one.
- Keep following the above-mentioned steps till you reach to the end point and left with just 1 or half inches of hair.
- Tie the French Rope Braid using a rubber band.
Tips for French Rope Braid
While adding the strands and while twisting, make sure the hair does not come out. And pull hair tightly while adding them to make a neat French Rope Braid.
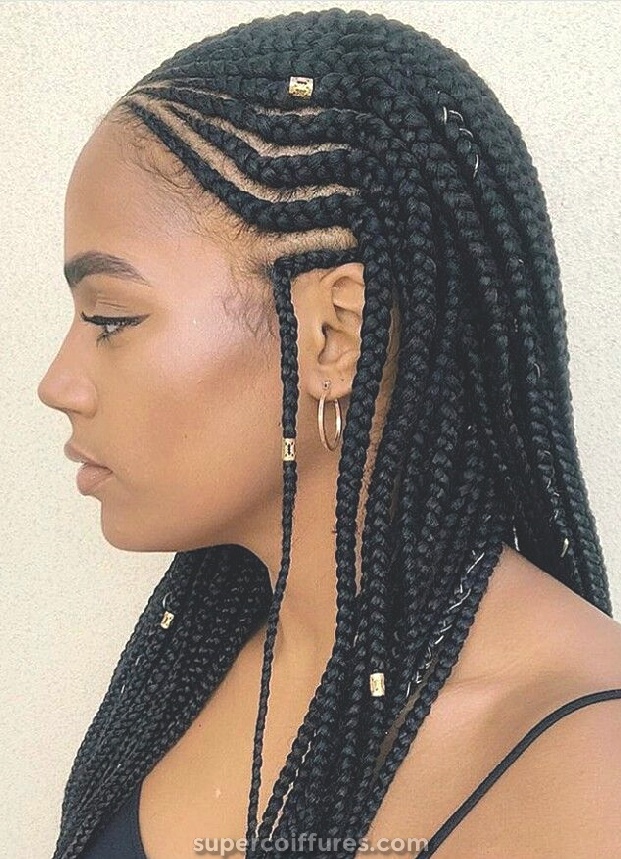
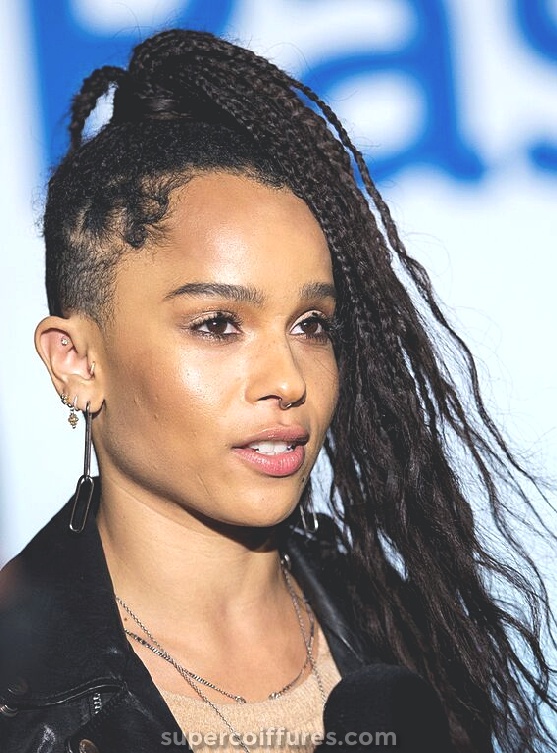
(25) Goddess Braids
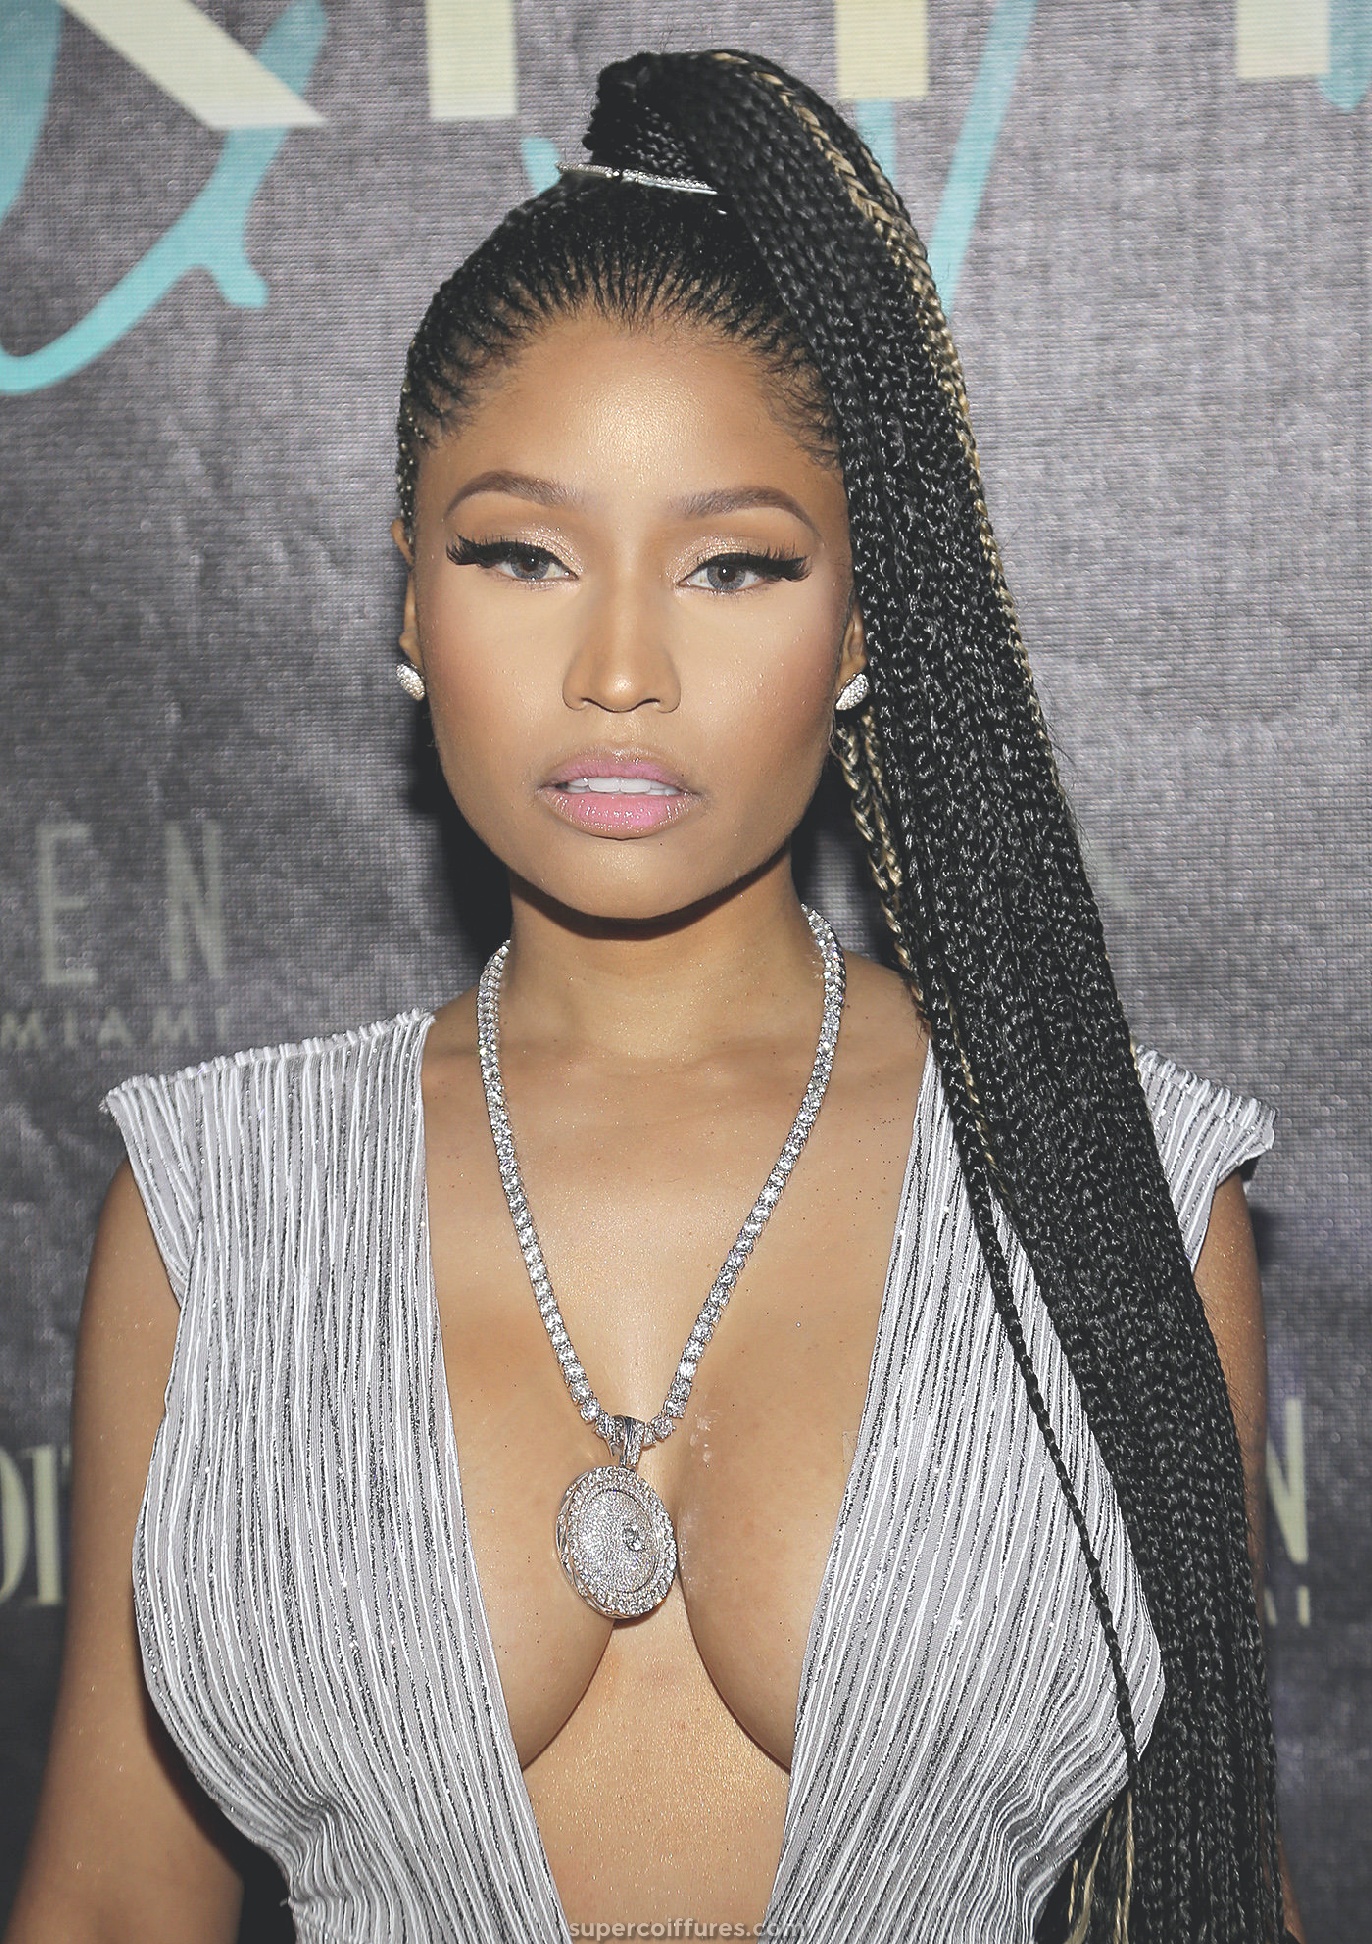
These braids are originally from Africa, but you will see many Hollywood celebrities slaying the Goddess braid look at different events. These are good for the award functions, rock show, and concerts like events. The one in the pic is a combination of Goddess Braid and Box Braid. They are very time taking but the result is worth it. These are not any new braids emerging, but women are using them from quite a long time.
How to do Goddess Braids:
- To make a Goddess Braid there are different ways, so we will do like that in the picture.
- Just like in the crochet braids, the artificial crochet braids were added to the cornrow braids.
- Here, the goddess braids are being added in the ponytail with the help of the needle and hook.
- The other way to make the Goddess Braids are to do the braiding on the scalp like that in the Cornrow Braid.
- So, start the braiding from all the sides of the head to the center.
- And then, make the normal braids or long and sleek box braids.
- To make the box braids you will have to take a very small section of hair and have to divide it into 3 parts. Then, do regular braiding till the tip.
- Repeat the same by taking a small amount of hair every time, till the hair gets finish. But leave some hair strands for covering the elastic.
- Once you are done making the box braids, secure them in the form of high side ponytail. And to hide the elastic, you can use your hair strands by wrapping it over the elastic.
Tips for Goddess Braids
Whether you use extensions or you make goddess braids, do not forget to apply hair oil to keep your scalp and hair moisturized.
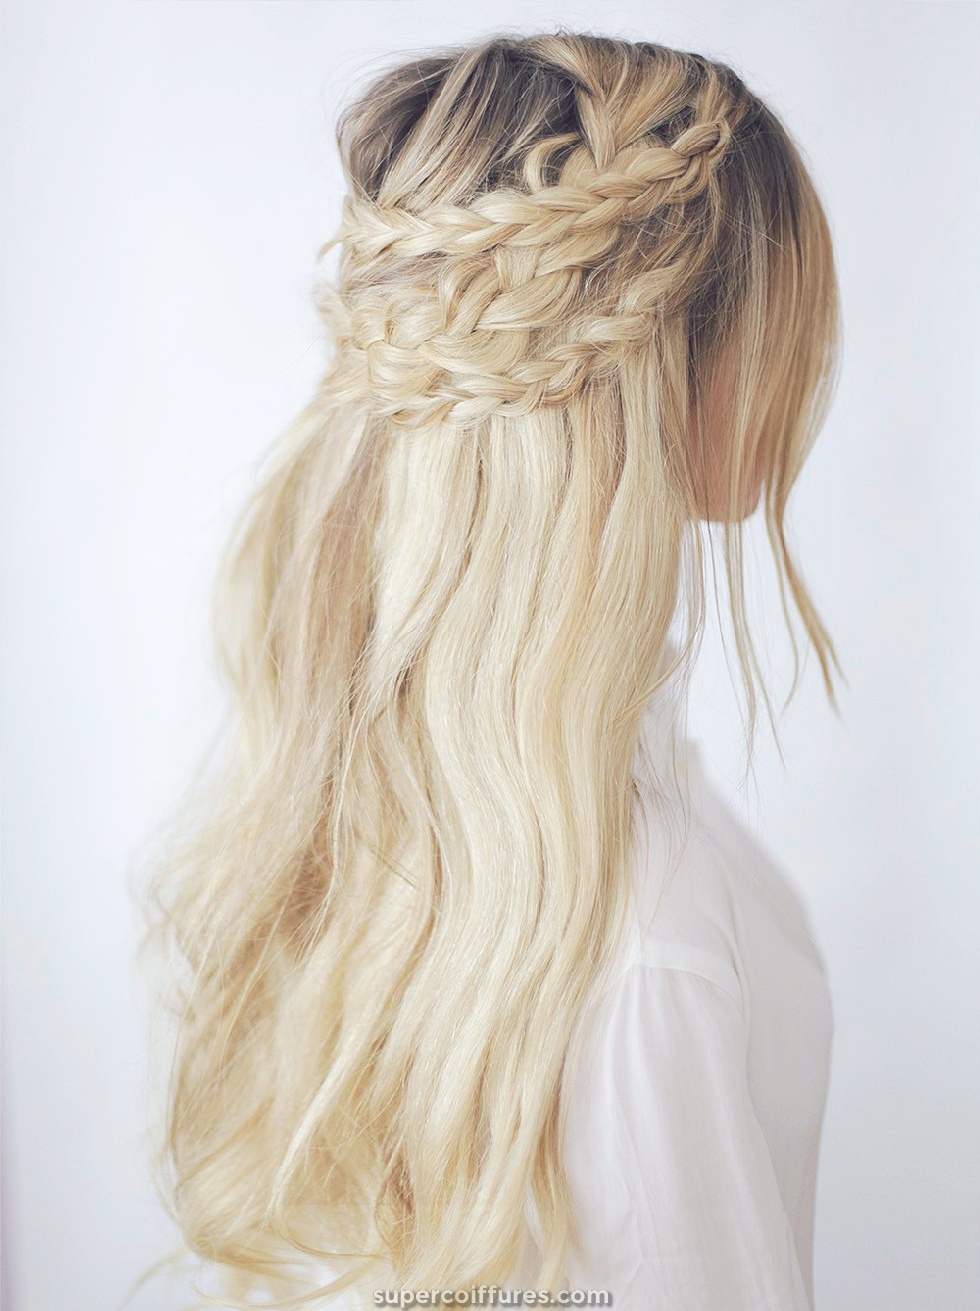
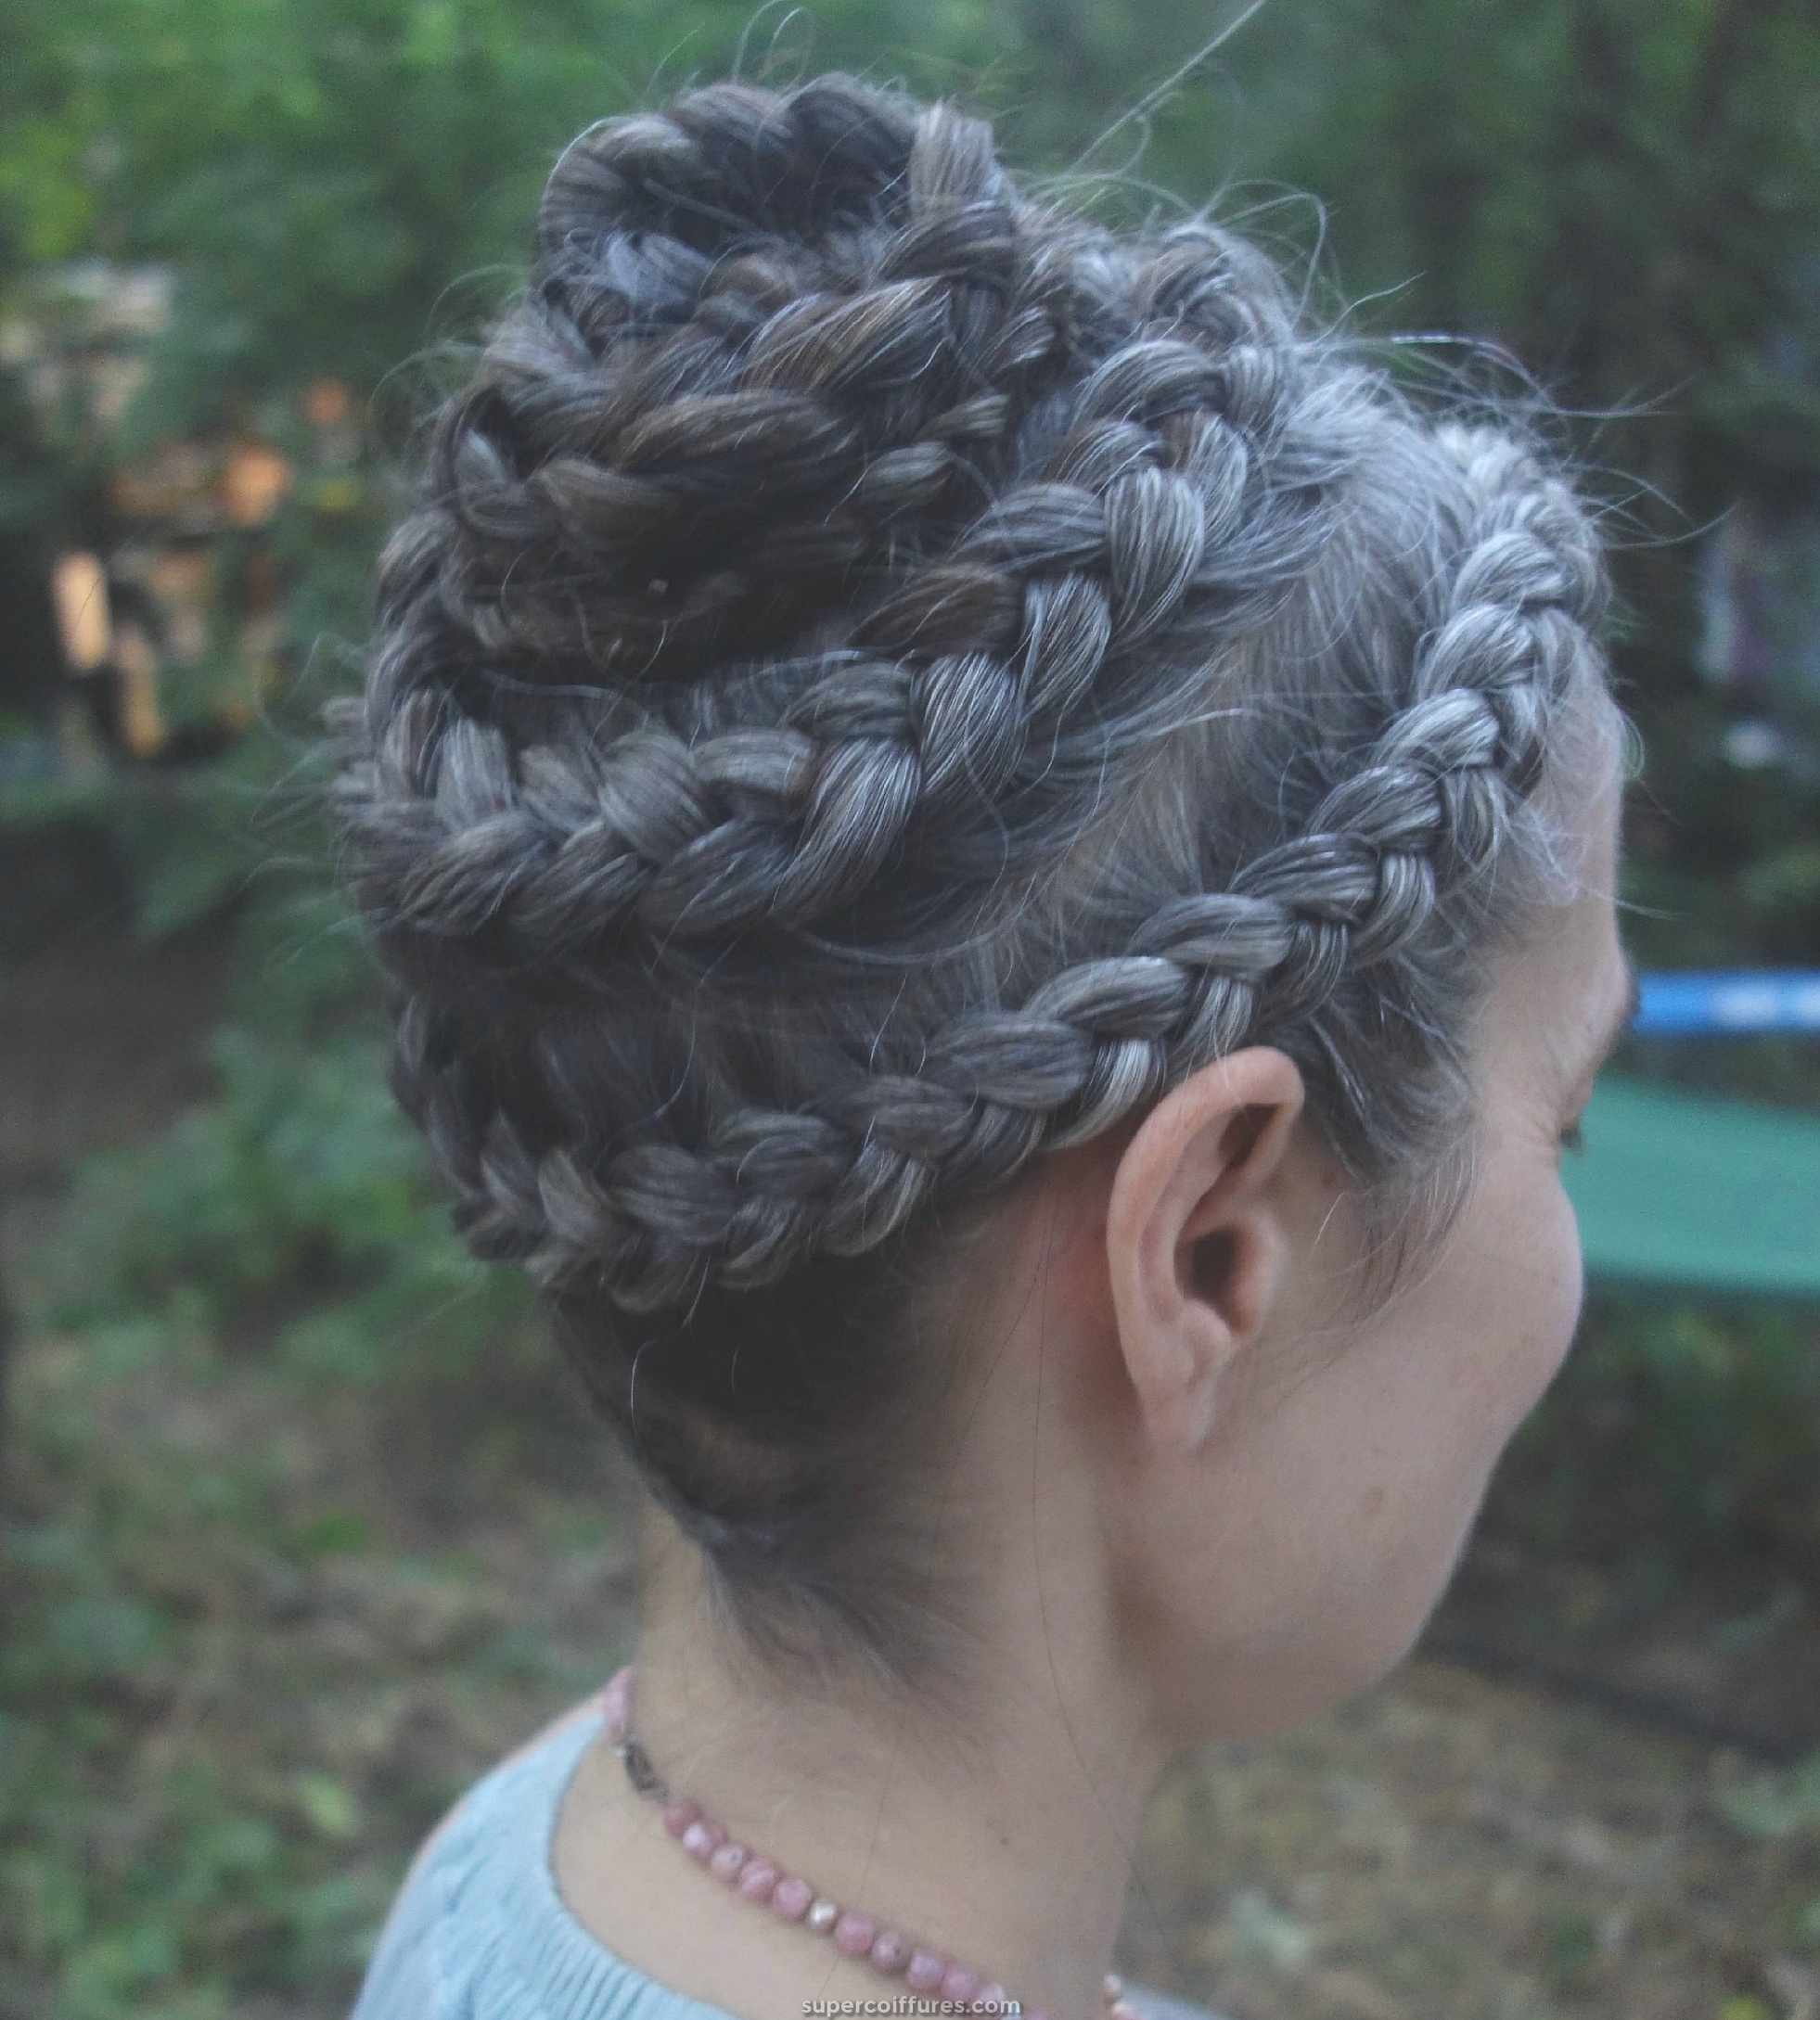
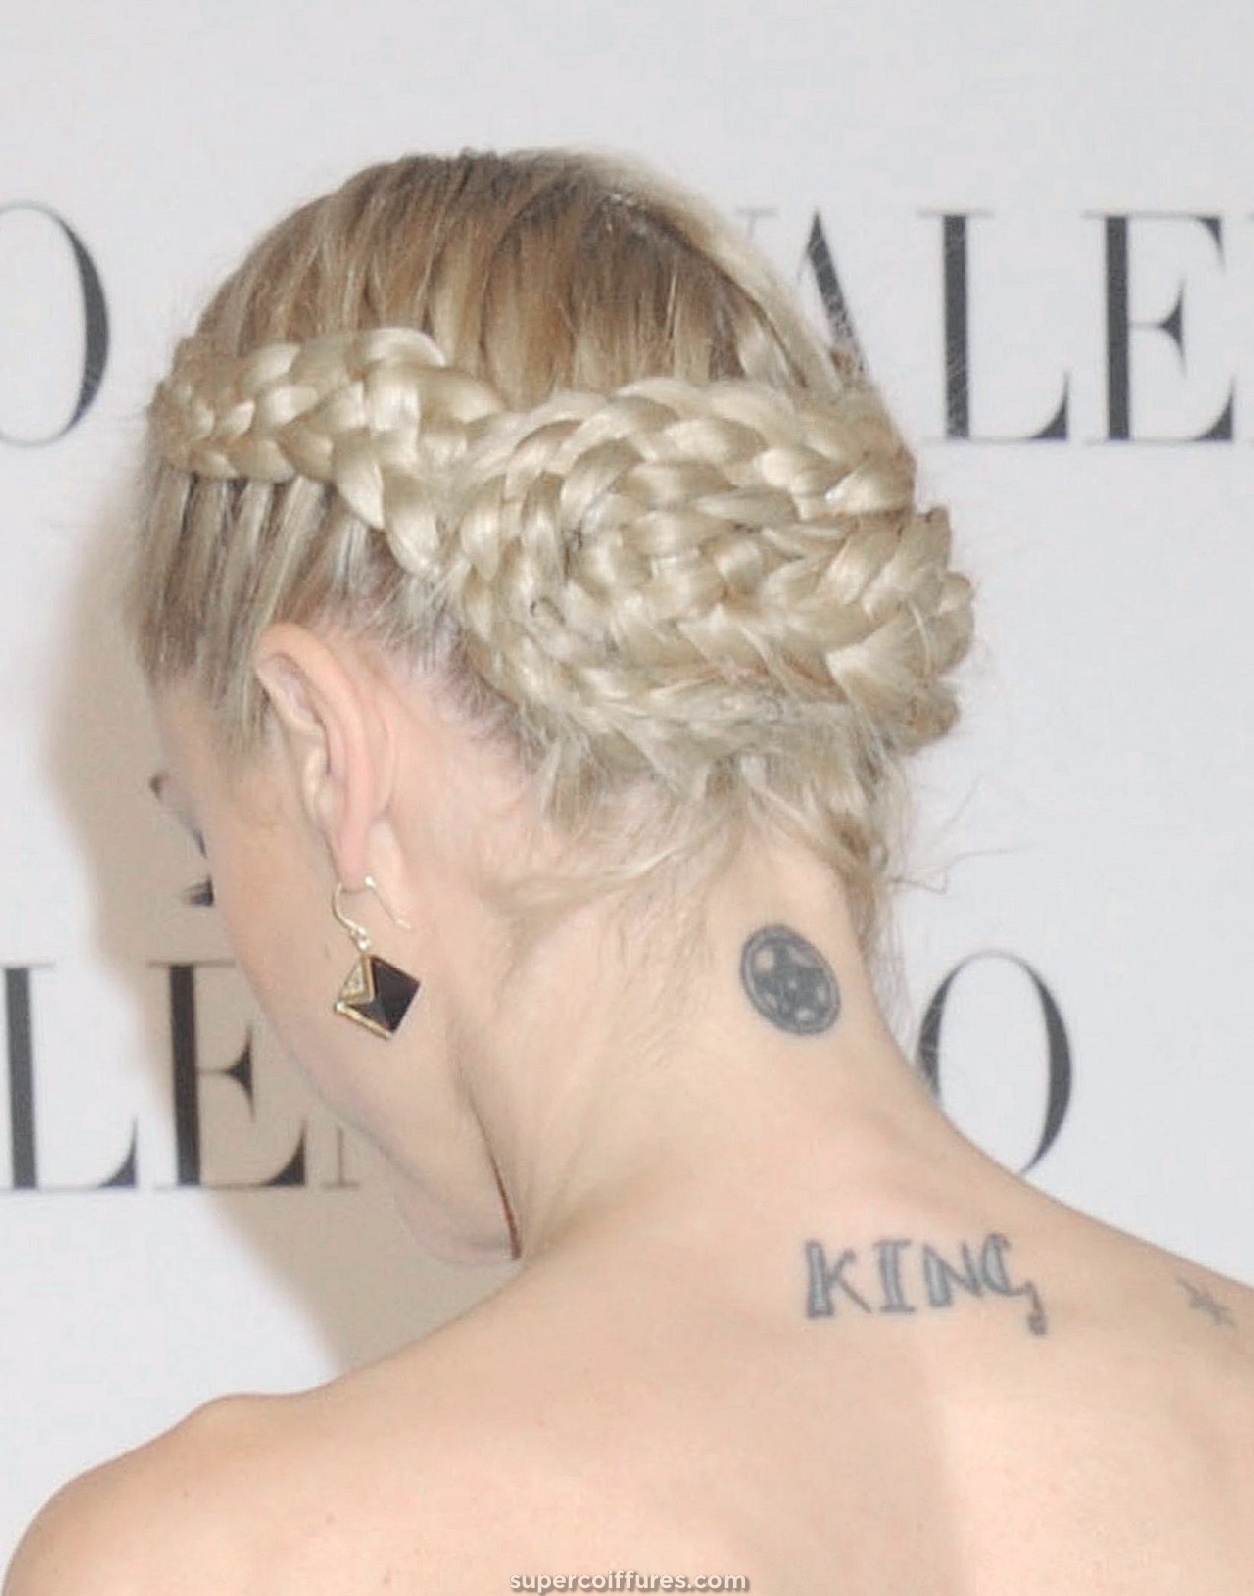
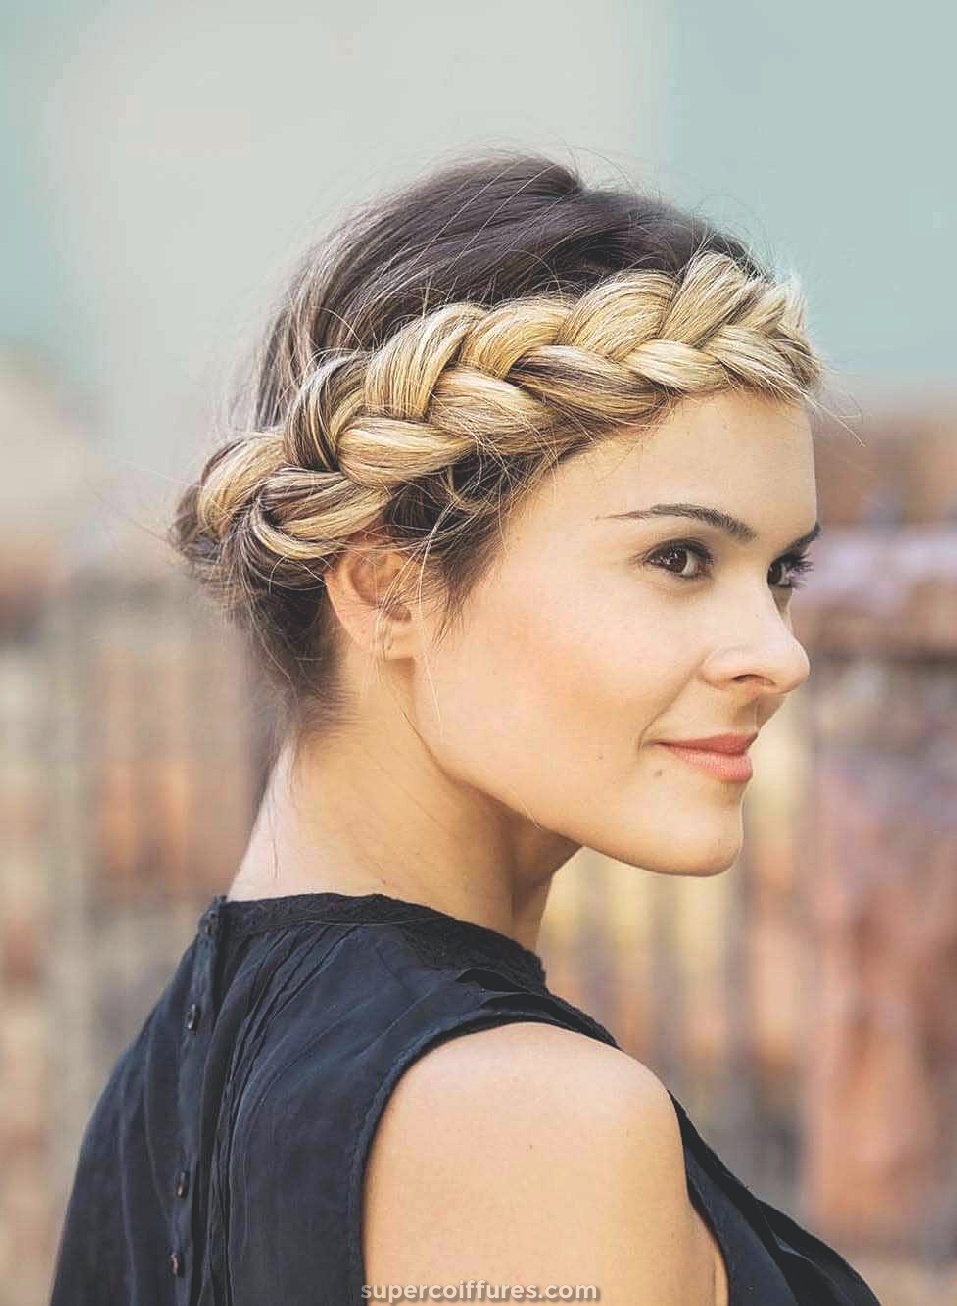
(26) Halo Braid
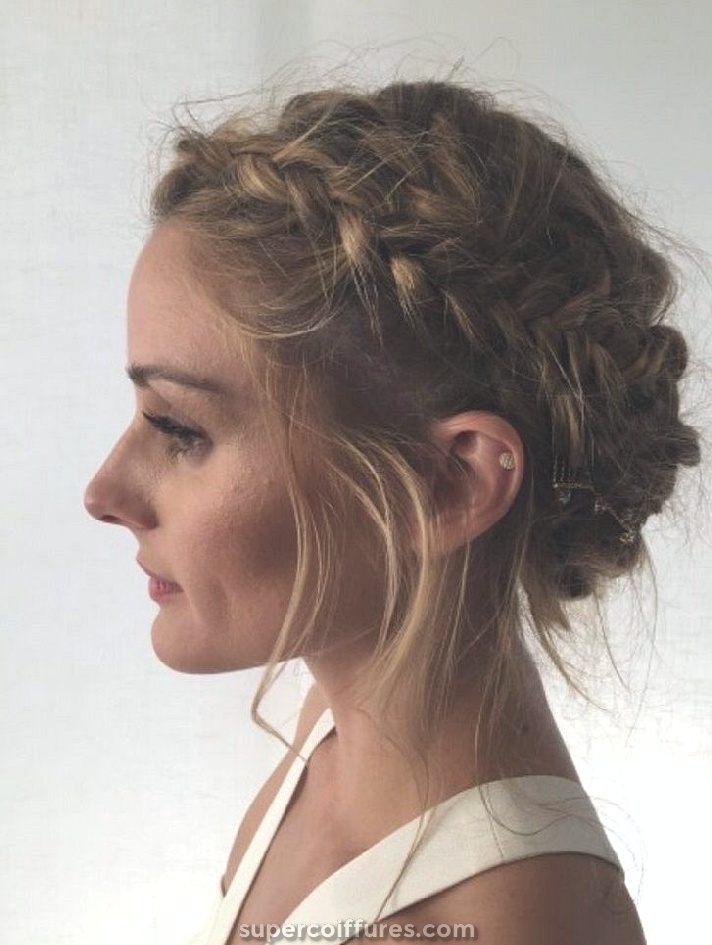
It looks so classy and distinctive than any other braid. Halo braid is a little difficult and tricky to do but once you will try this, with practice you will be able to do it easily. If you ask us, when to wear this braid, then we have a number of events for you to get this braid done. You can wear it to work every day to the formal parties, weddings, concerts, prom night, and many such events. You can make it using straight hair as well as curvy hair.
How to do Halo Braid:
- Whenever start any braid, do comb your hair to untangle any knot.
- Start with doing a side partition of hair.
- Pick the hair from the front head from one of the sections after the side partition. Also, remember that you have to pick the hair from the side which has more hair after the side partition.
- Divide the hair you picked into three equal strands for braiding.
- Now start braiding by putting the hair strands on the side over the middle strand one by one. Hold the hair tightly if you want the Halo Braid to look like that in the picture.
- Make sure that you keep braiding along the hairline and move towards the ear.
- While braiding, you can add extra hair from both sides.
- Keep braiding behind the ear to the bottom. Once you are done with this braid, tie it with a hair tie.
- Now start on the other side of the partition and make it in the same way to the bottom.
- Now it will look like you have two pigtails.
- To give a look of a full circle at the back also, place the braid on the right side across the left. And pin it up using hair pins.
- Do the same with the braid of the left side, by putting it across the right, and then secure it using hair pins.
Tips for Halo Braids
If you have curly hair and you want exactly the same look, then you need to straighten your hair.

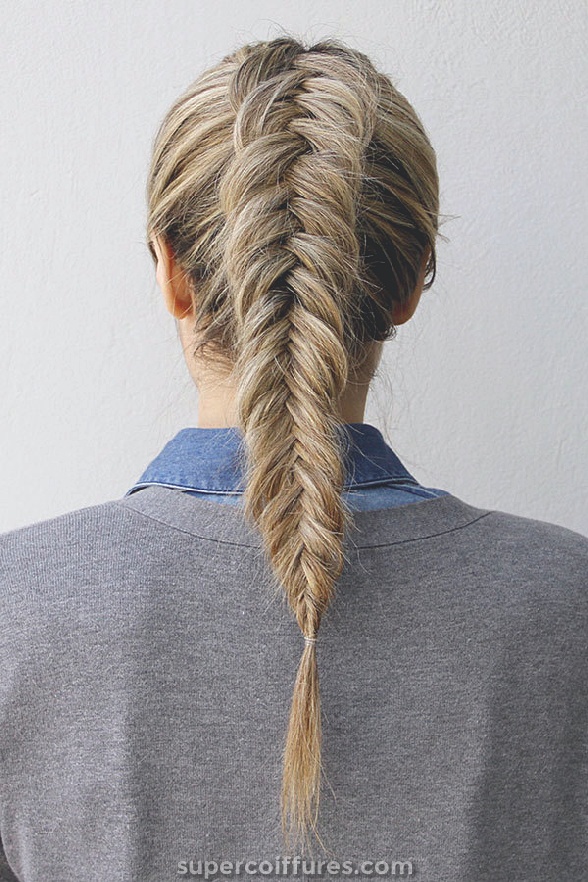
(27) Inverted Fishtail Braid
You all have read above how to do the Fishtail Braid. Here, we will see how to do the Inverted Fishtail Braid. And do not think too much that how it will look. As it will look as amazing as the Fishtail Braid. You can see that yourself in the picture. And if we talk about how difficult it is, then do not worry, as it is not that difficult, if you can do a fishtail braid, you will be able to do it quickly and easily. You can wear this pretty look at any wedding function, any traditional event, or during travel or for night outs also. This will look beautiful on any outfit.
How to do Inverted Fishtail Braid:
- Comb your hair towards the back of the head just like you do in the normal fishtail braid.
- As we have to make an Inverted Fishtail Braid, so the technique of braiding will change.
- So, we have to do the braiding in an inverted manner. Take hair strands from the mid of the head.
- Divide it into 2 equal parts. Pick the hair strand from the outer left side and pass it under the left side strand and combine it with right strand.
- Do from the other side now, by picking up hair from the outer right side and pass it under the right-side strand and then combine it with left strand.
- Keep repeating the steps until you reach the end.
- Then, secure your inverted fishtail braid using a hair tie.
Tips for Inverted Fishtail Braid
If you want a relaxed inverted fishtail braid then don’t put the strands very tightly. But if you want to make a tight inverted fishtail braid, then pull strands tightly and hold them tightly.
(28) Lace Braid
If you do not want to do a full braid, then you can choose lace braid also. Here, we will guide you on how to do this upward lace braid. Whether you try it on a teenage girl or a woman in 20’s, it will compliment everyone. You can try it on wavy or curls also. No particular occasion is needed to try this look, as it will suit most of them.
How to do Lace Braid:
- Start with combing and detangling your hair properly.
- You have to then do a middle partition of the hair from front dividing the hair into two equal parts.
- From the right side of the hair, take some hair strands. Divide those hair strands into two equal parts.
- Start creating a braid now, by picking up the hair strands from the outer portion and adding it to the braid just like you do in the French Braid or Fishtail Braid.
- Make sure you create the braid around the head like that in the picture. And make the braid length only till the crown, leave rest of the hair like that.
- Using the bobby pins tuck the hair properly at the back of the head at the crown.
- Now take the hair strands from the left side of the hair and divide them into equal parts.
- Repeat the same procedure as you did for the right side and at the end tuck that also at the crown joining both the braids together.
- You can use a bow to put at the crown where both the braids are joining.
- Now you have a beautiful lace braid.
Tips for Lace Braid
At the end, if you want to use the hairspray, you can. Do not make the lace braid very thick.
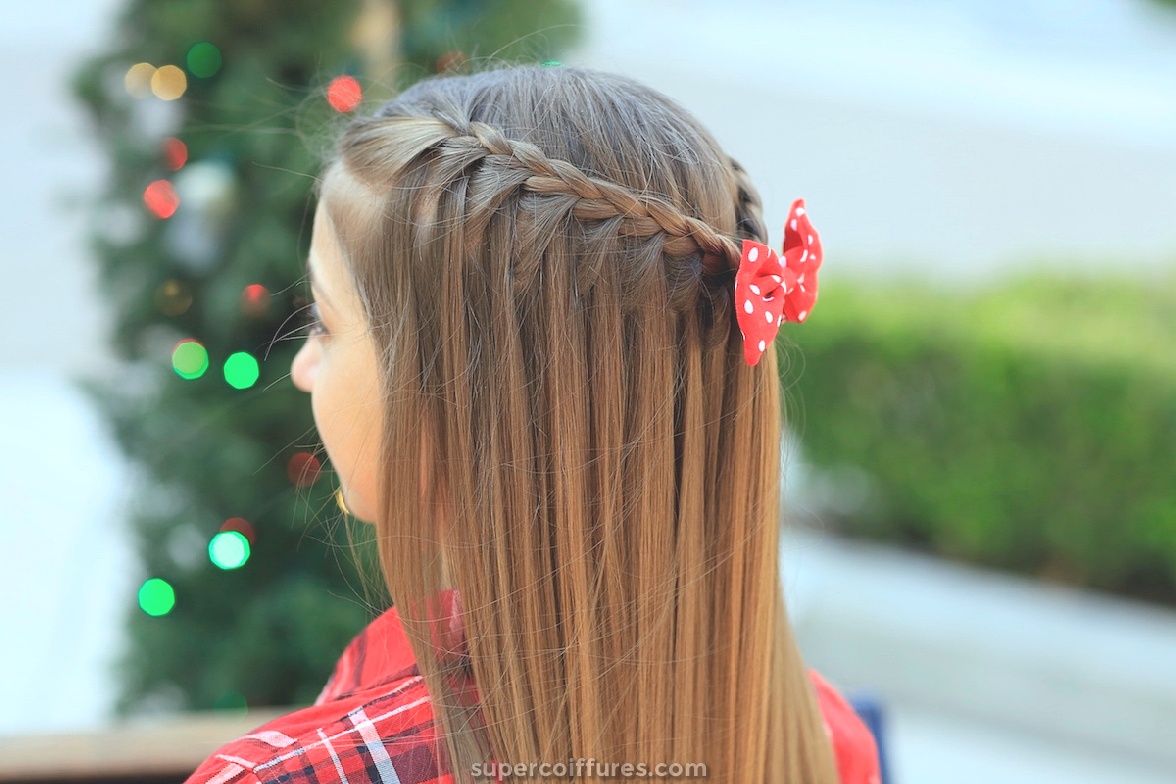
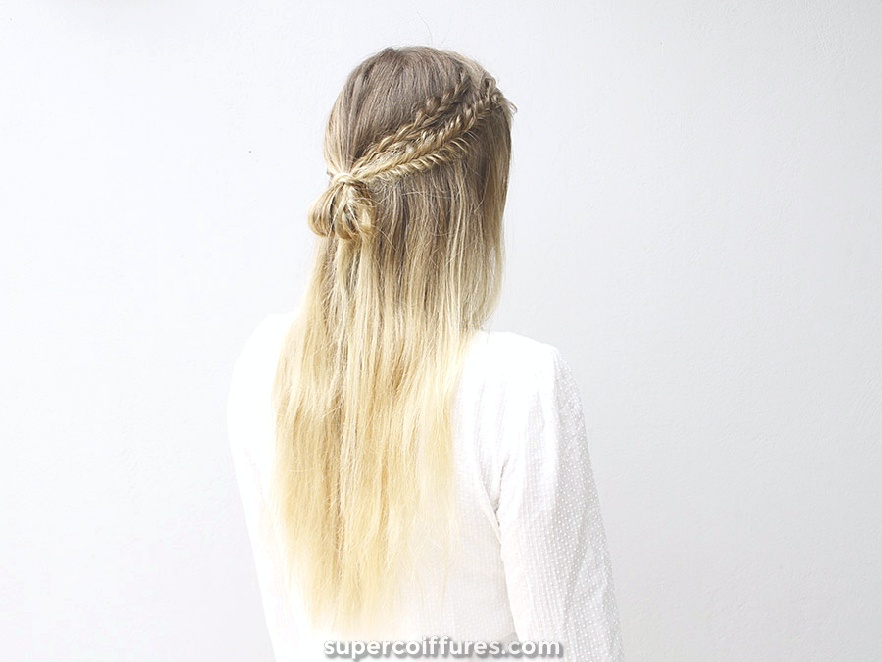
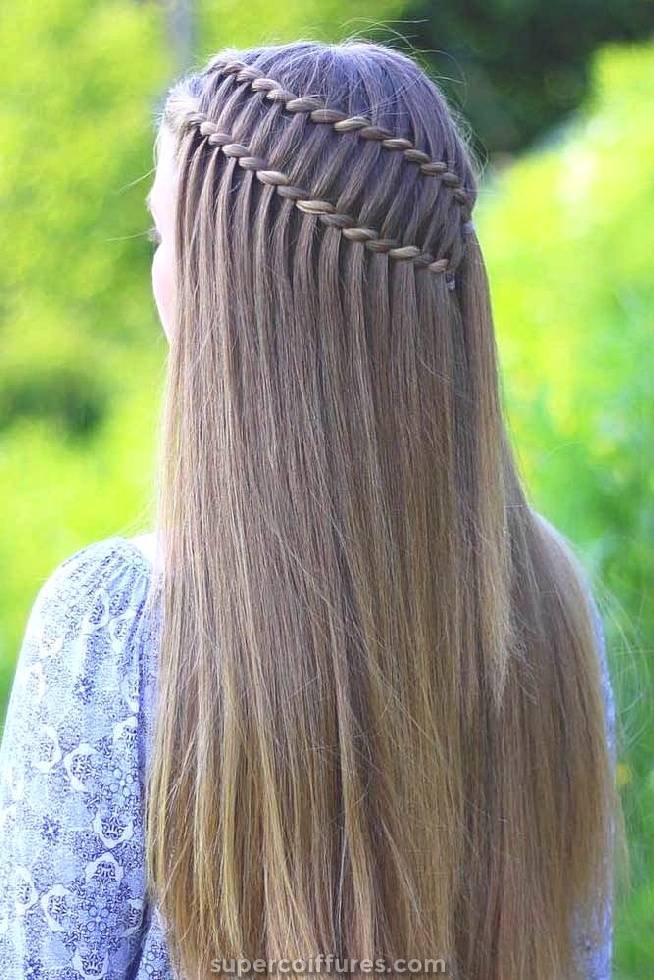
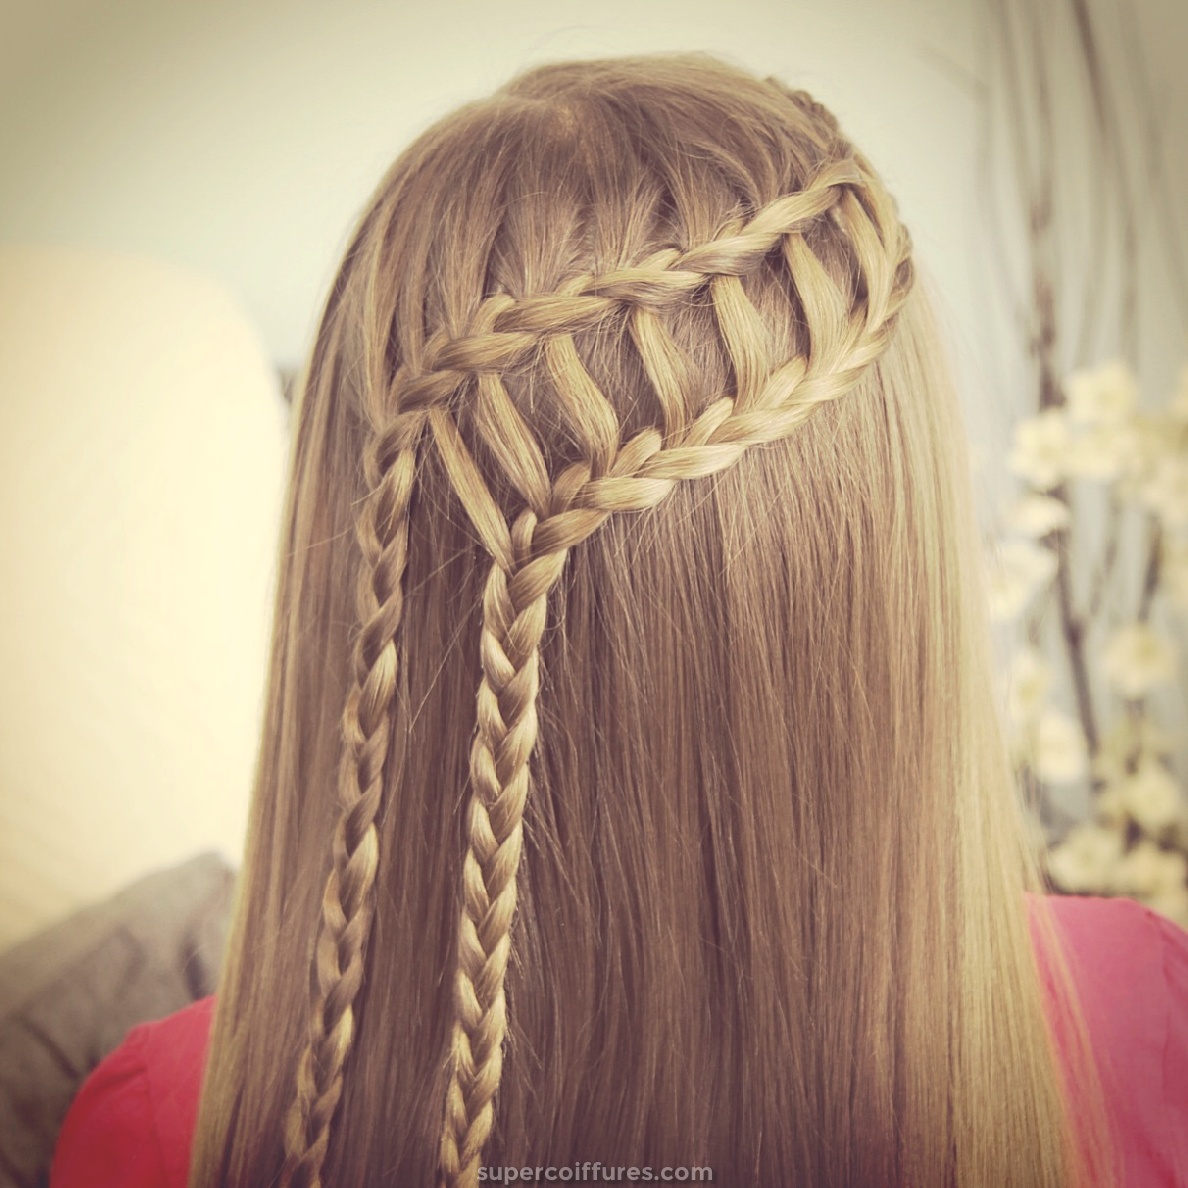
(29) Ladder Braid
This braid style is trending these days. For women who have long tresses, do try this style for once. And, you will surely go for it again and again. The ladder braid can be made in different styles. It has a class and looks great especially on the straight hair. You can decide yourself, on which occasion you would like to do this braid.
How to do Ladder Braid:
- For making this Ladder Braid, start by picking up a small strand of hair from any of the side (you can choose according to yourself).
- You have to make a waterfall braid with twisting the hair strands. As you can see in the picture, the top one is the waterfall twist braid and the bottom one is the lace braid.
- You can read below how to do waterfall twist braid. Once you reach the end of doing waterfall twist braid, tie it up using a hair tie. Remember, you have to make it till you reach the center of the head.
- While you are doing waterfall twist braid, ask someone to help you in holding the waterfall strands which you passed in between the twists.
- Again, take small strands of hair just 1-inch below the waterfall twist braid.
- Start doing the lace braid by reading the instruction from the lace braid tutorial which we have mentioned above.
- While doing lace braid, you have to pass the same waterfall strands from between the lace braid, that is why we asked you to take a help of someone in holding those hair strands.
- Keep passing each waterfall strand from every stitch of lace braid.
- Once you reach the point where waterfall strands get over, just tie using a hair tie.
- You will now see both braids together giving a look of Ladder Braid.
Tips for Ladder Braid
For Ladder Braid, you can use even normal waterfall braid also at the top instead of using waterfall twist braid. Use hairspray after completing the braid, so that the hair coming out should stick to one place.
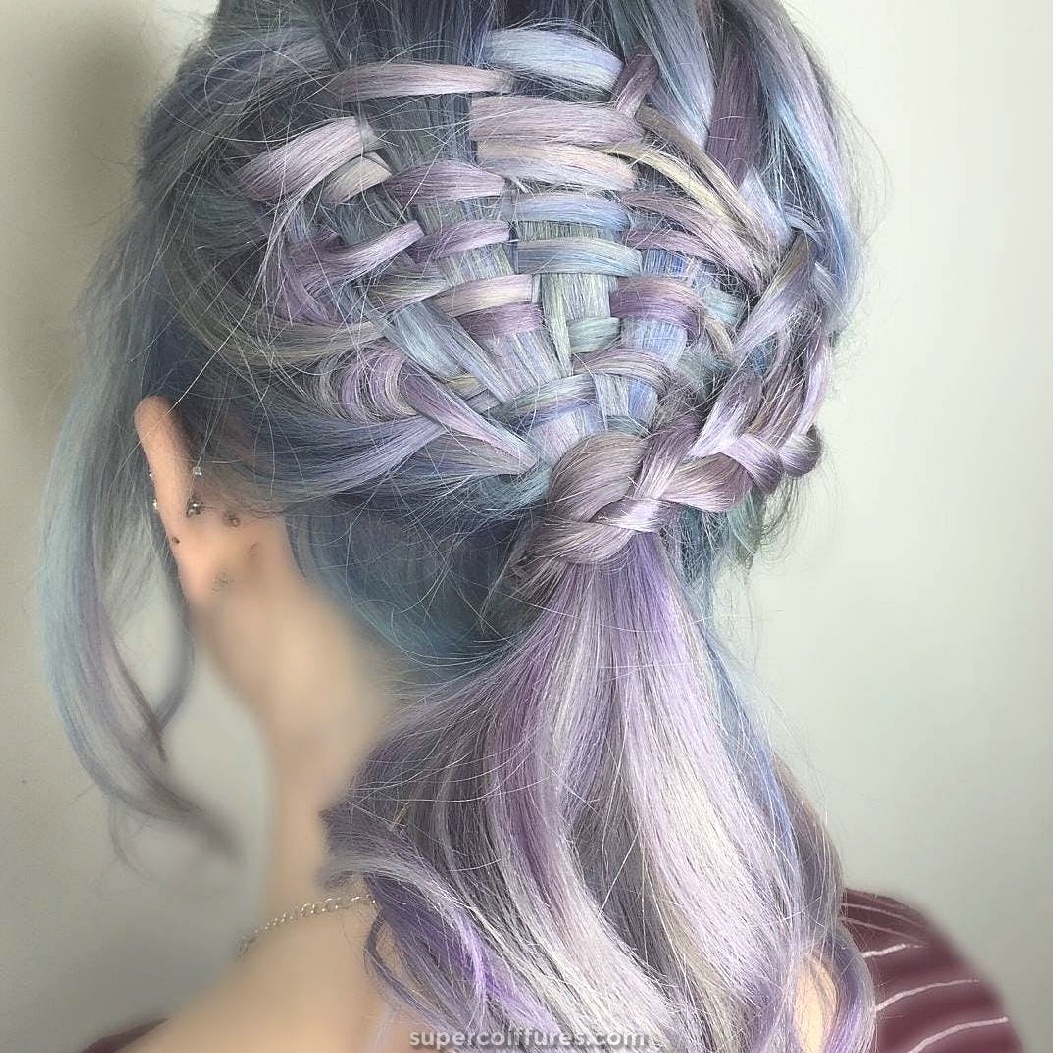
(30) Lattice Braid
With the different colors shade, this braid is looking very vibrant and sassy. You can also call the lattice braid as the basket braid. It does look easy but it is a bit tricky braid. You will need someone to help you doing the Lattice Braid. You can wear this braid on different informal or casual occasion. You can also get your hair colored like the one on the picture, to make your braid look more stylish. We are going to explain you about how to do a normal lattice braid.
How to do Lattice Braid:
- Start with combing hair towards the back. Then, we will start making the Lattice Braid.
- Take, around 4 hair strands from your head, depending on how big lattice braid you want.
- Now, ask someone to hold all these strands separately and vertically.
- You have to now pick one more strand from the left side and start moving it horizontally.
- When you will move the braid horizontally, you have to pass it under and over these 4 vertical strands. Start by passing the hair strand horizontally under the 1st strand. Then over the 2nd strand, again under the 3rd strand, and over the 4th strand. Ask that person to hold this horizontal strand also.
- Now pick the other strand to pass it horizontally, and this time you have to pass it over the 1st strand, then under the 2nd strand, again over the 3rd strand and then under the 4th strand.
- Let that person hold the second horizontal strand also.
- In a similar way, pass around 4 more horizontal hair strands from the vertical strands. But remember you have to keep switching the order. Like the third horizontal strand will go under the 1st vertical strand, then over the 2nd strand, again under the 3rd strand, and over the 4th strand.
- And then the 4th horizontal strand will be vice versa of the 3rd one.
- Once you have done it, you can then either pin up the horizontal strands behind.
- And tie the vertical strands using a hair tie. This will give it a look of the basket.
Tips for Lattice Braid
Hold the strands tightly, to give the lattice braid a nice look.
(31) Mermaid Braid
There are many women around the world who are a fan of Mermaid Braid. The braid looks so elegant and beautiful, that every woman would love to get it. Even many Hollywood and Bollywood actresses also have tried this hair braid. You can wear this hair braid with different dresses, as it will suit any dress style.
How to do Mermaid Braid:
- You have to start by taking a section of hair from the head’s top near the hairline.
- Divide the section of hair into 2 strands equally.
- You have to braid it like the fishtail with a little bit of technique.
- So, initially for the first stitch, you will do as fishtail braid by taking hair from the left side and crossing it over the left strand and then joining it with right strand.
- After that, take the hair from the right side and cross it over the right strand and then join it with left strand.
- Now, start taking hair from the hairline also and add it while braiding.
- So, above steps will go same, but when you will cross the right-side strand with the right-side hair and will join it with left side strand, also add the hair from the right-side hairline to the left side strand.
- And when you will cross the left side hair over the left strand and will add it to the right strand, also take hair from the left side hairline and add it to the right strand.
- Continue braiding using the same steps mentioned above until you reach the neckline.
- From the neckline, you can do the normal braiding, as you did in the first step, but you have to pass the hair under the strand instead of passing it over the strand.
- Once you reach at the end, just tie your braid using an elastic band.
Tips for Mermaid Braid
Pick the equal hair from the hairline while braiding. In the end, you can also try normal fishtail braid instead of the reverse fishtail braid.
(32) Micro Braids
These braids are mostly for the women with curly hair. And this style is being carried mostly by African women. They can be simply done by using the reverse three-strand braid. But on the other hand, one needs to invest a lot of time in braiding the micro braids. You may need someone’s help also to do these braids. So, here we are sharing with you how to do regular micro braids.
How to do Micro Braids:
- Firstly, do the basic things what you need to do before the braiding like washing hair, conditioning them, oiling them, and dry them. After that detangle all the hair strands.
- For short hair strands, it is a bit easy to do, but for long hair, it is time taking. So divide your hair strands into many small sections.
- Now take that small section and divide it further into three parts so that we can make a three-strand reverse braid.
- To do a reverse three-strand braid, you will have to pass take the left strand and pass it under the middle strand, which makes the middle strand the left side strand and the left one the middle strand. Now, take the right-side strand, and pass it under the middle strand. So, the middle strand will become the right strand and the right one will become the middle strand.
- Complete the braid until the end.
- Repeat the same for all the sections of your hair, and your micro braid will be ready.
Tips for Micro Braids
It is very essential to moisturize the hair, as your hair may become dry after making these braids. So, at least oil your hair and scalp once or twice in a week.

(33) Milkmaid Braid
The Milkmaid braid is up for the summer fashion and the spring fashion. It has been styled by many Hollywood celebrities at different events. It is not very difficult hair braid style but reflects elegance in the style. You will look absolutely beautiful with this look. If you have long hair, do try this hair braid style.
How to do Milkmaid Braid:
- We will start with doing the partition of hair in two parts from front to the neckline.
- Now, pick hair from any of the sides, and start braiding.
- You have to make a normal braid, which has to go horizontally towards your face.
- Once you are done with making this regular braid at one side, tie it with a hair tie.
- Now, do the same on the other side of your head also.
- After that, take anyone braid, put it over the head’s top but around 1-inch away from the hairline or the forehead.
- Similarly, take the other braid, and put that too also over the head.
- Tuck the end of both the braids under each other using a hairpin or bobby pin.
- Also, secure the braids using the bobby pins, so that the braids remain at one place. Your milkmaid braid look is now ready to flaunt.
Tips for Milkmaid Braid
Do not braid hair very tightly. Leave some hair strands in the front of the face, to give a frame to the face. You can also make use of hairspray for both the braids.
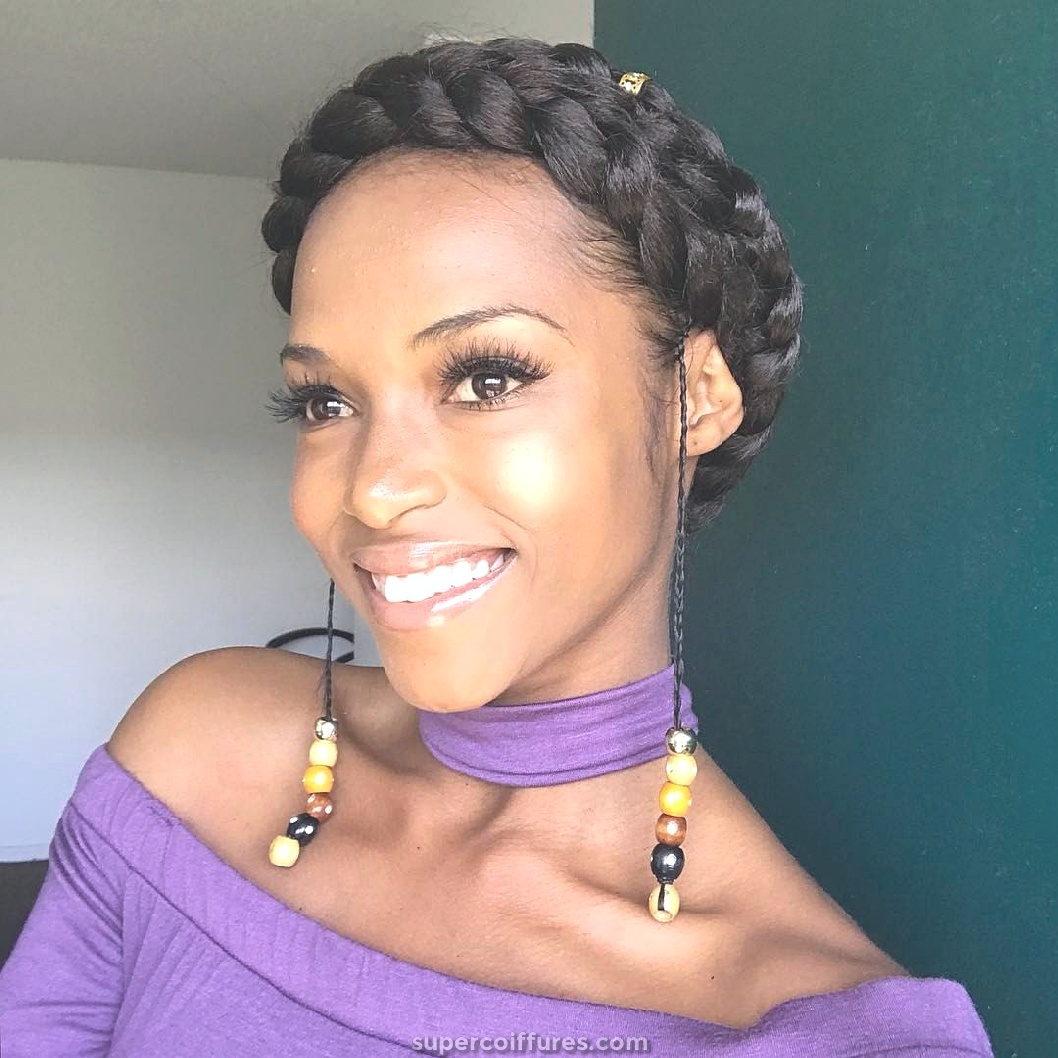
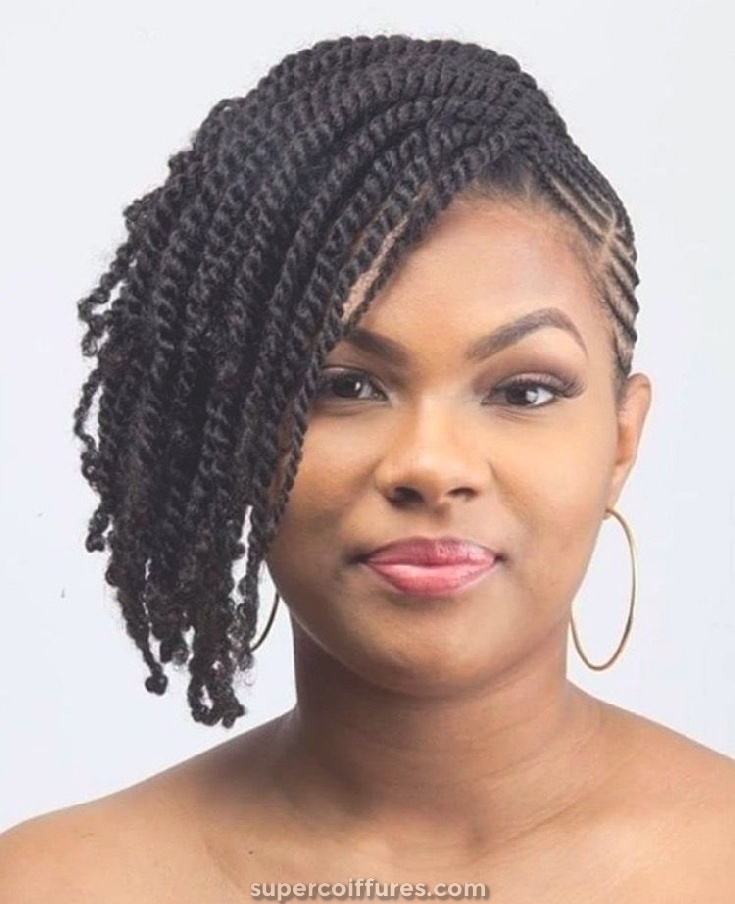
(34) Natural Hair Braids
Another hair braid, which is mostly being used by the women if Africa or America. The natural hair braids have different variations. And it can be made using the neck length hair, mid-length hair, and the long hair as well. Most of these braids are being made using the box braids and the cornrow braids style. Women do use extensions also to carry these braids look.
How to do Natural Hair Braids:
- To make the natural hair braids, you will have to do the box braiding only.
- So, firstly start with cleaning up of hair, and then dry it properly. Brush your hair to remove knots.
- You can do the cornrow braiding at one side in horizontal direction like in the picture, you can see cornrow braiding is done from left to right horizontally. (For doing cornrow braiding you can read the steps above in the cornrow braid tutorial).
- Then, you can start the box braiding on the other side, which means the right side of the hair.
- For that, you have to divide your hair into many small sub-sections.
- Take any one small sub-section and do the division of it in three parts. Start braiding the regular braid using three strands from root to tip.
- Keep braiding all the sub-sections in a similar way.
- To tie the hair or to secure them, dip all the sub-section braids into hot water. It will keep them from opening. So, now your natural hair braids are ready.
Tips for Natural Hair Braids
Do not tie, the box braids very tightly, as it will affect your hair and scalp both. No matter for how long you keep this natural hair braid but do wash your braids at least one time in a week and apply oil as well. Also, use satin or silk pillow cloth or either wrap your braids in satin or silk cloth while sleeping.
(35) Pull Through Braids
A new name in the list of braids but look wise this looks fabulous and hot. In the picture, you will see a horizontal pull through the braid. It can be done vertically also, and that also looks quite glamorous. It is much easier to do this braid than some other braids. And for occasions like wedding, prom night, clubbing, night out, this look is going to rock.
How to do Pull Through Braids:
- First of all, you have to do a side parting of the hair, and we will start braiding with the part which has more hair.
- So, we are starting with the left side. Divide the hair on the left side in a triangle shape section. And secure it with the elastic band.
- In a similar way, you have to pick some more hair strands behind the first tie in the same shape. Tie this one also using an elastic band.
- Now, split the first hair tie into 2 parts, and take the second hair tie, and put it in between the first hair tie split.
- Combine the 2 split sections of the first hair tie again, so that they can wrap the second hair tie section which is in the middle of the two.
- Take some hair strands from outside and bring them to the split parts of the first tie. So, in total now there will be three hair strands including the 2 split hair strands of the first tie and one new hair strand.
- Tie all the three together, using a hair tie. This makes the third hair tie.
- Now split the second hair tie section into two small parts and bring the third one in between the two. Clip the third one like you did the second one before.
- In a similar way, as you did for the first tie, bring the split sections of the second tie together along with some hair strands from outside. And tie the three strands together making use of a hair tie. This will make a fourth hair tie.
- Keep repeating the above steps, until you reach the right side.
- Starting from the right side, pull the sides of the pull through braid slowly and gently, so that it looks full of volume.
- Do, it with all the sections, so that they look same in size. And your pull through braid is now ready.
Tips for Pull Through Braids
To hold this style for a long time, spray some hairspray on the pull through the braid. You can also make the vertical pull through braid in a similar manner.
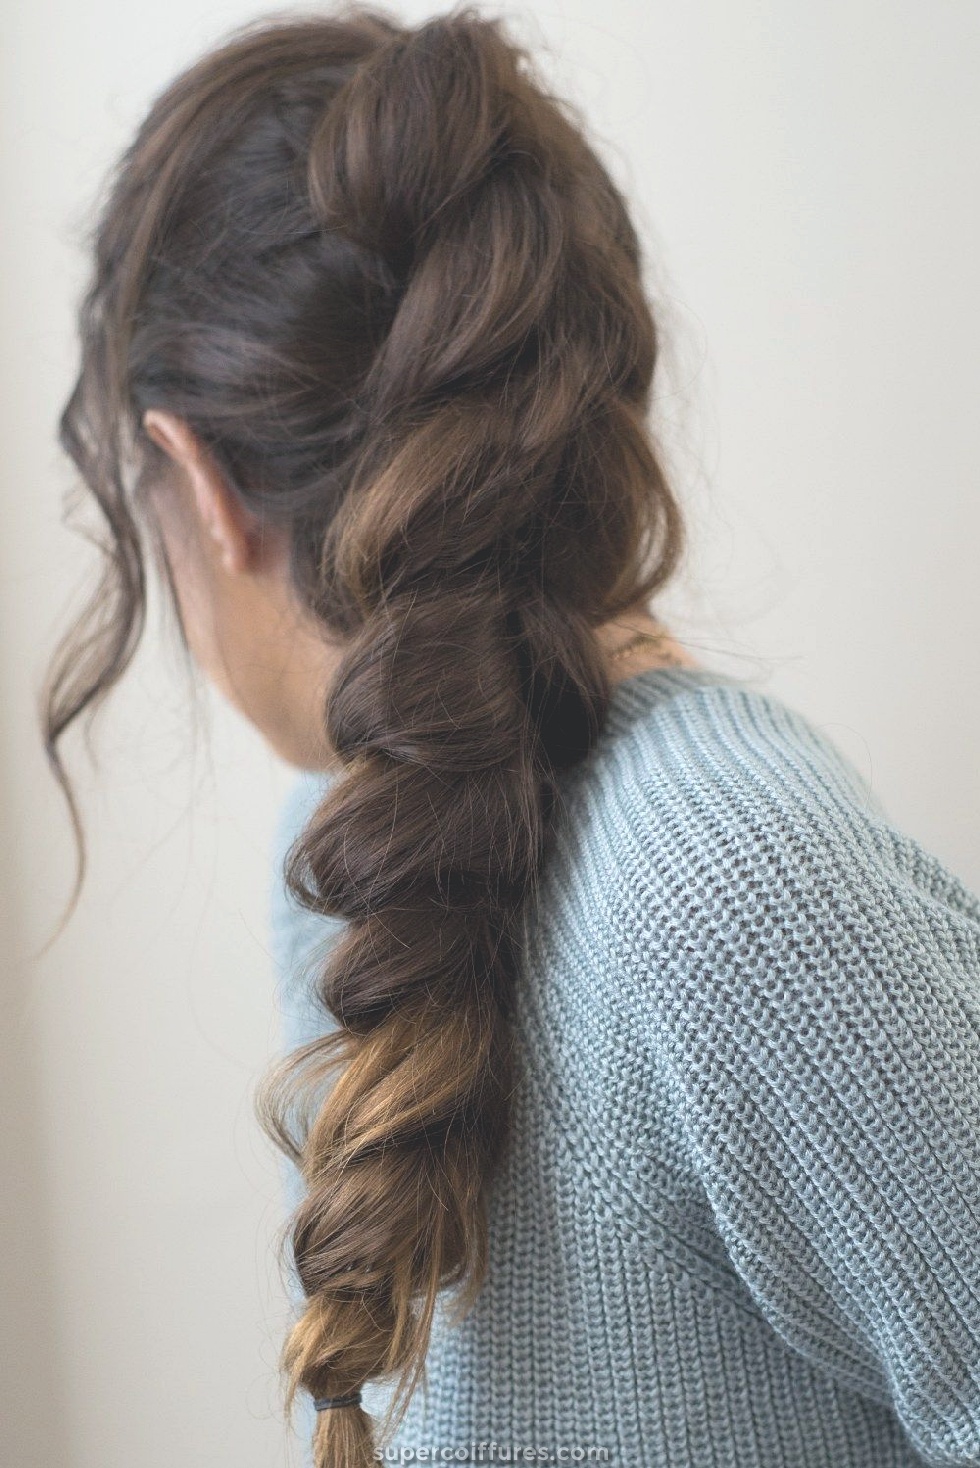
(36) Rope Braid
Carrying a hair braid which looks very stunning and sporty at the same time is what many women want. The Rope braid is one such braid which can be done easily and gives a strong look to your hair. If you are a sports person, I will definitely suggest this one to you. Even you can carry it normally also like that in the picture. Here, we will guide you how to make a regular rope braid.
How to do Rope Braid:
- Clean your hair and then dry it. After that comb, it properly to solve all the tangles to avoid any bumps in the braid.
- After brushing up your hair towards the back, bring your hair together at the crown of the head, to make it into a high ponytail.
- Tie the ponytail using a hair tie, and then take some hair strands from under the ponytail and wrap it around the hair tie to hide it.
- Now, divide your ponytail hair into 2 parts equally. Hold the right section in right hand, and the left one in the left hand.
- Now, start twisting both the section tightly but individually in the clockwise direction.
- After that, start twisting both the sections of hair around each other in the opposite direction.
- Once you reach at the end, tie them using an elastic band.
Tips for Rope Braid
You can use hair cream to bring the smoothness in the braid. In the end, you can use hairspray so that the hair strands in the rope braid do not break and come out because of twisting.
(37) Senegalese Twist Braids
Mostly used by the African-American women, this braid has now made its own place among the other braids. You will see many women of Hollywood carrying the Senegalese Twist Braids or Buns look. Braiding this one is difficult to do, and you can even add the extensions for saving your time. Depending on the event you can either let your Senegalese twist braids loose or can tie them up in a ponytail or a bun or maybe fusion also.
How to do Senegalese Twist Braids:
- As these braids are going to be on your head for quite a long time, so it will be good if you can wash them properly and moisturize them. Let them get dry and then comb them to solve the knots.
- With the help of a rat tail comb, you can part some section of hair strands at your head’s back.
- Secure rest of your hair strands using hair clips.
- Now, the hair section you separated will be the 1st row, and you have to take a small section from it in the shape of a box, which will be of the size of your finger’s width. Again, secure the rest of the hair strands in that row using hair clips.
- Now divide the hair of that box-shape section into 2 parts equally.
- With the help of your fingers, you have to start twisting the sections in the right direction while holding the root of that section tightly. Keep twisting until they form a coil like a shape.
- Do this with the other section also. And then you can switch the place of the two sections by putting the right coiled section over the left one.
- Complete twisting the hair of the whole row by using the above steps by dividing them first into the box.
- Once you are done with the row, start taking another row above it and do the same with them. Keep doing it till you finish the whole head hair.
- For securing all these braids, you can dip the end of these braids into hot water for sealing them.
Tips for Senegalese Twist Braids
Do use oil on your Senegalese Twist Braids at least two times a week. You can make the use of extensions also following the same steps.

(38) Skeleton Braids
Skeleton braids are also medium level braids which can be made easily but will need some effort. Most of these kinds of braids are for all the occasions. And you can wear this braid with different outfits as well, from the denim to the dresses. The skeleton braid in the picture is not that difficult to make, so let’s start with it.
How to do Skeleton Braids:
- Your hair should not have any knots, so make sure you untangle them before we start the braiding process.
- Now bring all your tresses back and pick some hair strands from the center.
- You have to now make a regular braid by these hair strands. So, divide them into three sections, and start making a regular three-strand braid. If you don’t know how to make one, you can read it in the tutorial below.
- Make sure you make a very sleek braid, so pick hair also according to that only in the starting (above step).
- Once you are done with the braiding part, secure it using a rubber band.
- Now, loosen the plaits of your braid by pulling them slowly.
- It’s now the turn to pull some hair strands from both sides of your face as well. And add them to the braid, like you can see in the picture, the braid is covered with hair strand from both sides making a rib or skeleton structure.
- Keep doing the same till you reach the end.
- You can also twist the strands which you have added to make this braid.
Tips for Skeleton Braids
To get this braided look, you need to have straight hair, so if you have curly hair use straightener. Also, at the end use hairspray to keep braid perfect.
(39) Spiral Braids
Spiral braids is something very unique and gorgeous to make. After looking at this braid, many ladies find it difficult to do. But actually, it is not that difficult. And if you will learn to do it once, you can try it again and again.
How to do Spiral Braids:
- After combing your hair, use your comb to get your head’s center. And from there pick up some hair strands.
- Divide the hair strands into 3 equal parts for braiding.
- Start making the regular braid in the starting, but the braid has to go around in circular motion.
- While making a braid, keep adding the hair strands to it from the side and that too in circular motion only. It will be like a French Spiral Braid.
- Continuously keep braiding in the same way, you will notice the spiral braid forming.
- After reaching to the end, keep braiding till the tip. And tie it using a hair tie.
- To make the extra braid a part of your spiral braid, you can pass it from any of the circles. And to secure that extra braided part, you can secure it using a bobby pin.
- Your spiral braid is now ready.
Tips for Spiral Braids
In case, any hair strands are coming out, use hair pins to put them back at their place. And you can also make use of hairspray to keep the braid for a long time.
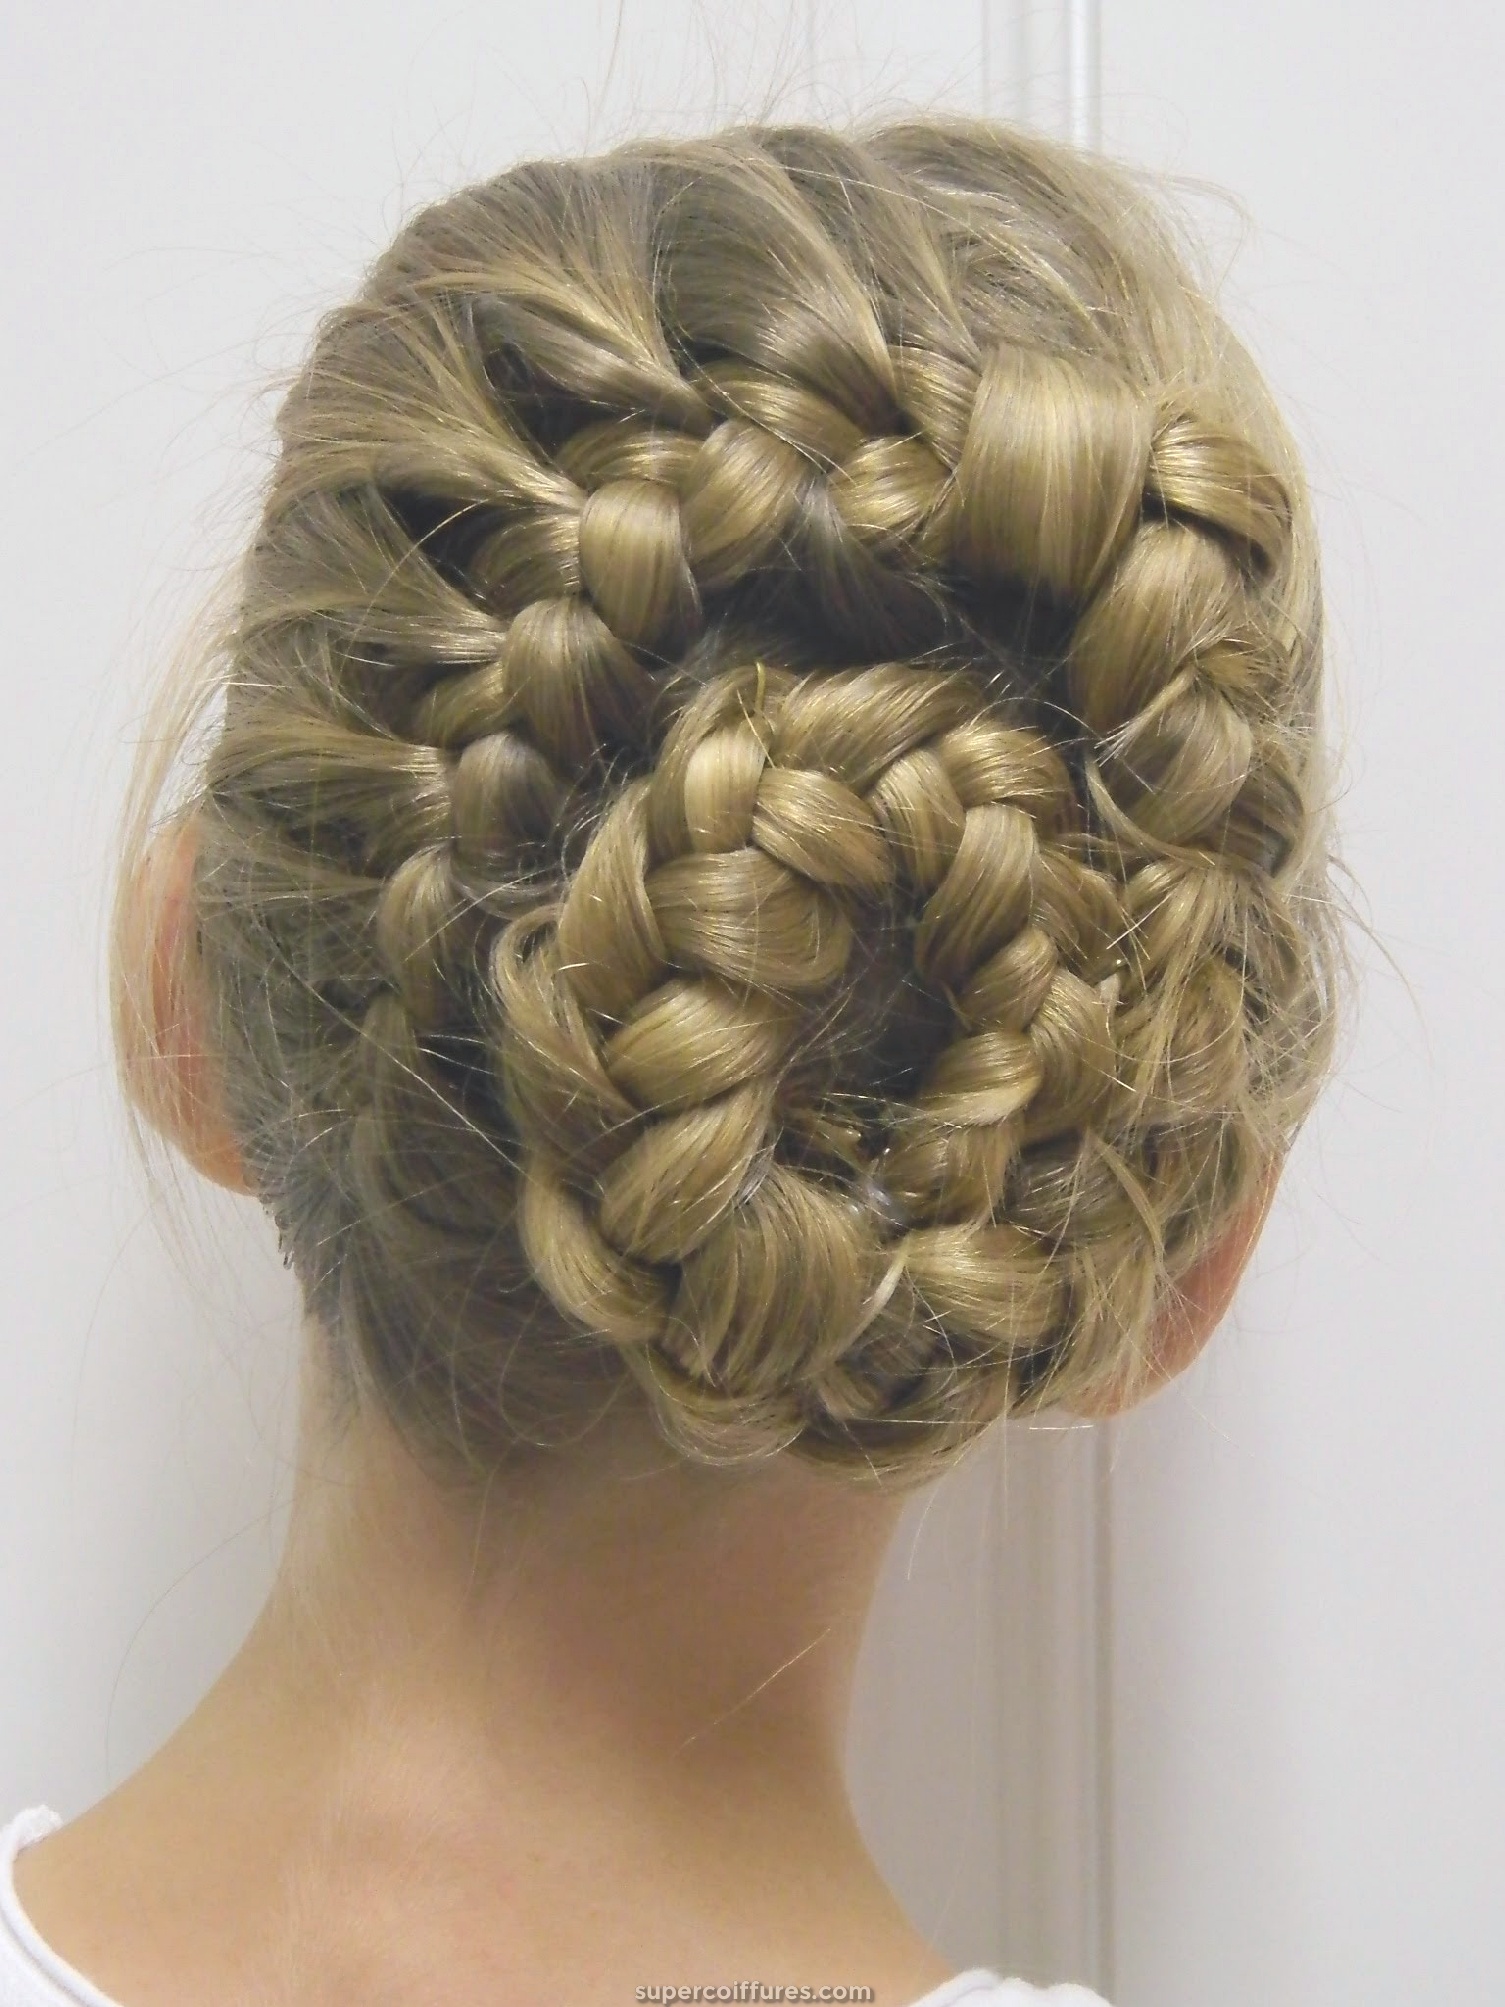
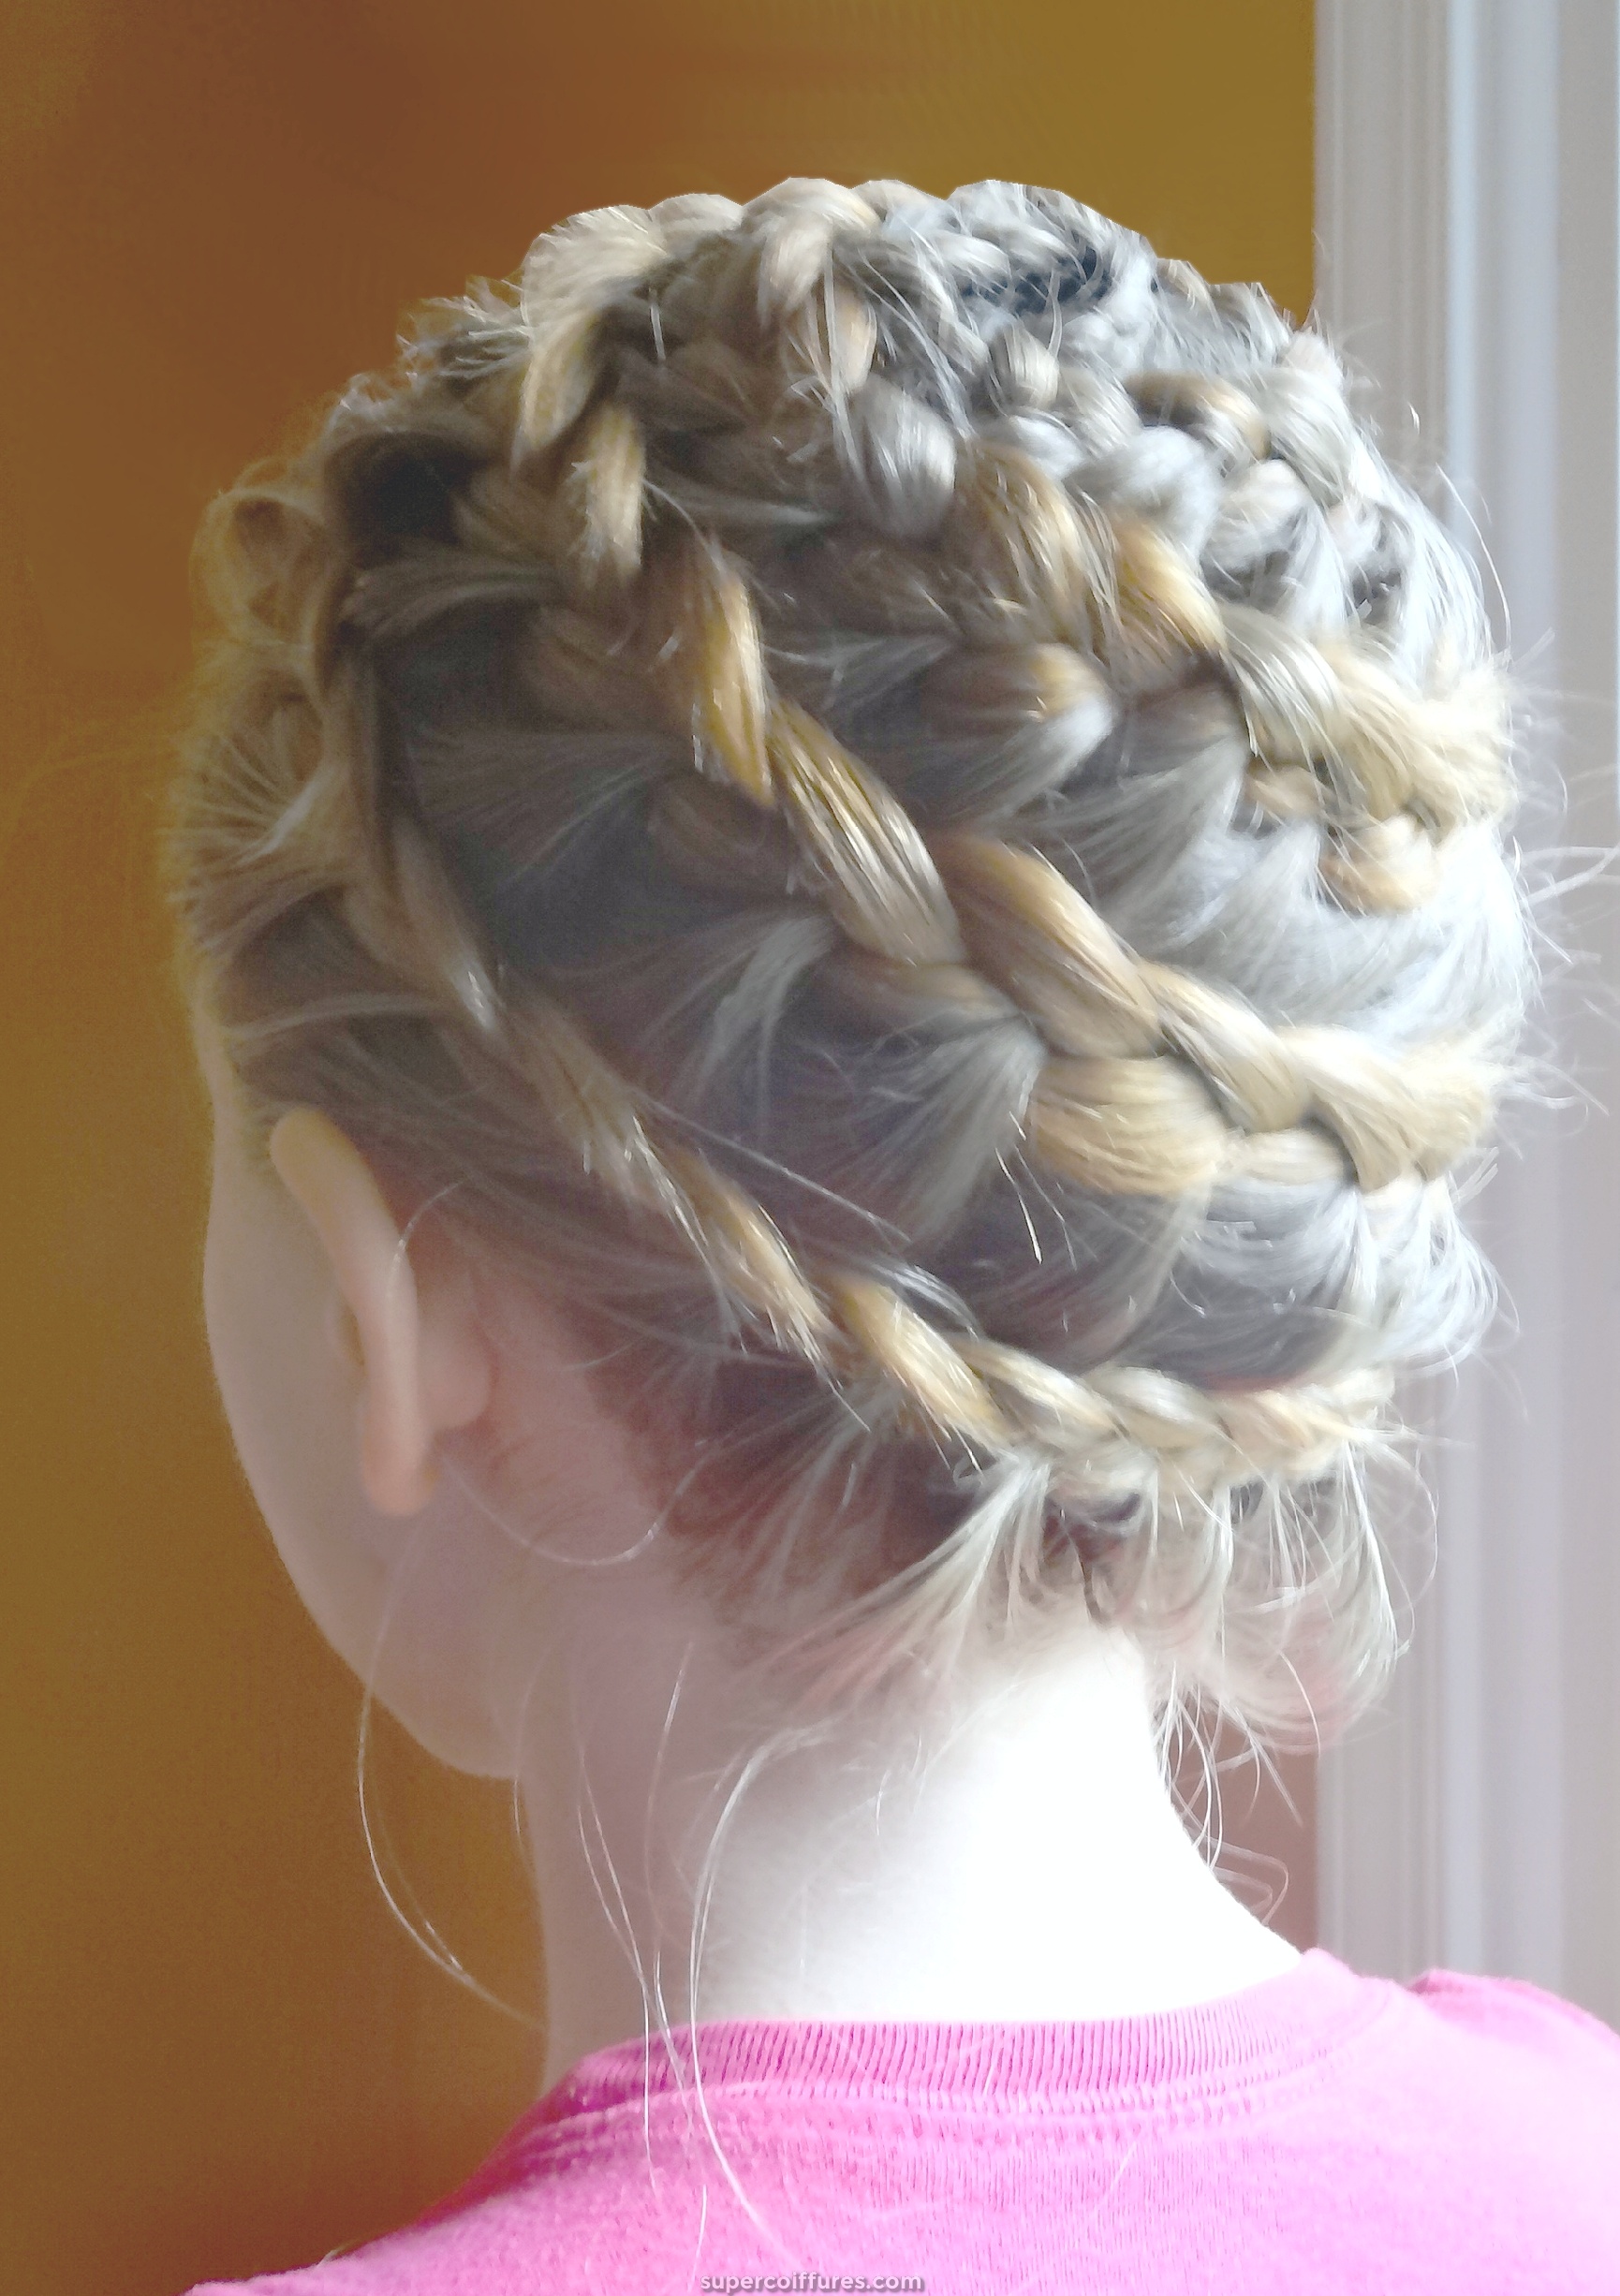
(40) Three Strand Braid
A three strand braid is one of the most common braids which most of us know. We have been doing this braid from our childhood, but still many of us don’t know how to do it. And we take others help for doing it. But with the steps we are going to share with you all here, you all will not at all need anyone’s help in doing a three-strand braid. Most importantly, that this braid goes with almost everything, and it is being used with other braids also as a fusion.
How to do Three Strand Braid:
- The first thing you need to do is to untangle your hair by combing it properly.
- Comb your hair back, and then from the crown of the head, pick a thick amount of hair strands. And divide them into 3 sections.
- We will now start braiding the three-strand braid. So, take the left strand and put it over the middle strand. By doing this the middle strand will come on the left side and the left one in the mid.
- Now, cross the right strand over the mid-strand, making mid-strand at right. And right strand in the mid.
- Follow the above-mentioned steps again and again and turn by turn, which means left one then right one and so on.
- By doing this you will reach at the end and the braid will get complete.
- Tie the braid with the help of an elastic band.
Tips for Three Strand Braid
Here we have told you about the simple three-strand braid. But you can try different variations or can make even two three-strand braids also.
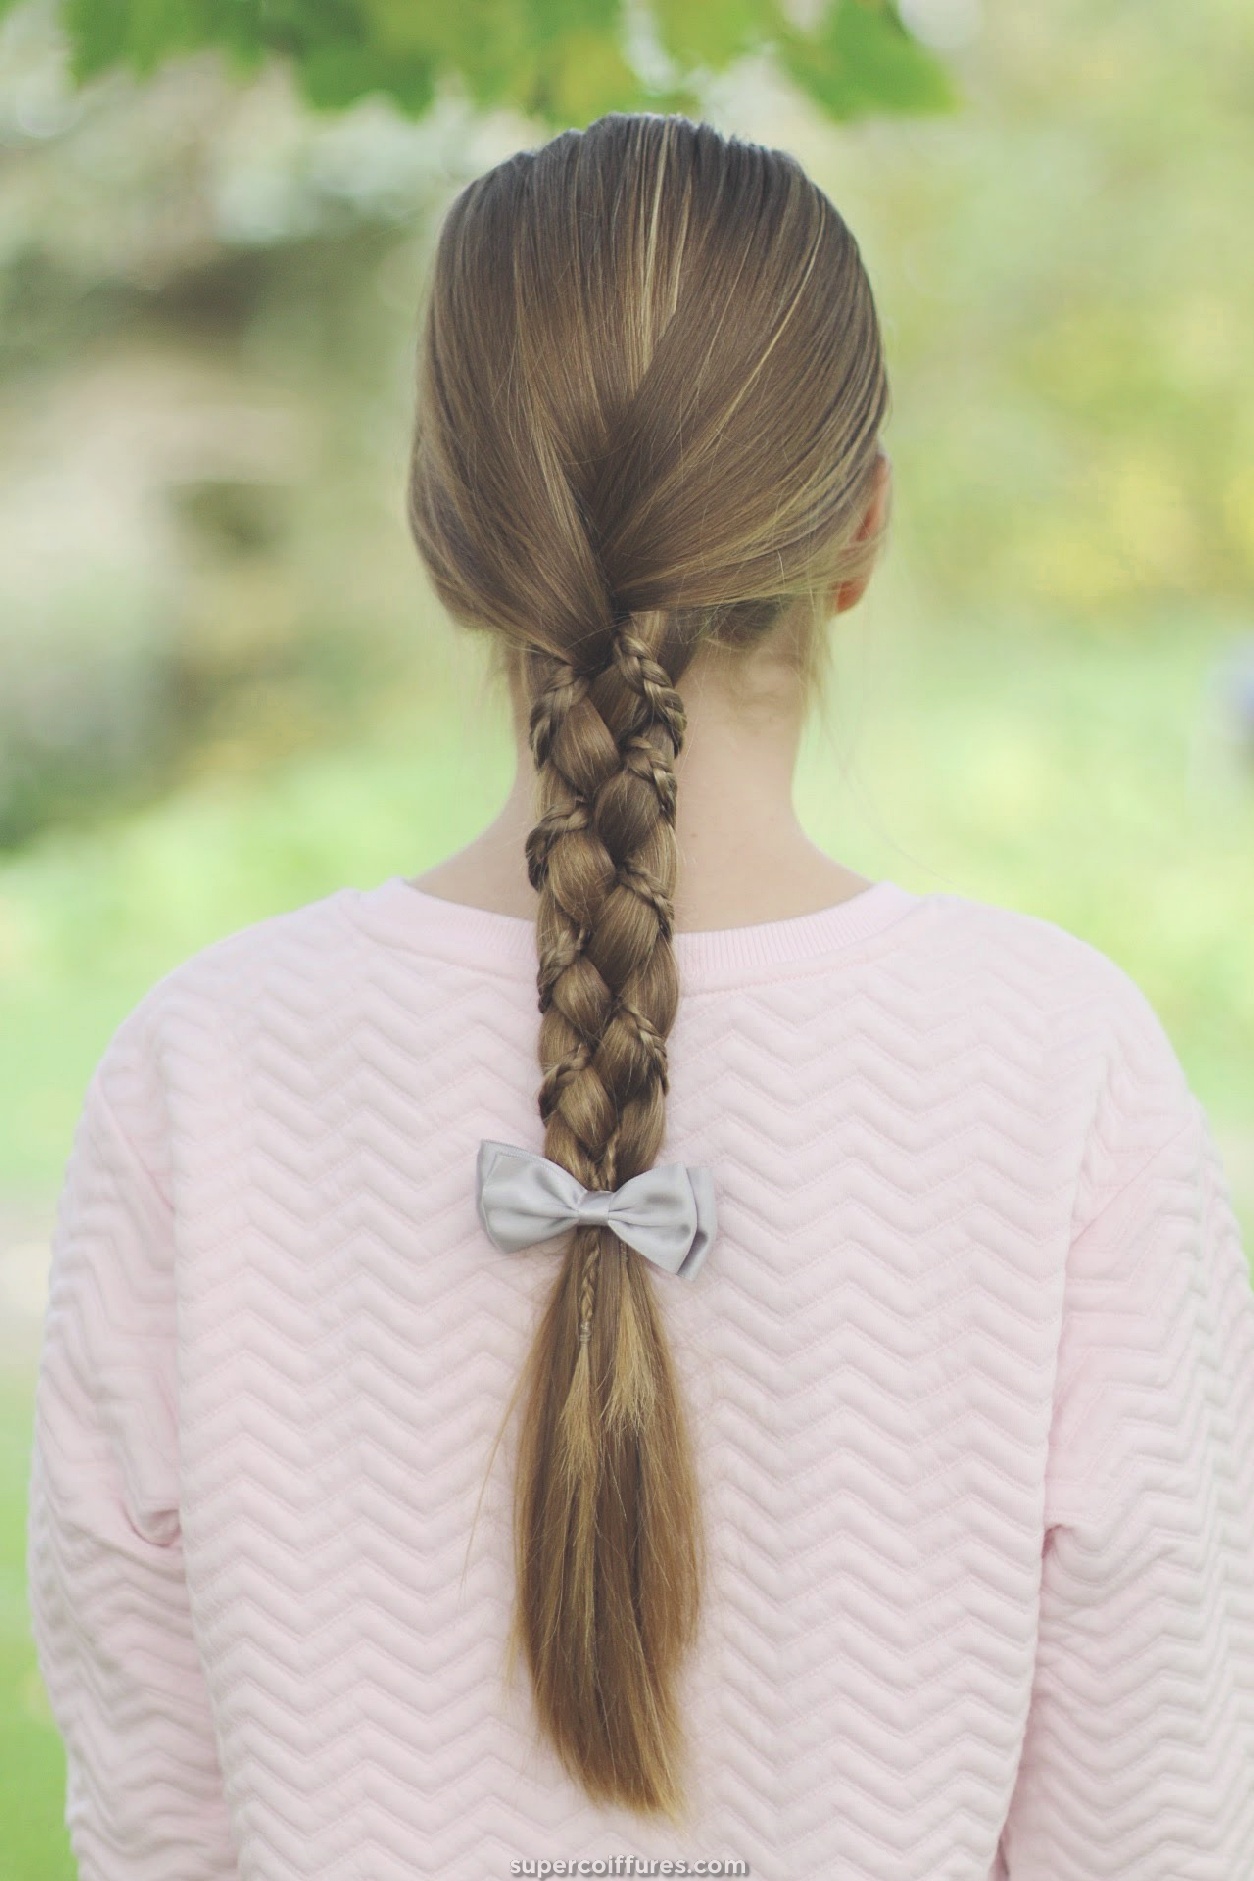
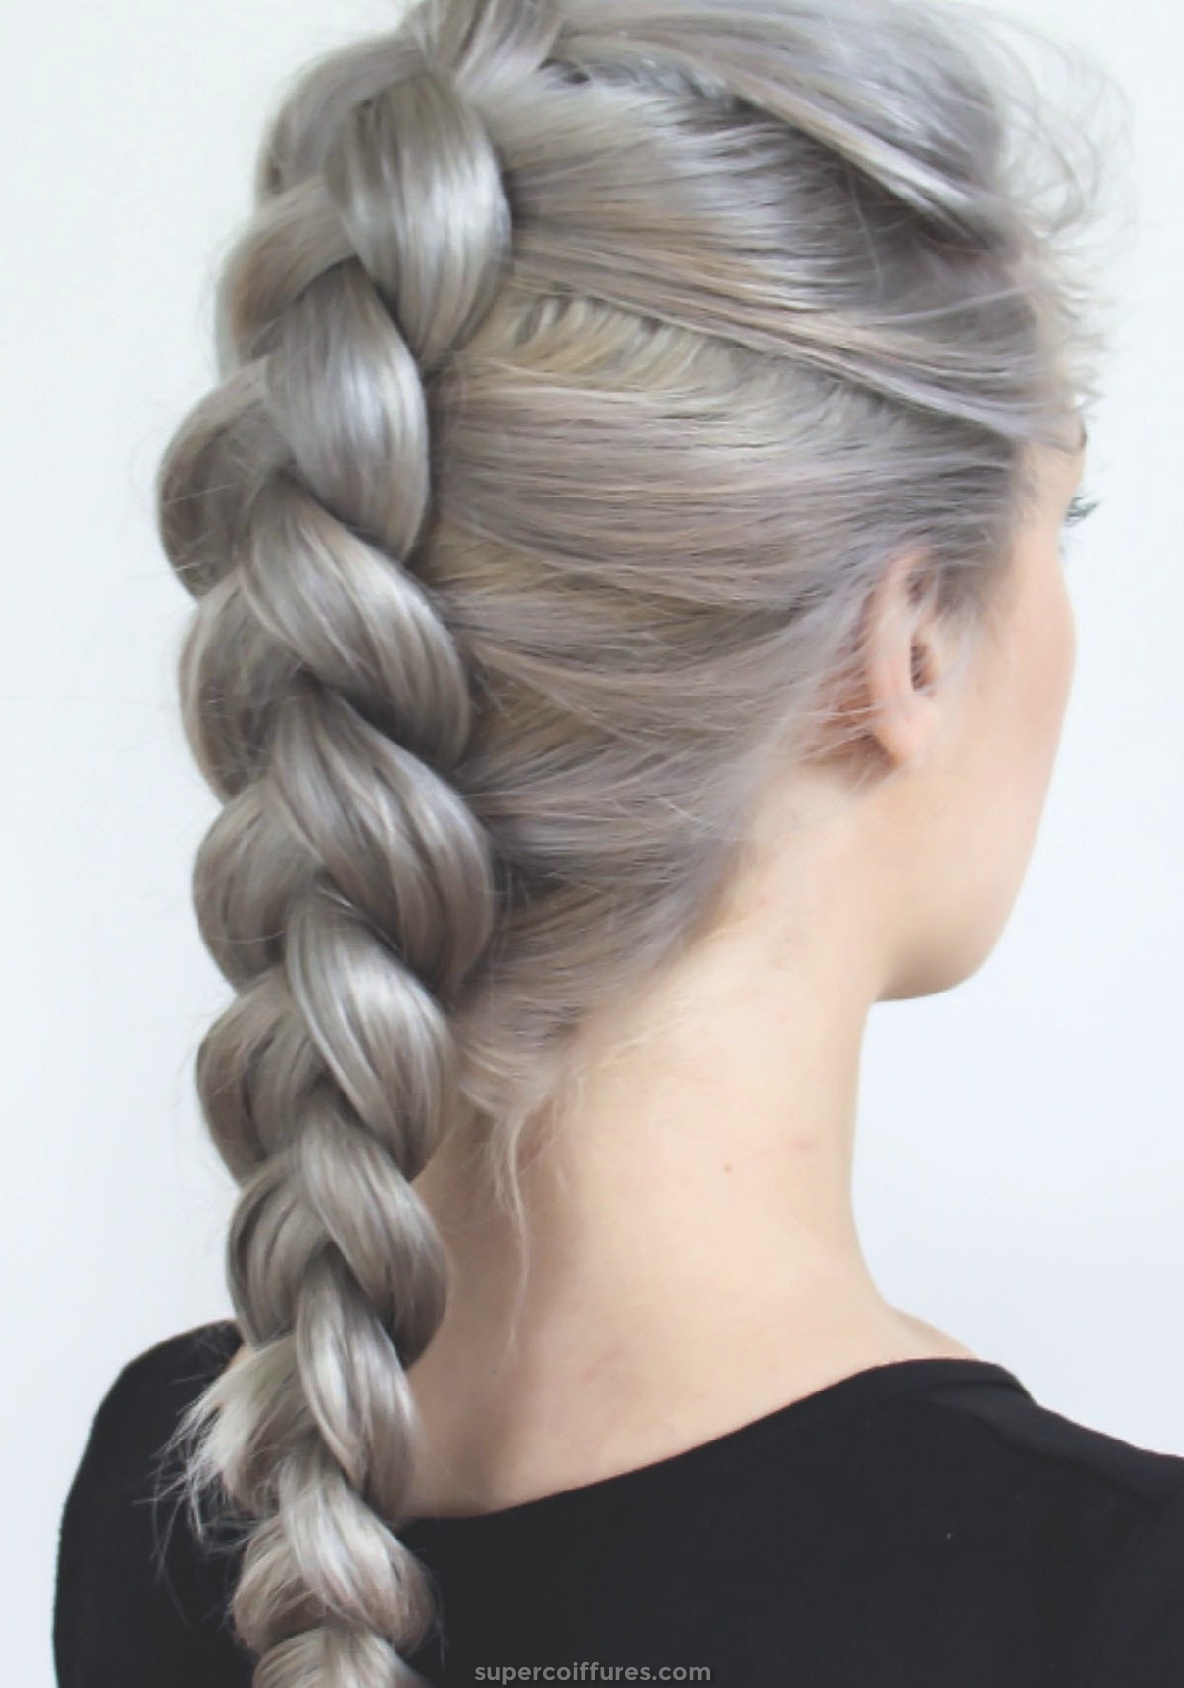
(41) Triple Fishtail Braid
We already love fishtail braids, and when we see that there are many variations available in the fishtail braid, we feel like trying every braid. As it looks stunning and very pretty also. In this triple fishtail braid, three fishtail braids are being braided together to make this braid. There is no doubt how beautiful this braid will look for any wedding related occasion or parties also.
How to do Triple Fishtail Braid:
- If you know how to make a fishtail braid, then you can easily make the triple fishtail braid.
- Properly comb your hair by solving all the tangles. Then, divide your hair into three parts. One part at the back and the other two parts at both sides.
- Pick any of the sides and start making fishtails braid from it by dividing it into two strands.
- You can check above the method of doing fishtail braiding, and you have to follow the same.
- Once you are done with the fishtail braid of one side, secure it using an elastic band.
- Take the hair strands of another side, and again you have to make the fishtail braid only. So, follow the process given above in the fishtail tutorial and braid it.
- After finishing the other side braid, just tie it up using an elastic band.
- It’s now the time to take the third section of hair which is at the back and start doing the fishtail braiding. After finishing the fishtail braid, secure this braid also with an elastic band.
- Now you have 3 fishtail braids on your head. And you have to braid them together to make a Triple Fishtail Braid.
- You can start braiding all the fishtail braids like you do a regular braid of three strands.
- And once the triple fishtail braid comes to an end, tie it using a hair tie.
Tips for Triple Fishtail Braid
Make use of hairspray, so that your triple fishtail braid looks as beautiful as the one in the picture.
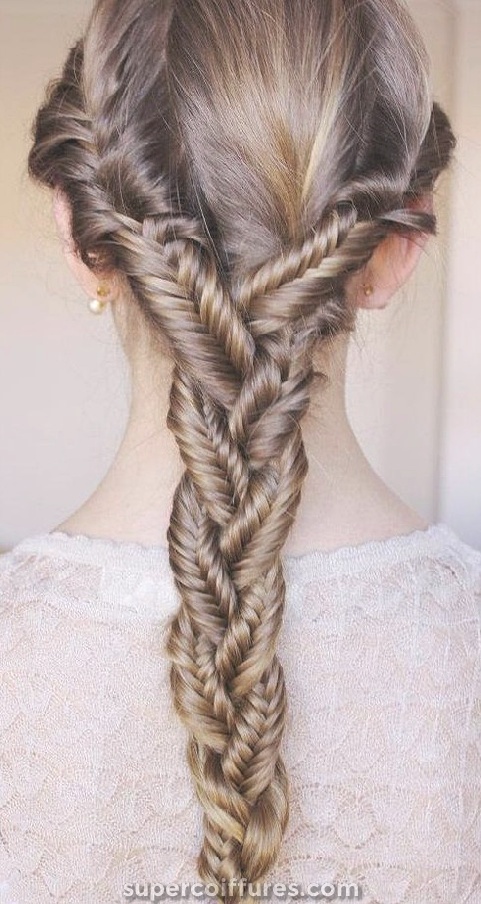
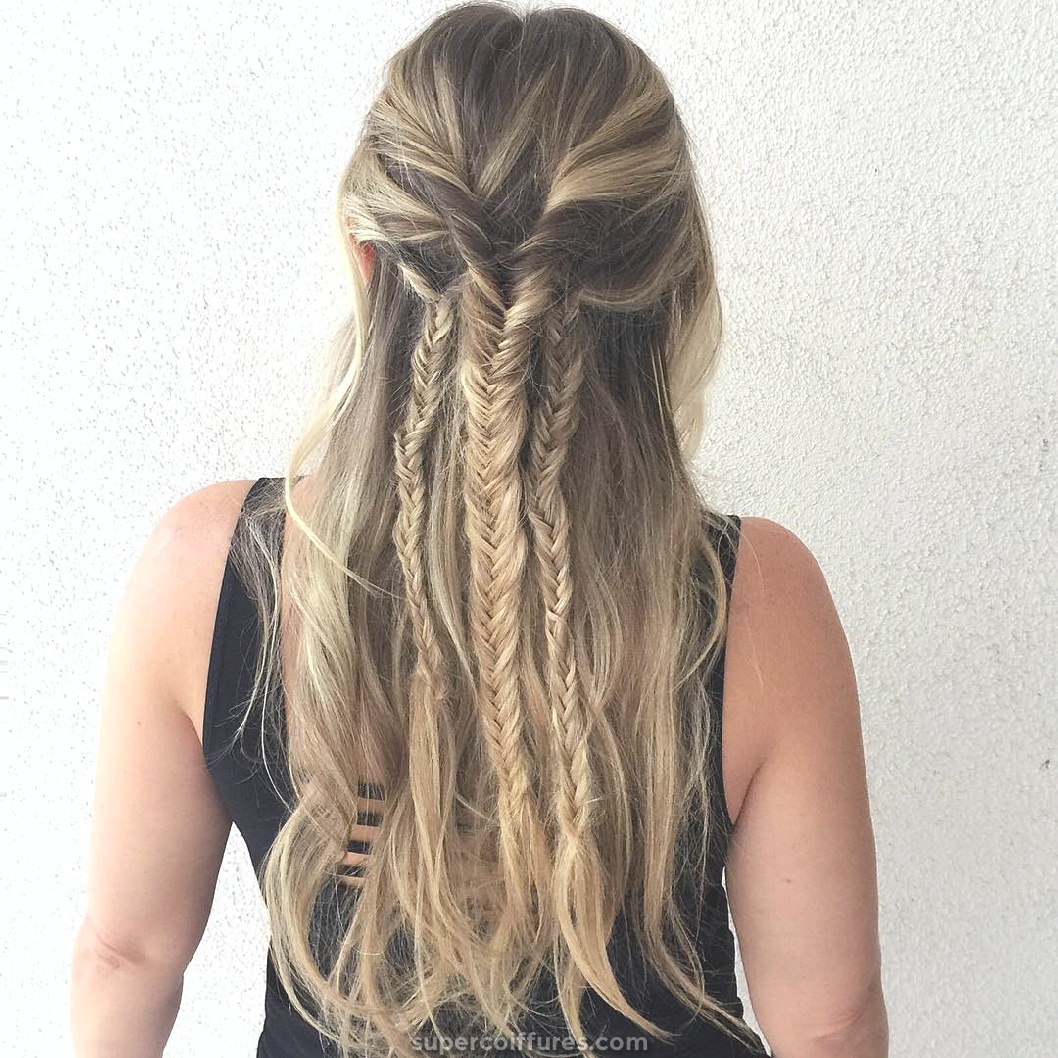
(42) Waterfall Braid
Whether it is a back-waterfall braid or the one on the side, both looks great. The good part about the waterfall braids is, that you need not worry about your hair texture or hair type. It can be done on straight smooth hair and on curvy and wavy hair too. It suits both the formal and the informal occasions. A neat side waterfall braid for an office party is perfect. And in a similar way, it adds charm to your look when you wear a back-waterfall braid with curvy hair for a wedding reception.
How to do Waterfall Braid:
- As it is a side waterfall braid, so, first of all, do side parting of the hair.
- You can make a braid on any of the sides, so we are doing it on the right side.
- Take hair from the front head near to the hairline and divide the hair into two parts.
- Make the hair strand near the hairline cross over the other hair strand.
- Bring a new hair strand from the inner side of the head, and make it fall on the inner strand passing it under the strand near the hairline.
- Let that new hair strand which you added from outside fall in between the braid giving a waterfall look.
- Repeat the same steps again by crossing the outer strand which is towards the hairline over the inner strand. And then adding a new fall by passing the new hair strand from the top of the head in between the braid.
- You have to braid it till you reach the crown of the head.
- Once you reach there, you can either secure the hair with the help of elastic or bobby pins. Or you can continue braiding but, it has to be a normal three strand braid. And tuck the braid at the back of the head at the crown.
Tips for Waterfall Braid
You can use hairspray to make this side waterfall braid looks more perfect.
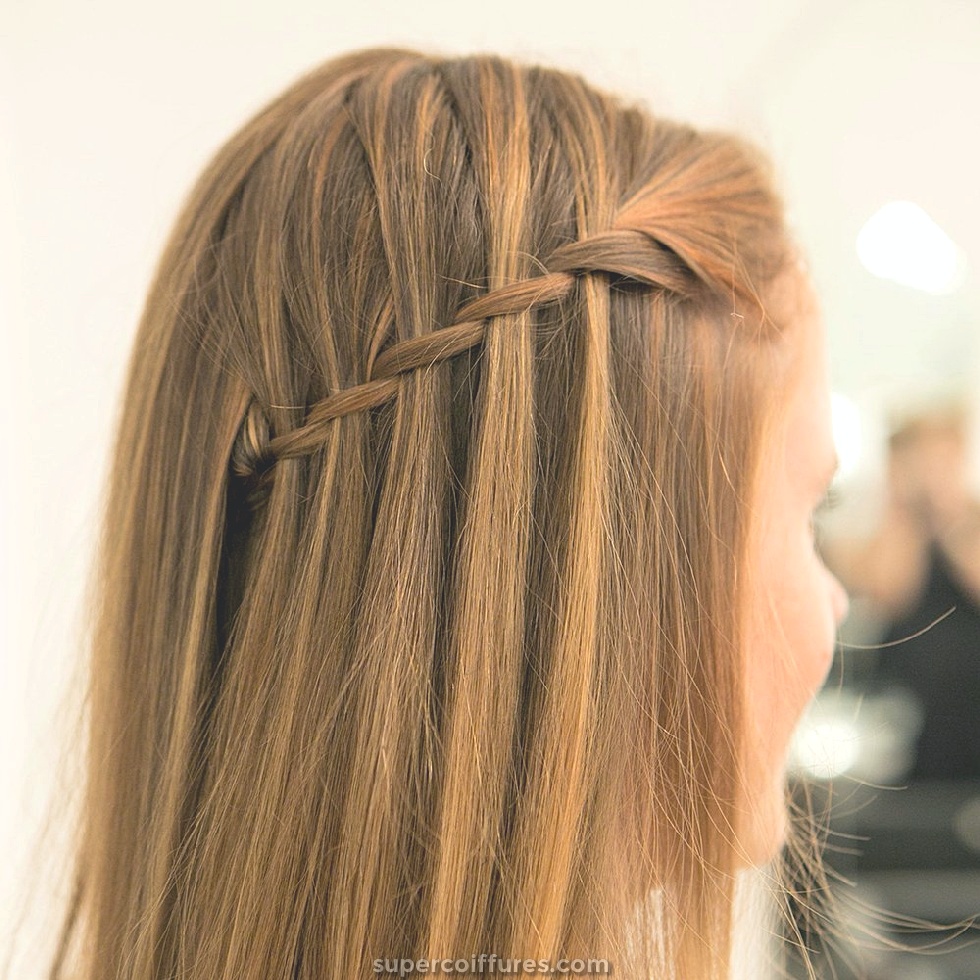
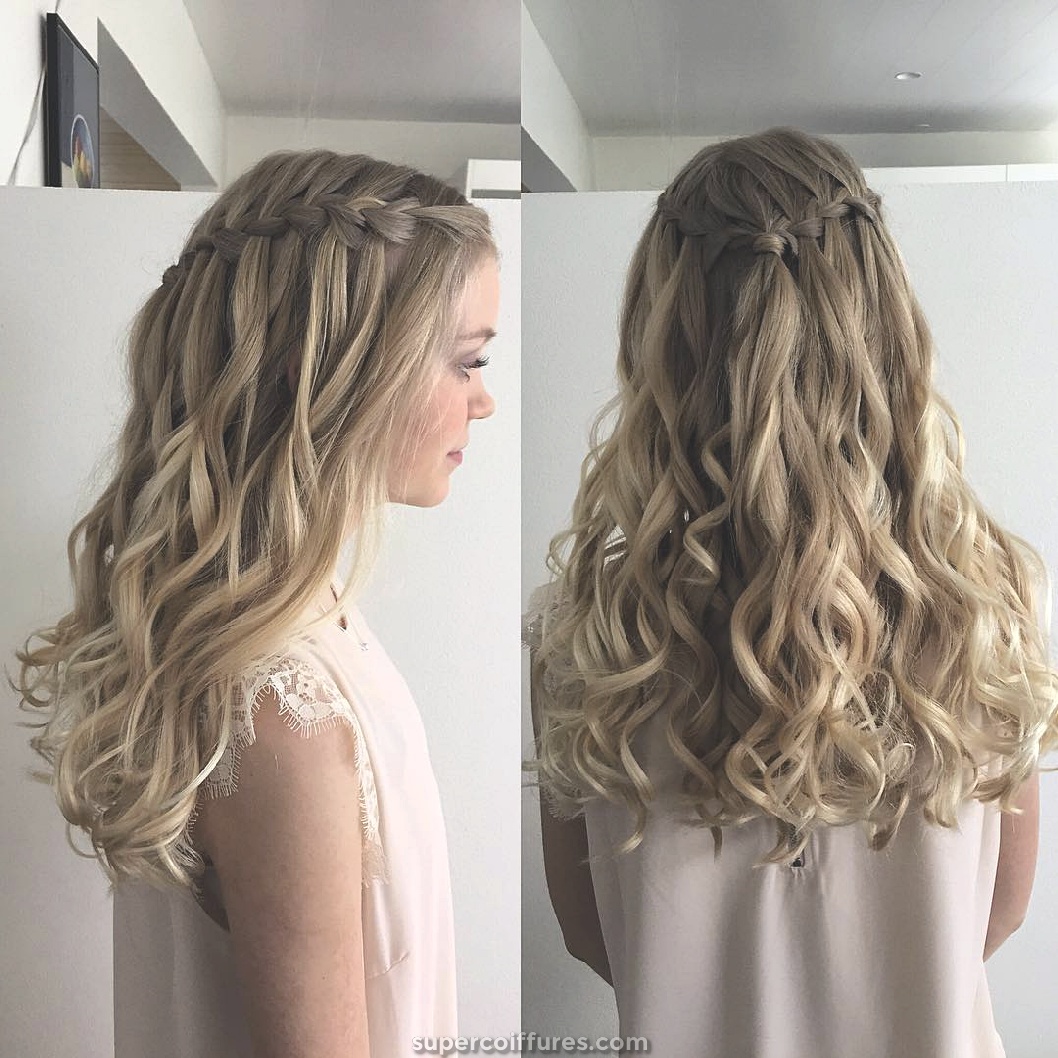
(43) Waterfall Twist Braid
Waterfall Twist Braid is not much different than the regular waterfall braid. Here, the braid is being made by twisting it. It can be made without much difficulty. A gown or a dress will perfectly go with this braid. Even you can wear it on denim and tops as well. Because of the curvy hair, this braid is looking full of volume. It will look dazzling on anyone who will wear this braid.
How to do Waterfall Twist Braid:
- After combing and parting your hair from the front mid, you have to start the process of braiding.
- For braiding, you will have to take a large amount of hair from one side of the front head.
- Do the division of the hair strands into 2 equal parts. And hold them just like you do during the regular waterfall braid.
- Put the outer strand over the other strand.
- Now, take extra small hair strands from the partition side and put it over the hair strand on the inner side and then under the hair strand on the outer side.
- You will need someone’s help for holding that hair strand which you passed in between the braid.
- Again, cross the outer side strand of the braid over the inner side strand. Take the extra hair strand again and make them fall from the mid of the two braids. But make sure that the braid should go cross over the inner strand of the braid and should pass under the outer strand of the braid.
- Ask the person to hold this hair strand also which you passed between the braid.
- Continuously keep doing the same steps as mentioned above till you braid around your head.
- To secure the braid, use bobby pins. And your waterfall twist braid is ready now.
Tips for Waterfall Twist Braid
Take a thick section of hair for the waterfall braid, so that you can complete the braid and reach the other corner of the head.
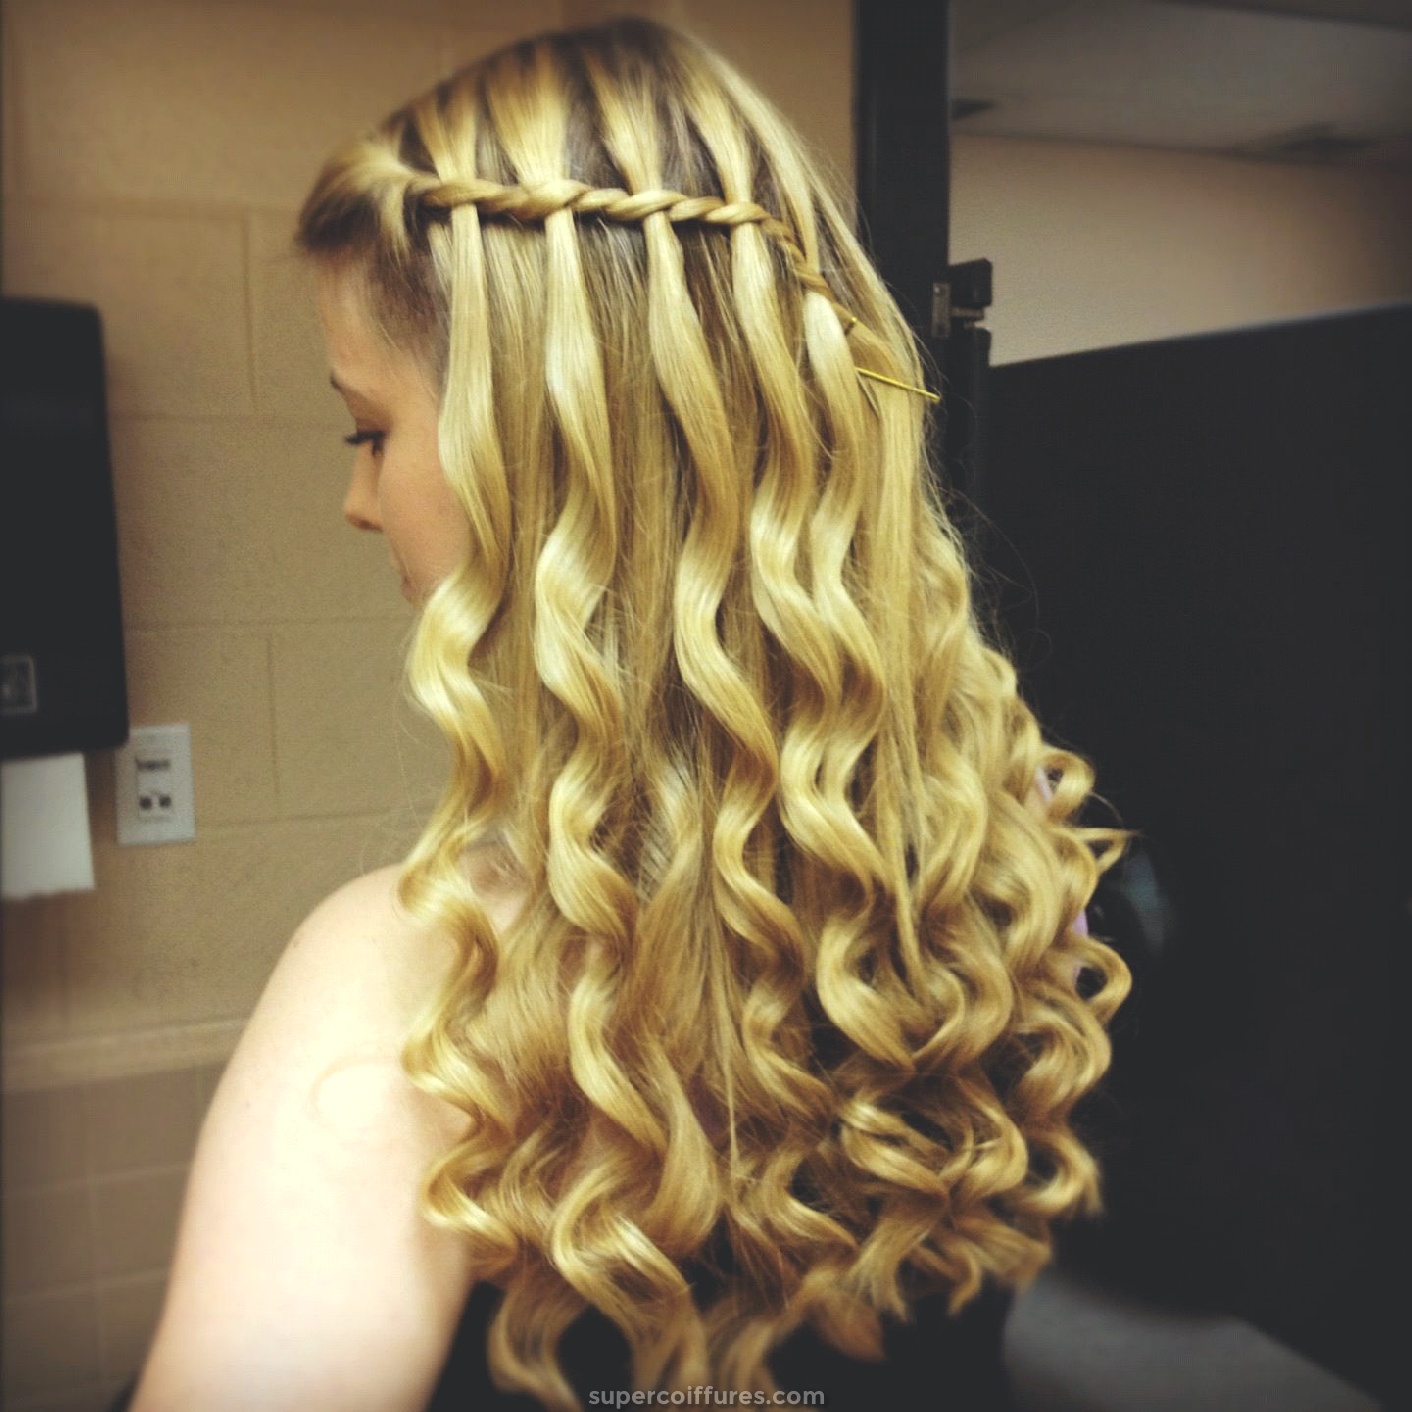
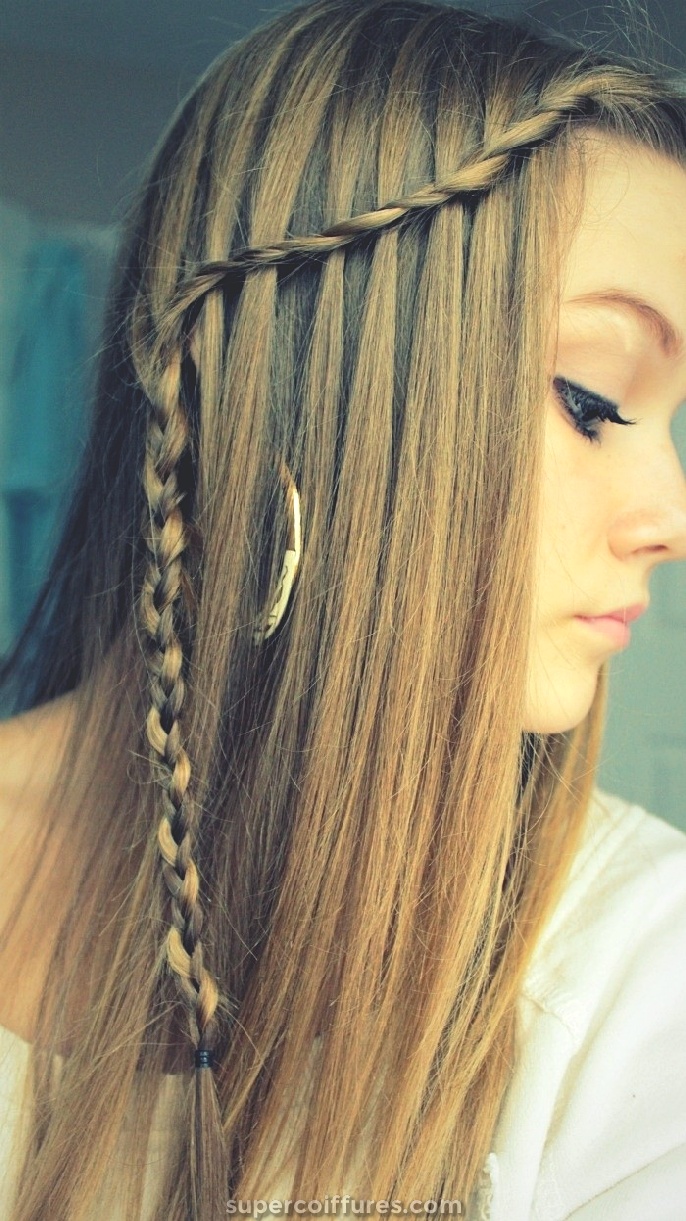
(44) Zig Zag Braids
If you will look at the picture, you will find that this braid hairstyle is a mixture of two braids hairstyle. One is the zig-zag braid hairstyle and the other one is the waterfall braid hairstyle. We have already checked above how to do Waterfall Braid Hairstyle. This zig-zag braids hairstyle will surely catch many eyes. For the occasions like a wedding ceremony or reception, or any grand house party or traditional party, this look is completely perfect.
How to do Zig Zag Braids:
- Brush your hair towards the back, and then you have to start braiding.
- You can start braiding from any side, either right or either left.
- We are going to guide you how to start braiding from the right side. Take hair strands from the right side from the hairline and around 1-inch above the ear.
- Divide the hair into 3 sections equally and start braiding diagonally from right to left.
- While braiding when you will move from right to left, also keep adding the outer hair strands in the braid on both sides. This will help in attaching the braid to the head only with the help of strands.
- Once your reach to the left while braiding, now start braiding towards the right and that too diagonally by adding outer hair strands.
- Keep moving the braid diagonally after reaching to the left and right corner.
- Once you reach the end of the braid that is the tip of the hair, all the hair should be attached to the braid.
- You will see a zig-zag braid at your back.
Tips for Zig Zag Braids
You can try any other braid also like the fishtail braid or lace braid for braiding Zig Zag Braid. Try this only if you have long hair, as this does not look great on medium or short length hair.
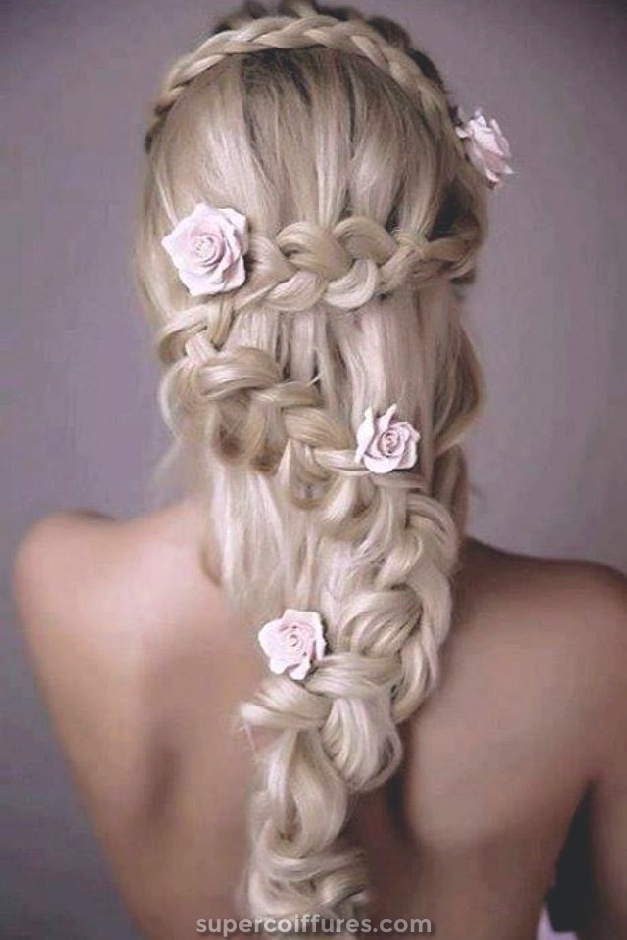
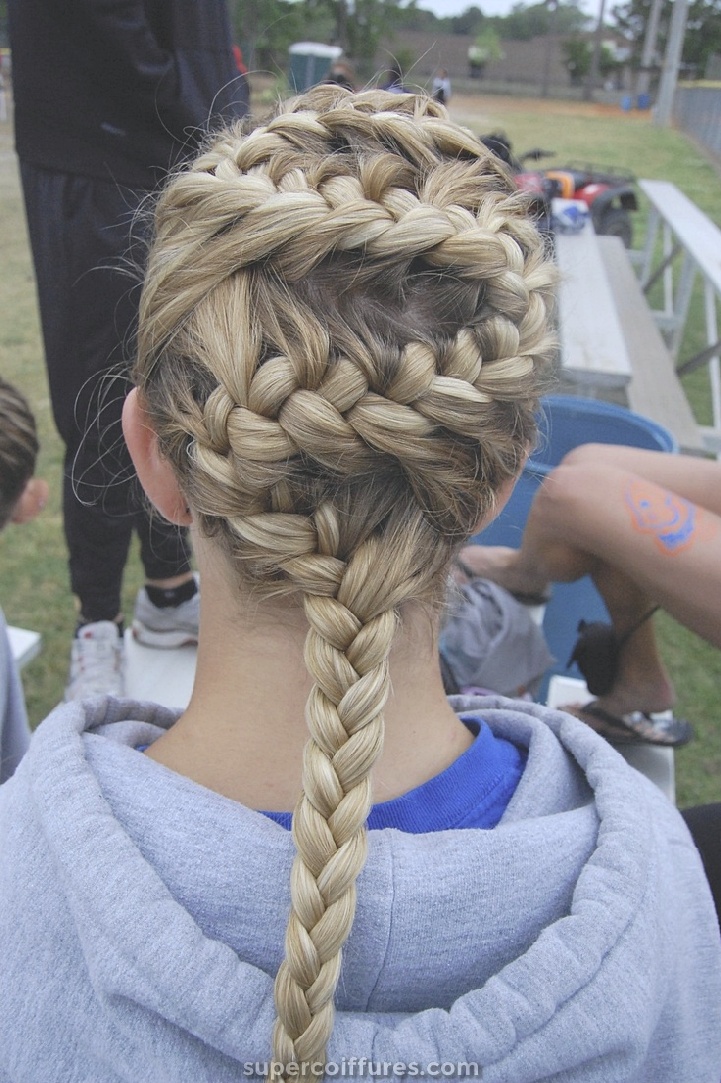
(45) Zipper Braid
Coming to our last braid, which is the Zipper Braid, it looks stunning. But when it comes to styling and doing this braid, it is not that easy task. It goes well for someone with long tresses but needs an expertise in braiding to do this style. Being one of the stylish updo hairstyles, you can carry Zipper braid at any formal party.
How to do Zipper Braid:
- To start this braid, first of all, wet your hair and comb it properly.
- We will start by taking a small amount of hair from the top of your head. Now divide the hair strands into 3 parts.
- Start braiding it by placing the middle strand over the left strand. So, now the left strand will be the middle strand and you have to take this strand over the right strand.
- Now, after the first stitch, take the strand in the middle over the strand at the left. And now instead of taking it over, take it under both the strands at right.
- You will have to take someone’s help to hold it.
- Take hair from the right side of your head as a new strand and cross it over the middle strand. And then cross it below the left strand.
- Again, you will need someone to hold it.
- Your base stitches for the zipper braid are now ready.
- Make sure that both the strands at left and right which was asked to hold are held by someone.
- Take some hair from the left side and cross it over the middle strand and then below the right strand. Ask the person to hold this strand as well.
- Bring the first stand at right held by that person under the second or new strand.
- Then, add this strand to the middle one.
- Now, repeat the same steps for both right and left side, until you have no hair left to add in the braid.
- Make a regular braid with the left hair strands. And twist it to make a bun from it.
- With the help of bobby pins, secure the bun at the required place.
- You will see the zipper braid hairstyle now on your head.
Tips for Zipper Braid
Do wet your hair before doing it. You can also add hairspray once you finish it.
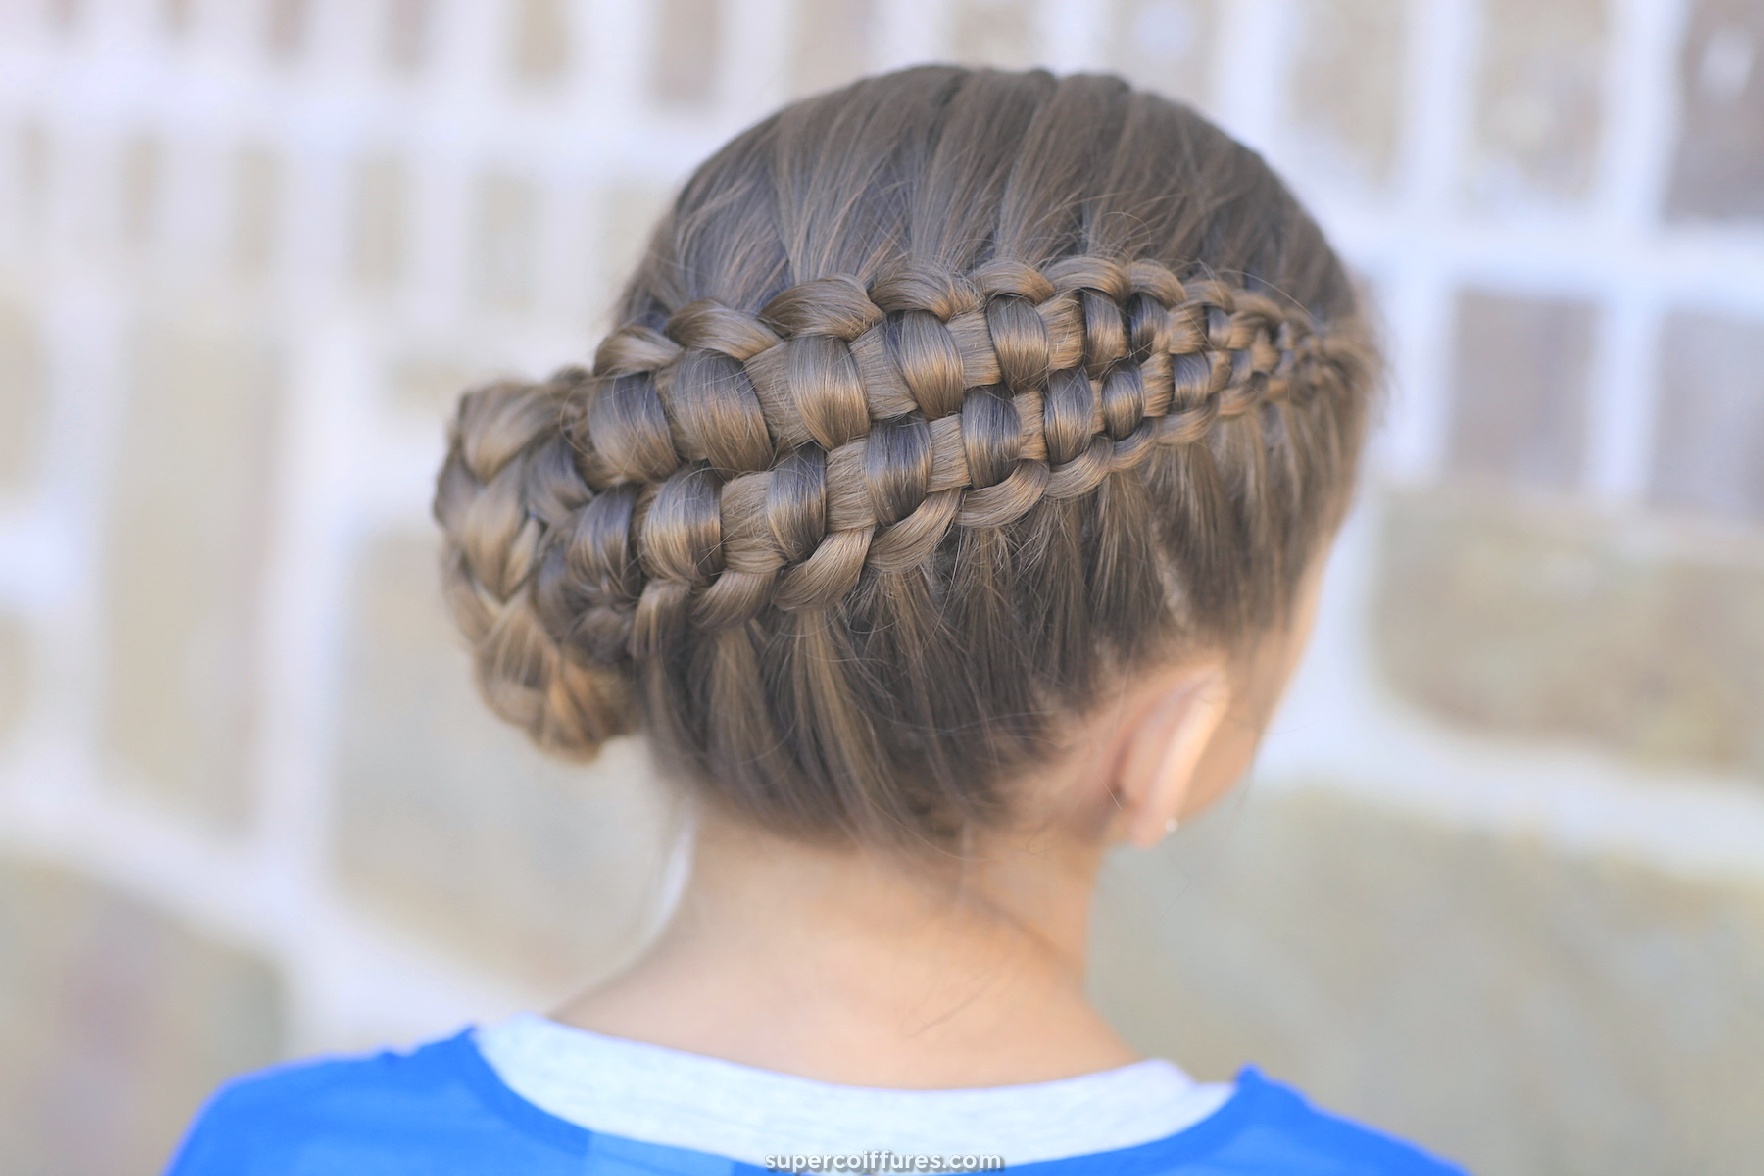
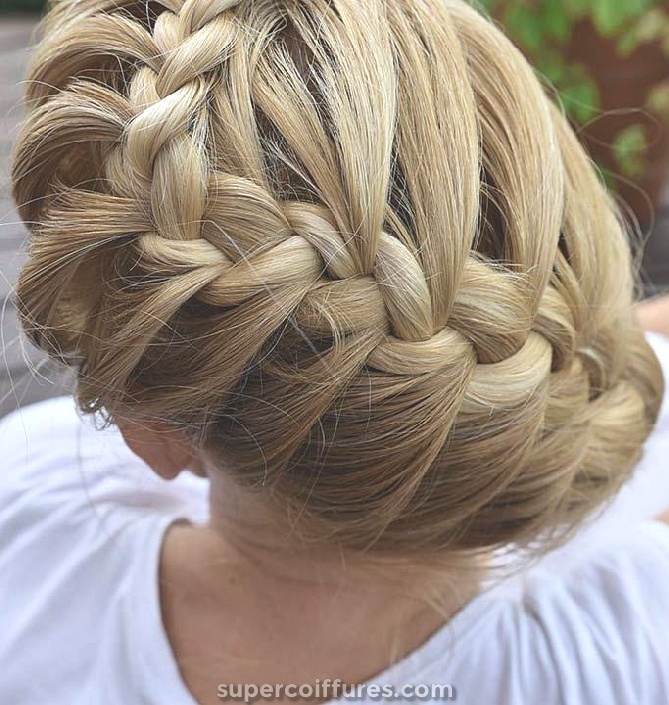
So, here is the end to all the beautiful hair braids which we have selected for you. We tried our best to share the simplest steps for making these braids so that you can do it with ease. After looking at these easy braid hairstyles, we are sure you cannot say that braids hairstyle is out of fashion. As it is now trending everywhere. Now, you have a collection of different stylish and classy braids which you can wear on the number of occasions or even day to day also. Do try these hair braids and let us know which one you liked the most.